
Introduction to Revised Europa
The Europa series from Frank Chadwick was one of the most ambitious wargaming projects ever. It started with “playable monster” operational games covering the eastern front, beginning with Drang Nach Osten (Fire in the East), then moved around the map with new modules covering every corner of WW2 in Europe.
Here is the whole family’s page on BGG, where an earlier version of these changes was posted –
Division and regiment units, hex and counter, elaborate supporting “air” game rules, kept simple and playable – Europa had a lot to recommend it in its day. It did struggle with scale, but that was kind of the point – Europa players wanted to see and manage every important attack on a two turns a month time scale, 16 miles to a hex level, for huge fronts splashed over 4-6 maps at a time. It was the ultimate “convention game”, played for a week as a stretch or more, often by teams of player rather than single opponents. Some of the later modules on theaters smaller than the eastern front got down to fewer maps and lower counter counts, and those are fine in their way, but not the point of the system.
But these days the system feels dated, in mechanics and in combat design. It tries to pack all the fighting in a 2 week period into one combat phase, and then make up for it by having that CRT be quite attacker friendly if they can get to the upper odds columns or earn large positive DRMs from armor superiority. Its “Lanchester” style CRT, while quite accurate and well tuned on the middling 3-2, 2-1, 3-1 and 4-1 columns most easily reached, becomes almost absurdly attacker friendly past that point, with attacker expected losses plummeting at 5-1 and disappearing entirely at 6-1 and up. This means as long as a strong spearhead only fights “unfair” it can do so forever, without any wear to its cutting edge. Firepower arms were also nearly unlimited in the system, leading to bizarre game practices like 1000 plane raids on single contested hexes.
In addition, the system’s Overrun rule was that 10-1 attacks result in automatic defender elimination during movement, but otherwise all combat is restricted to a single combat phase for a 2 week period. This results in an unintended consequence for effective defenses – creating “non overrun double lines” that cannot be moved more than 1 hex per turn regardless of what is thrown at them. To achieve this, maximum legal stacks are measured then defenders strive to make 10-1 odds impossible vs every hex of a defense. One must defend this strongly or not defend at all, is the unintended lesson, and it has led to the development of very unrealistic operational principles within the system, among players grown expert at these relationships.
This page is dedicated to my own re-development of the system, especially for the big eastern front modules Fire in the East and Scorched Earth. My intention is to remove incentives for unrealistic play, simplify where possible without loss of realism, while keeping the attractive core of the game system and its “playable monster” ambitions.
I am redesigning the presentation of my rule changes here to follow the rule numbering of the Scorched Earth v 1.5 rulebook. The remainder of this intro section just sketches the major changes in outline for players already familiar with the Europa system. The numbered section rules below supersede anything in the printed rulebook or original charts and tables.
New revision – after input from other testers, I am adding to the changes for Fire in the East / Scorched Earth a move to 3 turns per month instead of 2. This is meant to reflect historical movement rates more accurately (e.g. 6 x 2 x 16 miles for infantry admin move in clear = 192 miles is a more realistic as 19.2 miles per day when unopposed and 12.8 miles per day) and to give the Germans more turns (especially of good weather) to achieve something like their historical advance and pace.
Overview of major revisions
Stacking is simplified to 10 REs regardless of composition. Factor limits are used on both attack and defense, starting with a limit of 30 combat factors in a single hex from the start of Barbarossa through the April III 1942 turn. From May I 1942, this rises to 40 combat factors. Total attacking factors are set at 2x this per-hex factor limit, thus 60 initially and 80 from May I 1942 onward.
Overruns can now be attempted at all odds ratios using the normal CRT, with no automatic victory possible (the highest CRT column remains 7-1). Overrun attempts are still prohibited in Mud weather but are allowed in Snow. Overrun attempts are limited to 1 per moving stack and to 1 per target hex per movement phase, and any failure to clear the target hex halts the stack’s movement.
ZOC related movement costs are simplified and made uniform across unit types and nationalities, with the only special case being that isolated units (2nd turn out of supply and no line of supply of any length) plus the Russians on the first turn get only limited ZOCs, which cost only +1 MP to leave instead of the normal +2 MPs to leave for everyone else.
Supply length limits are increased for Trucks in all weathers and for most lengths in poor weather. Rail gauge changing is made significantly faster, as rail engineer units only have to enter a connected rail hex by ordinary movement to change the hex’s gauge. In return for these changes, Trucks can no longer be Depleted to provide one-time supply. Out of supply effects are checked only on friendly player turns, but isolation attrition begins with the 2nd such out of supply turn and will reduce cut-off forces by half on a missed attrition roll.
The air phase is moved to right after the initial phase, before normal movement, requiring planning air operations significantly further ahead and thus reducing air-ground cooperation. The number of air units is cut by half with their bombardment ratings doubled, except for a few (1) strength (effectively, half sized or reduced) air units. Air basing limits are also halved rounded up. Missions have group limits each, and flak gets DRMs vs larger missions instead of attacking every participating unit. Air interdiction effects are increased and that mission encouraged, while also being simplified in procedure. The pre-game air surprise routine has been completely redone to reflect its actual moderate impact on the Soviet air force. The intention is to reduce the number of air units players must manage and to make the air game less “fine grained” and air power a “blunter” instrument overall.
Movement uses the system of Scorched Earth for administrative movement (1/2 MP cost per hex) not that of Fire in the East (+50% MA). Mud and Snow weather both skip the Exploitation phase, but Snow allows possible overruns and armor advantage. Frost acts as Clear weather in almost all respects, besides its effects on seasonal terrain (rivers, swamps, seasonal lake hexes). Seasonal terrain effects are also simplified – rivers downgrade 1 type, intermittent lakes become woods and swamps become forest hexes. Full lake hexes and hexsides remain impassible but in Snow weather (only) supply may be traced across them.
The combat effects of terrain are reduced and simplified, with no terrain offering greater advantage than halving most attackers, preventing armor advantage effects, and a 1 left column shift on the CRT. Forts and Dot cities make clear terrain 1L but do not negate armor advantage; forts in already 1L terrain do negate armor advantage, as does wooded rough. The intention is for the factor limits and forces to matter more for effective defense lines, while preventing super-terrain positions with -3 DRMs and quartered attackers as unrealistic for the period.
Armor effects are also simplified and reduced in possible scope, with the greatest attacker effect being 1R column shift and +1 DRM, and the greatest defensive shift being -1 DRM. The 1R shift is earned if attacking armor factors match or exceed total defense factors, while the DRMs are earned for armor-only odds under 1:1 (defensive -1 DRM) or 4:1 or higher (attacker +1 DRM). This replaces the complex AEC calculations of the original system.
There are much stricter limits on artillery support for ordinary combat, with attacking artillery only contributing normal AF up to total defense strength. Firepower in excess of this and supporting air must instead use a Bombardment table before combat itself to earn column shifts or defender losses before resolution. This system is indebted to MMP game systems like SCS and OCS.
There is an entirely new CRT with simplified results, all given in attacker or defender losses (or both for exchange results) which are sized to 1/2 the factor strength of the weaker force involved (usually the defender). This allows attacker loss results to extend into the higher columns of the CRT, though sometimes the factor loss required may be modest. Over fulfillment of required loss results returns Replacement Factors that can be used the following game turn, but with a penalty of 1 factor lost. Defender retreats are increased to 2 hexes except in heavy terrain (city, forest, swamp, mountain), with 1 RE extra losses for retreating through EZOC.
The full mix of stacking, factor limit, combat and overrun changes is designed to encourage more realistic defenses in depth rather than “NODLs”, while making it possible to advance faster against weak enough defenders. Operational attackers can also expect greater “wear” on their spearheads, however, due to losses extending into the higher odds columns.
Besides the supply range changes, the revision also introduces operational supply limits in the form of a global supply point (SP) pool, which must be used to operate air groups, move and fight with c/m divisions, and fund infantry division and artillery combat. Land unit operations must pay SP if in trace supply and the global SP pool allows. Units that cannot pay SP for either reason (out of trace or no SP in the global pool) suffer 1/2 AF and 1/2 normal C/M movement, as equivalent to being out of supply for a 1st turn. Unsupplied air units cannot operate. Supply is received every turn and can be accumulated, but only to a maximum of 3 full turns of supply income. Supply points (SP) and Resource Points (RPs) can be converted into each other, but with RPs costing 3 SPs while only yielding 2 SPs if exchanged back.
New abbrevations to avoid confusion – SP = supply point, SF = strength factor; RP = resource point, RF = replacement factor. Using F for “factor” for all cases involving unit strength keeps the abbreviation distinct, instead of keeping the overly generic “P for point” everywhere. Thanks for feedback that led to this clarity improvement.
Turns are now 3 per month instead of 2, with adjustments needed for this change addressed throughout. The largest are reduced rail capacity for all nations, one extra turn for permanent construction, plus some minor changes to weather and some Soviet reinforcement arrivals.
Russian replacement rates are deliberately increased compared to the original system, including a 1/4 rate for Special Replacements starting July I 1941 and infantry RFs received at the stated rates every turn from Aug I 1941. Operating Russian factories produce 2 RFs for each of armor and 1 RF for artillery in the I turn of every month, but nothing in the II in III turns. Later for improved factories those rise to 3 and 2 RFs per month respectively. These systems are tuned to provide a more realistic Russian force trajectory over the course of the campaign, subject of course to whether the Germans manage to inflict historically comparable losses on their fielded force.
Lastly, a scenario featuring only the 2 main central map sections, though extending to the full Scorched Earth width east to west, is provided. This excludes most of the northern Finnish front and the Arkhangel and Transcaucasus military districts from play (the Finnish front near Leningrad is still in play, however). This allows the game to be played in a 6 foot by 5 foot map area, or 5 foot by 5 foot is the Scorched Earth eastern extension maps are left out as well. Including those is recommended, however, for any campaign extending into 1942. In my experience, the peripheral fronts take an inordinate amount of both game space and player time for anything they provide to the core fighting on the main front.
That concludes the overview of changes. The rest of this page will give all the new rule details by Scorched Earth rule number.
House Rule revisions
Rule A (may not examine stacks) is not used, but rule D (D10 roll for fractional odds to reach the next column) may be used by mutual consent. Rule C (designation of all attacks before resolution of any) is modified in the following ways. Air missions must all be set out in the new separate air phase at the start of the turn, before any are resolved. Shift hits achieved by air support in the air phase must be used in the first attack against that hex, whether overrun or normal combat. They expire and are removed if unused during the full player turn. In the combat phase, the phasing player must commit to attacks before resolving any supporting artillery bombardment, and may not change the participating forces or call off the attack after seeing the bombardment result. The phasing player may still execute his designated attacks in any order he wishes. Rule E (no air units on the map) is not used, being replaced by a 2 for 1 reduced air unit count and the moved air phase of the revised rules. Rule F (1/2 move in Exploitation for speed 7+ non c/m units) is not used. Rule G (revised detailed factory production schedule) is not used; instead all operating Soviet factories produce 2 armor and 1 artillery RFs in the I turn of each month starting with Aug I 1941. Upgraded factories when received on the reinforcement chart increase this output to 3 RFs of armor and 2 of artillery on the same schedule.
Rule 1 revisions (scale)
The only revision to game scale is that each air unit now represents 50 to 100 aircraft, with 72 being typical, and that a single game turn now represents 10 days.
Rule 2 revisions (components)
There is a new 2D6 land combat CRT, a new 2D6 bombardment CRT. These replace the Ground Combat Results table and Bombing table respectively. The Air Combat and AA fire tables are used as-is, with R meaning mission ended but still Operable, A meaning mission ended and group rendered Inoperable, X sending the group to the EFT or EET box depending on location. There is a new TEC for combat effects. The original TEC is still used for movement costs, though with some simplifications for weather effects (frozen swamps are treated as Forest and frozen intermittent lakes are treated as Woods). In the new armor system, the AECD column of the unit ID chart is not used; the ATEC column is always used for the defender’s armor strength for armor advantage calculations. The Anti-Armor/Antitank Effects chart is not used; it is replaced by the new Armor Odds procedure and possible 1R shift for attacking armor equal to all DF or better. ZOC movement cost and Overrun movement costs charts are replaced with a uniform 3 MPs (plus cost of hex) for all Overruns, 2 MPs to leave a normal ZOC, and 1 MP to leave a reduced ZOC (from Isolated divisions). All entries on the Airbase table are used with the value halved, rounded up. Airbases add their value to that of any other entry-item in the hex before the total is halved, with rounding applied only afterward. The single +2 entry on the Winterization table is reduce to +1, and non-winterized non-Finn Axis suffers -1 DRM in attacks in Snow the first winter. The Supply Line Summary table uses new values, with Frost entries equal to Clear ones.
Rule 3 (Game concept) revisions
Fractions are retained only until a final count for each side in any situation is reached, then always round up to the next integer. On the new TEC on combat chart, the most that a single terrain feature ever does to AF is to halve it. AFs may still be quartered if a halving hexside feature (river e.g.) and defending hex terrain type (swamp e.g.) both apply. In addition, supply might halve a unit’s strength again.
Supply Points – SP – are introduced as a game concept. SP are a global pool for each side, Axis or Soviet. SP are received every game turn in each Initial Phase and may be accumulated up to 2x current SP income, maximum. SP must be spent to activated air groups, move and fight with C/M divisions in both Movement and Exploitation phases, attack with other divisions, and Bombard with artillery. Units performing these actions in trace supply must spend global SP to do so, if there are any in that side’s SP pool. If SP cannot be spent, C/M units are treated as 1st turn unsupplied in the normal movement and combat phases and may not move at all in the Exploitaton phase. Unsupplied air units may Repair (to Operating status) and Transfer between bases, but cannot conduct any other missions. Unsupplied are halved for AF, unaffected for DF, but within new artillery support limits (1x total DF for attackers, single highest DF for defenders). Unsupplied artillery cannot conduct Bombardment. Unsupplied non C/M divisions are halved on attack. Only divisional units require supply, but all non division units take on the supply state of any divisions they are stacked with. All divisions in a stack must pay SP attack costs or none do so, and units in trace with global SP available MUST spend SP to perform these actions (you may not attack at 1/2 AF for no supply paid if you have SP; you may of course refrain from attacking to avoid paying SP). SP may be exchanged for RP in the Initial phase only, at a cost of 3 SP to purchase 1 RP. Also in the Initial phase, RP anywhere connected by rail to a friendly board edge may be exchanged for SP in the pool, but only yield 2 SP per RP.
Rule 4 revisions – revised Sequence of Play
Initial phase – only the phasing player checks the supply of his units. RFs created by disbanding units or Breakout are only added to RF pools after any replacement actions are taken; they can only be used on the following game turn. Air Interdiction zones placed the previous turn are removed at this time. Air transport missions for Supply (only) are conducted now, with the Transport groups left at their destination hex. Units that were already Unsupplied the previous turn that are Isolated when checked now may conduct Breakout, and if they do not must roll for Isolation Attrition. (Design note – the onset of isolation attrition is deliberately faster than in the original. Most pockets in this campaign did not last months and needed special support e.g. by air supply in order to do so). Construction requiring RPs may be initiated within Truck distance of the RP being expended. Temporary airfields may be constructed by engineers by “tapping” those, expending their full turn to provide 1 air group of capacity. Damaged permanent airfields or ports may be repaired 1 level each by tapping up to 2 engineer capable units in the hex. Permanent airfield markers at 0 capacity only may be removed instead at the owning player’s option. All engineering except clearing/refitting railroads now happens in this Initial phase, not during movement.
Air phase – the full air phase now comes before the Movement phase. Unready groups may roll for Ready, and Ready off map groups may be moved onto the map at any friendly airfield. Groups on the map may be placed off map but this uses their full turn. This move off-map is forced if a previously provided temporary airfield was withdrawn (not kept up or replaced by a new engineer or finished permanent field) in the Initial phase. Groups may also Stage their range to a new operating airfield; this costs 1 group of a capacity at both ends of the staging transfer. Staged-in groups may fly all missions normally from their new base. All missions are sent out before any are resolved, with Fighter Sweep missions resolved first, then enemy Intercepts (including Transport missions), and all other missions last in any order chosen by the phasing player. Fighter Patrol and Alert missions remain active through the next enemy player turn. Ground support 1R shifts earned are marked by Hit markers and must be used in the first overrun or combat against that hex. Interdiction missions roll 1D6 under tactical bombardment factor (normally doubled) to place an Interdiction Zone, affecting the mission hex and all adjacent hexes (automatic with 6+ factors). Note also there is no longer any defensive air support; the non-phasing player may only conduct fighter Intercepts during his opponent’s turn.
Movement phase – There are changes to ZOC movement costs and effects. Overruns may be conducted during movement as normal attacks by a single moving stack against a target hex. See overruns for restrictions and mechanics. In supply C/M divisions must spend global pool Supply Points (SP) to move and fight, otherwise they are treated as 1st turn Unsupplied (1/2 MA, 1/2 AF, and no Exploitation movement).
Combat phase – Supply is not checked before combat, only in each player’s own Initial phase. Each combat may be preceded by a Bombardment by adjacent artillery units only. Note there are no Bombardments before or during Overruns, only in Combat phase attacks. Designated attacks must be carried out regardless of the results of each preceding Bombardment. There are new Factor Limits on total CF in 1 hex, set at 30 CF (on attack or defense) from June III 1941 through April III 1942, rising to 40 CF from May I 1942 until the end of the game. In addition, total AF in any one attack are capped at twice these single-hex levels. All factor limits are applied after any halving for terrain or supply. Attacking bombardments and divisions require SP, though C/M divisions already funded are covered by their movement phase SP cost.
Exploitation phase – The exploitation phase is skipped in all Mud and Snow weather turns and zones. The starting location of a unit determines the weather applying to it for this purpose, so e.g. a unit may legally activate for exploitation in a zone in Frost but move into a zone in Snow. C/M divisions must be in full supply since the start of their turn, and require additional SP to move and conduct overruns in the Exploitation phase. At the end of the Exploitation phase, any unused ground support Hit markers are removed.
Rule 5 revisions – Zones of Control
The cost to leave an EZOC is made uniform at +2 MPs, regardless of side, unit type, and whether the move is ZOC to ZOC or not. Reduced ZOCs (exerted by Isolated divisions or the Russians on the June III turn) cost only +1 MP to leave. All units may move from ZOC to ZOC and continue moving as far as their movement allowance permits. Friendly units in a hex negate EZOCs into that hex for purposes of supply trace and retreat after combat, but not for movement.
The previous overrun rule that units targeted by overrun immediately lose their ZOCs is ignored, since overruns are completely changed in this revision. Also, while not a change, keep in mind that in the Europa system, only divisional units (including Soviet tank and mech corps) have ZOCs.
Rule 6 revisions – Movement
The clause that “all C/M units may move in the exploitation phase” is amended to read “all fully supplied C/M units may move in the exploitation phase”. To be fully supplied, a C/M unit must be in trace supply (checked only in the player’s initial phase, however) and division-sized units must expend SP – 1 SP for panzer, tank, and soviet Mech divisions or corps, 1/2 SP each for motorized and German panzergrenadier division. If Soviet Guards Cavalry Corps have been upgraded to have Exploitation ability, they cost 1/2 SP as well. Pay for all units activating with any fractional cost rounded up. This cost must be paid again in the Exploitation phase if a C/M division wishes to use Exploitation movement including any overruns.
There is also an exception by Rule 31 C Soviet Mobility Limits. Soviet C/M units that start the Exploitation phase in EZOC or that attacked in the immediately preceding combat phase may not activate at all in their Exploitation phase, to move or overrun. The mobility limit rule stands, in other words.
Leaving an air interdiction zone hex costs C/M units +2 MP and non-C/M units +1 MP, but this cost is not cumulative with the cost to leave ZOC. Pay the higher of the two costs if both apply. Units moving by Operational Rail movement pay +2 full MPs only for a rail cut hex, including the center hex of an air Interdiction zone. Rail cuts also prevent strategic rail movement.
Overruns may be conducted during movement for +3 MPs plus the cost to enter the target hex. Overruns do not benefit from the road movement rate into a defender’s hex. Overrun attacks do not need to pay costs to exit ZOC from their attacking hex as well; the +3 overrun cost covers that. All unit types may conduct overruns, MPs permitting, but may not use 1 hex movement for this purpose. (I.e. they must be able to pay the full cost of the defender’s hex +3 MP in order to conduct an overrun). Overrun stacks may pick up units during movement, but must move one stack at a time to do so, and take on the minimum number of remaining movement points when they join. MPs permitting, overruns may be attempted against any terrain type, but may not be conducted in Mud weather. They can be conducted in Snow weather. Overrun attacks are resolved as normal combat, but with no prior artillery bombardment step and from only a single attacking stack.
In addition, a moving stack may only attempt 1 overrun per movement or exploitation phase (potentially each). A given target hex may also only be subject to a single overrun attack in a given movement or exploitation phase. If an overrun fails to clear its target hex, the attacking stack halts and any remaining MP are lost. If an overrun does clear its target hex, the entire overrun stack must advance into the target hex, and may then continue movement, remaining MP allowance permitting. If an overrun attempt against any given target hex fails, no additional overrun attempts are allowed against that hex in that phase. It might still be attacked in a subsequent Combat phase or overrun again in a following Exploitation phase, or both. Non C/M divisions conducting overruns must pay 1/2 SP per division involved, round up. C/M divisions that already paid for movement pay no additional SP cost to conduct an overrun. All SP costs paid in the same phase may be combined before rounding (not per attack or overrun, in other words).
Administrative movement is allowed if a unit never enters or leaves an EZOC, paying 1/2 the normal TEC cost for each hex. Administrative movement is allowed through hexes that normally cost up to 2 MP each (woods, rough, crossing a minor river into clear e.g.). If the base cost of entering a hex (taking into account the weather state) is 3 MPs or more, that unit may not enter it by Administrative movement. All the other restrictions on Administrative movement of the original rules still apply (not adjacent to enemy units even those without ZOCs; in supply; all hexes traversed began under friendly control; along roads only in arctic Zone A, etc). Units may enter or leave an Air Interdiction Zone in a turn they use Administrative Movement, but must pay the full hex cost and normal Interdiction cost (+2 MPs for C/M, +1 MP for non C/M units) for leaving each such zone hex. Their movement costs for other hexes can be halved if they meet the other conditions for Administrative Movement. As in the original, Administrative Movement is only available in the normal Movement phase, not in the Exploitation phase.
Rule 7 revisions – Transportation lines
Railroad engineers automatically convert to national gauge / refit to operating status all connected rail hexes they enter by normal movement, without any additional MP expenditure. They may combine this with operational rail movement, MPs and rail cap usage permitting. Railroad engineers may not combine rail conversion with Administrative movement. Railroad engineers would have to pay costs for exiting EZOCs or Interdiction Zones like all other non C/M units. Ignore all clauses about accelerated conversion using additional engineers. Newly re-gauged rail lines may not be used until the following game turn, but are ready in the next Initial phase.
Ignore all rules about units breaking rail lines or rail breaks by bombing missions. Air Interdiction Zones create a temporary rail break in their central hex only for the single turn the mission persists. Partisan attacks created by insufficient Axis Garrisons may place temporary rail break markers using the Success Table without modifiers (5-6 to place a break, separate target hex for each attack). All rail breaks are temporary and are removed in the initial phase of the placing player’s next turn. The only replacement for unit rail breaking is that rail lines may not be used into enemy controlled hexes, so friendly units must have reached a given hex along a line the turn before it can be used, even if it is already the right gauge.
Units using operational rail movement pay 2 MPs from their pre-multiplied movement allowance per break to cross the break hex. Note they will generally also have spent 1 pre-multiplied MP to entrain. Units may not use strategic rail movement (150 hex allowance, cannot be combined with other movement types, revised for 3 turns per month) to cross a rail break hex.
Rule 8 revisions – Stacking
The new stacking limit is 10 REs per hex regardless of type. This is lowered to 7 REs in Mountain terrain, and to 4 REs in the Arctic. There are also new density shifts on the Bombardment table – 1L for 3 REs or fewer, 1R for 7.5 REs or higher in the same hex. In addition, there are new limits on Combat Factors per hex and per attack, and on artillery factors contributing to AF and DF. Additional artillery may always be used to Bombard, though only in the Combat phase. Air missions both offensive and interceptions are limited to 4 air units maximum.
Combat factor limits
For the period June III 1941 to April III 1942, the maximum combat factors from a single hex is 30 CF. This applies after any halving of AF for terrain effects, and applies to both attackers and defenders. This limit will of course apply in Overruns since those always involve attackers from a single stack from a single hex. In addition, in this period the maximum AF in any combat phase attack is 60 CF from all hexes combined, again after any halving of AF for terrain.
Starting in May I 1942 and until the end of the game, these limits are increased to 40 CF per hex and 80 AF in a single combat phase attack. These apply after any terrain halving as above.
Artillery strength limits
There are also new limits on artillery strength. For the defender, the highest single DF artillery unit in the hex contributes its full DF. Any additional artillery units contribute only 1 DF each. For the attacker, the maximum AF provided by artillery is equal to the total DF of the attacked hex, with the limit applied after any halving for terrain effects on any of the attacking artillery units. Artillery strength in excess of this may only be used to Bombard instead, and only in the Bombardment phase right before the Combat phase, thus not during Overruns. The phasing player may choose which artillery AFs to use for Bombardment and which to use to support the AFs for the attack as they wish, subject to these limits.
Air mission limits
There is a new limit of 4 air groups per mission, only 3 of which may be strike, and a similar 4 group limit on interceptors vs any given mission.
Rule 9 revisions – Combat
Procedure revisions – Bombardment
Before any designated attack, the phasing player may choose to Bombard the target hex with any adjacent artillery. Each artillery unit may only conduct 1 bombardment or attack in a given combat phase, a given target hex may only be bombarded once using all factors combined into one event, and only in-supply artillery units may Bombard. Bombardment always uses the attack factor strength of the artillery unit, modified for terrain.
There is no limit to the artillery factors used in a Bombardment, but the top column is already reached for 26+ factors, potentially sooner if a 1R shift for target density is earned on the Bombardment. When allocating roles, keep in mind that artillery used in the combat itself is capped at total defense factors in the target hex. Allocation of artillery role is always done by full units, with any excess lost. Bombardment strength used never counts toward per hex or overall AF limits.
To fire a bombardment, the phasing player designates the participating artillery units and pays 1 SP for the bombardment as a whole. He may designate the attack as Bombardment only or as followed up by a normal attack this phase, and must designate the attacking force before seeing the result of the Bombardment if he does attack. Unlike regular combat, attacking artillery units never suffer any effects from their own Bombardment attacks.
Adjust the column reached for target density and terrain, then roll 2D6 and consult the Bombardment table to determine the result. Table results include 1R, which earns 1 column right shift on any attack on that hex in this combat phase, Re which requires the defender to lose 1 RE from the defending hex, and/or C which reduces any one division present to cadre. If no divisional units are present, the defender may fulfill a C result by losing 2 REs instead. If no units smaller than a division are present, the defender may fulfill an Re result by paying 2 infantry RPs immediately. If he cannot or chooses not to, he must reduce a division to cadre instead, treating the result as a 2 DF loss requirement for over-fulfillment RP recovery purposes. Specific units hit by Bombardment are determined by the defender, as long as he fulfills the table’s loss requirement.
1R shift results have no effect if the targeted hex is not attacked in combat. In addition, if the hex has already been hit for 1R shift by a close air support mission that has not been used, any additional 1R result is ignored, as the maximum shift from prior all bombardment is 1 odds column. An artillery bombardment can still be fired in this case, but the attacker is searching only for Re or C results if he does so.
Next proceed to the actual ground combat attack if one was designated. A bombardment and its attack must always be carried out before proceeding to another bombardment.
Main ground combat procedure
The procedure for ground combats is to designate the defending hex, all attacking units from any number of adjacent hexes excluding any that have already attacked this phase (including by bombardment), adjust strength for terrain, supply, and artillery strength and factor limits, calculate armor advantage effects if terrain and weather allow AEC, and determine the overall odds as AF divided by DF rounded to the nearest odds column. Attacking non C/M divisions must pay 1/2 SP each to attack (if in trace supply and global SP are available). Non-C/M divisions out of supply may attack with 1/2 AF, but if in trace they either pay SP and attack at full strength or they don’t attack. C/M divisions that have already paid SP in the movement phase when activated do not need to pay again in the combat phase. Non-divisional units and defenders never pay SP to participate in ground combat or overruns.
If the optional D10 rule for intermediate odds is used, the attack rolls 1D10 with the normal combat 2D6 to determine whether his extra AFs earn him a single additional column. Note that the new CRT uses 2D6 in all cases and has a 3:2 column. Attackers may earn 1R shift for prior Bombardment success by air or artillery, 1R shift for adjusted armor AFs greater than or equal to total DF if AEC is possible, and may suffer 1L shift for defensive terrain. If AEC applies and the armor-only odds are 4:1 or better, the attacker also earns +1 DRM. If AEC applies and the armor-only odds are under 1:1, the attack suffers -1 DRM.
It is also possible to earn +1 DRM for Winterization advantage in Snow weather only, or +1 DRM for a Commando operations Success result on the Success table. German commando operations in June III 1941 get +1 DRM on the success table (not +2 as in the original). However, the maximum DRM for any combat is +1 after all effects are included. Non winterized, non-Finn Axis units attacking in Snow weather before the May I 1942 turn (“the first winter”) suffer -1 DRM on all attacks. The largest penalty an attack can suffer is also capped at -1. (E.g. Axis 1st winter attack vs defensive armor advantage would only be -1, not -2 DRM).
New armor advantage procedure
When is armor advantage calculated? First the defender’s terrain has to permit armor advantage to apply, and the weather state in the zone of the defending hex cannot be Mud, otherwise the AEC procedure is just skipped. Second, either side must have actual AECA capable units. If either does not apply, there is no armor advantage. Notice, an attack without armor against a defender with exclusively ATEC units (antitank or heavy flak e.g.) would not calculate any armor advantage.
Attackers total their armor only attack strength, using the full or 50% ratings given on the AECA column of the Unit ID chart. Hexside barriers or being out of supply can reduce these strengths by 50%. Isolated units do contribute t0 AECA and ATEC but with their reduced strengths.
Defenders do the same but using their defense strengths and the ATEC column of the Unit ID Chart. Note that the AECD column is not used. Hexside effects never reduce defender armor strength.
Calculate the “armor only odds” from those two strengths rounding normally. If the final armor odds are 1-2 or less, there is defender armor advantage and -1 DRM to the combat. If the armor odds are 4-1 or greater, there is attacker armor advantage and +1 DRM to the combat.
Next, determine whether the attacker’s total armor strength (using AECA) is at least equal to the entire defense strength of all defending units (all types, total DF). If it is, then the attacker’s earn 1 column right for sufficient armor strength. This is calculated independent of the armor only odds which determines the armor DRM (if any).
To be clear, the attacker needs 1:1 armor-only odds vs defender ATEC to avoid giving the defender armor advantage, provided armor advantage is possible (terrain permits, either side has AECA units).
Examples – 2 German 7-6 infantry divisions attack 1 Soviet 4-6 rifle division stacked with a 2-3-8 antitank regiment in clear terrain. There is no armor advantage because neither side has actual AECA units. If the Soviets also had a 3-2-8 tank cadre then they would have defensive armor advantage and would earn -1 DRM. If the Germans had a 2-1-10 StuG brigade, armor odds would be 2 to 5 rounding to 1-3 so the Soviets would still earn defensive armor advantage. If the Soviets have the tank cadre but no AT regiment, the armor odds would be 2 vs 2 thus 1:1 and neither side would have armor advantage.
If the Germans had the StuG brigade and the defenders had only the rifle division, the Germans would earn +1 DRM for armor advantage from 2 vs 0 armor-only odds, but would not earn a column shift, since they have only 2 armor strength vs 4 total defense strength in that case. If the German attackers instead had 1 9-10 panzer division in place of one of the 7-6 infantry divisions, the Germans would earn both the +1 DRM and 1 column right.
Defensive artillery
The highest DF defending artillery unit in the hex contributes its full defense strength to the hex’s defense, like any other unit. No other units need be present; ignore the original rule counting non-artillery REs. Any artillery unit also provides all units in the hex with Support. All other artillery units contribute only 1 defense strength to the combat, or 0 if they have 0 listed DF. Defensive artillery never uses the bombardment table, it just adds to defense strength according to this rule.
Note that there is no provision in revised Europa for defensive air support. The operational defender may of course use his air units for interdiction, bombardment attacks, and support of any counterattacks, but those are all conducted during his own air phase on his player turn, not during the enemy’s player turn. This revision is meant to reflect the very limited level of air-ground coordination actually possible during WW2. Real time close air support using ground forward air controllers in radio communication with supporting air wasn’t a military reality until the Korean War.
Offensive artillery support and timings
Attacking artillery units contribute to attacking strength in regular ground combat and in overruns only up to 1x the total adjusted defense strength of the defenders in the attack itself. This limit is tested after any reductions to artillery AF for terrain. This limit is also the most that artillery can contribute in Overrun attacks, since there is no Bombardment phase before resolving Overruns. Note this means Overrunning artillery units under division strength never pay SP to participate.
For all bombing and artillery support resolutions, roll 2D6 and consult the new bombardment table.
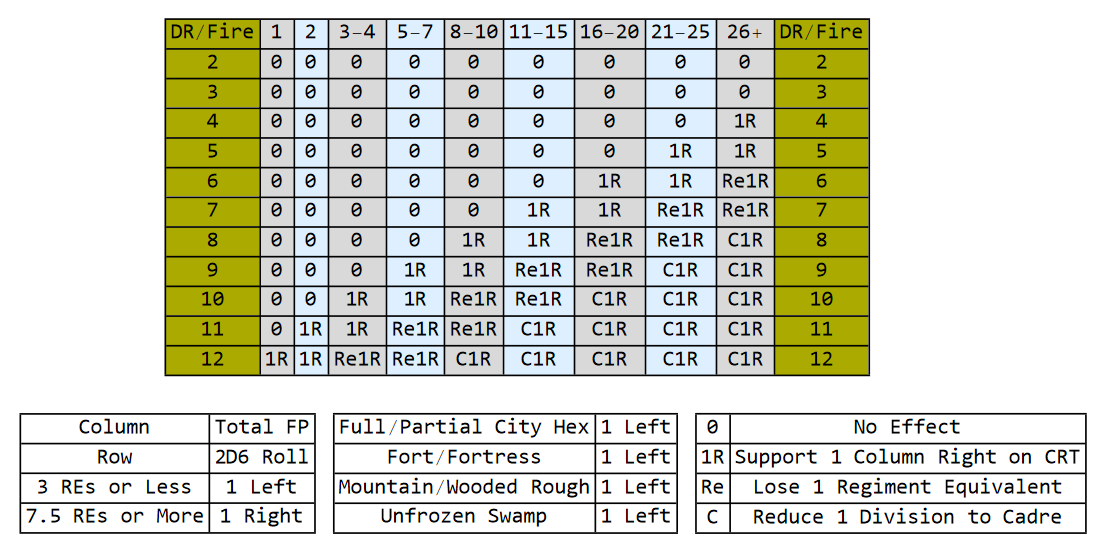
Bombardment table shifts –
If there are 3 REs or less in the target hex, bombardments shift one column left; if there 7.5 or more REs in the hex, shift one column right. Various forms of defensive terrain also give 1 shift left if any applies, which may be cumulative with a density shift.
Results on the table possible 1 column shifts for the CRT (support results) or loss of a single regimental equivalent (Re) or 1 division reduced to a cadre (C). As the table shows, an attack never earns more than a single column shift right for air or ground fire support on a given combat; however it is possible to earn one shift from each of these (1 from air, 1 from ground artillery), though this will happen in different phases.
Re combat results may be satisfied with any regimental unit or cadre, or any 2 battalion sized units. A division cadre result may be satisfied by losing any 2 regimental equivalents but only if no division sized unit is present. Defender chooses which units he loses in all bombardments.
Attacks on facilities score 1 hit for either a 1R or Re1R result and score 2 hits for C1R result. Hits on airfields each send one air unit present into Repair status as well as reducing airfield capacity by 1 until repaired. Facilities (permanent airfields and ports) may be repaired up to 2 hits per turn in the player’s Initial phase by tapping 1 Engineer unit for each point repaired to a single facility.
Terrain effects on combat
There is a new TEC for terrain effects on combat, while terrain effects on movement are unchanged from the original rules.
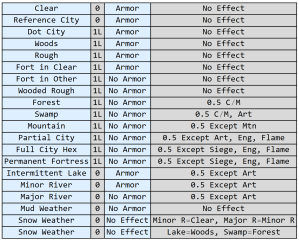
Note that armor effects are now allowed vs fort counters, dot cities, and across minor rivers, but not into wooded rough, across major rivers, or fort counters in otherwise -1 terrain (woods, rough, and dot cities). Also attacks across major rivers are only 0.5 attack factor, not the 0.25 of original Europa, but also nullify armor advantage. Full city hexes now halve normal artillery but leave siege artillery unchanged, along with engineers and flame tanks. The same applies to permanent fortress hexes. Terrain can at most halve (most or all) attackers and generate 1L shift for ordinary combat. It can also generate 1L shifts vs bombardment.
Note that there is no DRM for 1/5 of attacking REs from combat engineers or flame tanks; these types are simply not halved against city and fortress terrain types as their combat benefit. DRMs are only earned for armor advantage or successful Commando operations.
The new combat procedure is to first determine if any shifts or DRMs earned for terrain and fire support using the procedure above, then calculate the armor-only odds ratio to determine whether either side earns an armor DRM or armor column shift, terrain permitting. Then calculate the odds for the combat as in original Europa but with attacking artillery contributing no more than the adjusted defense strength, and defensive artillery limited to 1 unit at full and 1 DF for additional defending artillery units. Then consult the proper CRT column (above 7-1 uses 7-1, below 1-4 is attacker eliminated) and roll 2D6, applying any DRMs. Adjusted rolls below “2” are “2” and above “12” are “12”.
The main CRT now looks like this –
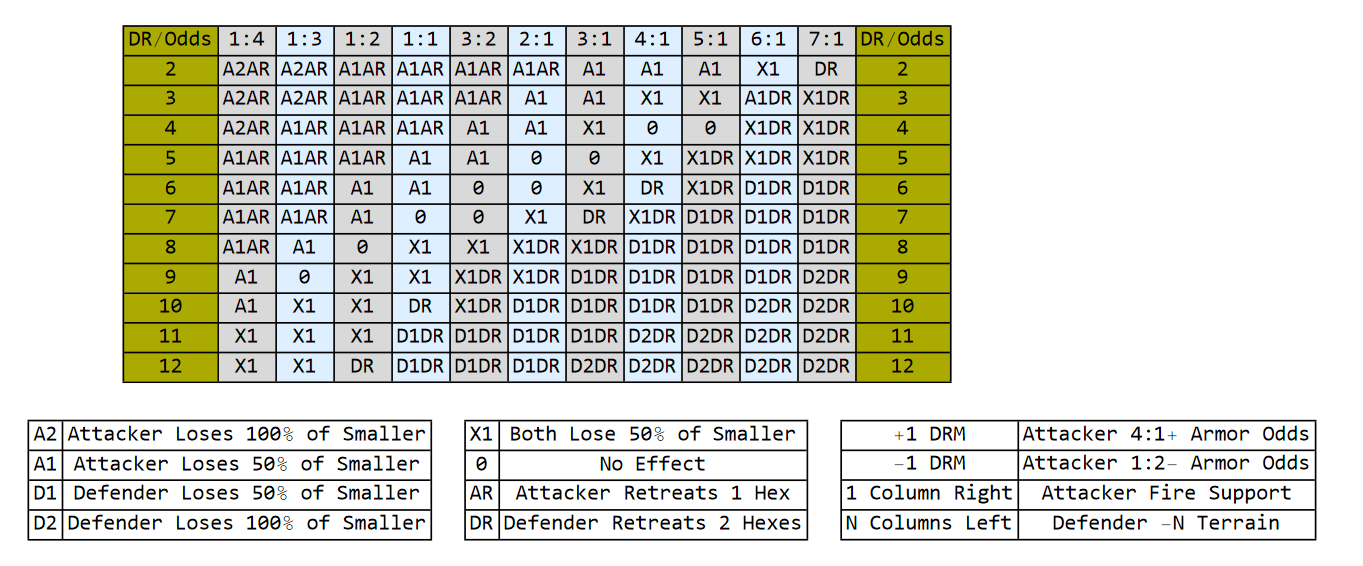
All loses are “calibrated” to 50% of the weaker side in SFs, with the “1” results that amount, the “2” results twice that amount (which will normally be weaker side “elimination” – reduction of all divisions to cadres and non divisions removed).
For SF removal, the weaker side is determined from the combat odds column used. Use the defender’s strength for all attacks at 1-1 and upward, and the attacker’s strength for all attacks at 1-2 and below.
Then use printed combat strength of the specified smaller side reduced by out of supply or lack of support effects. All other adjustments to attack or defense strength have no impact on loss amount determination. So e.g. if an attack across a river goes in at 1-2, the attacker’s printed AF strength would be used to determine loss amounts.
Combat loss allocations are chosen by the suffering side, but must fulfill the whole amount of the required loss or exceed it, and may be required to allocate losses to armored units first in some cases.
Armor loss requirement – if the attacker has any armor and the defender (1) has non-zero ATEC, or (2) is in a fortification hex, or (3) is in a major city hex, then at least one attacking unit reduced must be a unit contributing AECA. If the defender has any AECA strength, and the terrain allowed a possible armor shift, and the attacker has any armor, then at least 1 defending unit reduced must be a unit with AECA. If these conditions are not fulfilled, armor losses are not required, and the losing player may fulfill their losses as they see fit.
Large armor advantage exception – if the attacker (only) earns both +1 DRM for high armor odds and 1 column right for armor in excess of total defense strength, the attacker armor loss requirement is waived for X1 results but not for A1 results. Required losses in this case may be fulfilled from any units the attacker chooses.
Full strength division reductions – whenever a full strength division is reduced to a cadre, doing so fulfills as a loss requirement the full value of the division, not just the change in its strength. However, the change in strength is still used for determining any RFs recovered as “change”. All one step units eliminated fulfill their listed strength, as always using attack factor for attackers and defense factor for defenders in that combat.
Replacements for excess removals – (Factor count games including FITE and SE)
For the games that count specific factors, every time you over-fulfill loss requirements, subtract 1 from the excess factors removed in that combat and add them to that nation’s replacement pool. If armor losses were taken without an armor loss requirement, the lesser of replacement points received or the armor cost of the unit change from the special RF costs chart are receive as armor replacement. However, when determining excess removal RFs, for any division reduce to a cadre, treat only its change in strength has having been lost, not the full division strength.
For clarity, if an armor loss was required, any excess removal RFs recovered are infantry RFs.
E.g. a German 10-10 Panzer division must take a 3 loss result, with no other units present. It did not have to take an armor loss from the conditions of the combat because it had large armor advantage. The German player reduces the division to its 4-8 cadre, and is entitled to 2 RFs back (6 reduction taken vs 3 required is 3 over-fulfillment, -1 per occasion gives 2 RFs “change”). Since the cost to upgrade a 10-10 from cadre to full is 3 armor and 3 infantry SF, these 2 RFs are received as armor RFs. The German player marks +2 armor RFs on his records track in return for the cadre reduction. He would need 1 additional armor RF plus 3 infantry RFs (3+3 total) to refit the division to full strength in his next Initial Phase.
Example – the Russians must fulfill at 2 DF loss requirement and removes a 4-6 rifle division to do so, which leaves no cadre. They add 1 factor to their infantry replacement pool (4 minus 2 is the over-fulfillment, 2, minus 1 per occasion, yields 1 RF recovered in this case).
No replacement REs are earned for over-fulfilling combat loss requirements if the units reduced are marked as Isolated at the moment of the combat. Such RFs can be earned by units removed while only Out of Supply. Note that Breakout is a way to try to recover RFs from Isolated units – see separate rules under supply.
Note that losses of 50% of defender’s strength remain possible all the way to the top column of the CRT. You can further reduce your expected losses by earning DRMs for armor superiority, but just via odds you will always have some chance of losses.
AR means the attacker must retreat 1 hex, DR means the defender must retreat 2 hexes and the attacker may advance into the defender’s hex.
Terrain Exception – if the defender’s hex is any of Fortress, City, Wooded Rough, Forest, Swamp, or Mountain terrain, a DR result requires only 1 hex retreat.
NKVD Political Troops Exception – if Russian defenders include at least one NKVD unit with the Political type symbol (not border regiments e.g.), the Russian player may cancel the required retreat on DR and X1DR results, but not for D1DR or D2DR results. At least 1 NKVD Political unit must be eliminated to exercise this option. Their loss can be part of any necessary X1 loss requirement.
X1 means both sides lose 50% of the weaker side’s SP strength, rounding fractions up for both sides.
A1 or D1 results mean the A or D side must remove 50% of the weaker side’s SF strength.
A2 or D2 results mean the A or D side must remove 100% of the weaker side’s SF strength.
0 results are no effect, same as the attacker repulsed in the original.
Units forced to retreat through enemy ZOCs may do so, but the retreating stack must lose 1 RE for doing so. If they cannot, they may reduce 1 division to a cadre instead. Friendly units do negate enemy ZOCs in their own hex for this retreat purpose. Armor type units cannot be forced to lose strength for retreating through enemy ZOCs unless at least one enemy unit exerting that ZOC has AECA rating full or 1/2. A mixed stack containing armor and non armor does lose 1 RE for retreating from other EZOCs.
Rule 13 revisions – Overruns – This is a major change. Overruns may be conducted during movement or exploitation movement as ordinary attacks by 1 moving stack vs 1 defending hex. They don’t need 10-1 odds and they never get auto elimination; they always attack using the CRT even if at or beyond the 7-1 column.
A single stack may only conduct 1 overrun in a given movement phase, though it may continue moving afterward if it has MPs remaining and cleared the target hex. If the target hex is not cleared, then the overrun stack must halt in the hex from which it made the attempt. Only 1 overrun attempt may be made in a given movement phase against a given enemy held hex; if they repulse the first such attempt they may not be overrun again by a new stack.
To be as clear as possible, if a hex is hit with an overrun and the defenders there are forced to retreat, the surviving defenders might be subject to a second overrun attempt in their new position later in the same movement or exploitation phase. They would only avoid such an opportunity if they happened to retreat into a hex that had already been subject to an overrun attempt that failed to clear that target hex. In other words, the restriction on 1 overrun attempt per phase applies to a defending HEX, not to any set of defending UNITS.
Overrun attacks calculate armor odds and advantage normally, and may benefit from a prior close air support mission against the target hex. However, no new air mission nor any artillery bombardment occur during an overrun. Attacking artillery may contribute factors up to 1x the total DF of the target hex, only. Overrunning non C/M divisions must pay 1/2 SP each to conduct an overrun attack. Overruns in the same phase may be combined before rounding any overrun SP cost upward.
Overrun costs 3 MPs plus the full cost of entry to the defender’s hex. This covers the cost of exiting any EZOCs to conduct the overrun, so do not count those twice.
Overruns are not allowed in mud weather turns, and may also not be attempted against wooded rough, mountain, swamp, and forest terrain. Clear, woods, normal rough, and all city types can be overrun in all other weather conditions. Overruns are also not allowed across major river hexsides unless they are frozen (and thus become minor rivers). Overruns are allowed in Frost and Snow weather conditions, though Snow may make them harder by raising MP costs, and there is still no Exploitation phase on Snow turns/regions.
Rule 12 revisions – Trace Supply and Trucks
A unit is in normal supply if it can trace an overland supply path of (normally) 7 hexes or less to a road, and another 7 road hexes only to a rail line of its national gauge, then a continuous line of rail hexes back to a friendly board edge or city hex in its home country (Poland aka Greater Germany serves for German and any Axis minor forces except Finns). The overland and road distance limits are 7 hexes in Clear or Frost weather, 5 hexes in Snow, and 4 hexes in Mud weather. Note this is deliberately increased for poor weather distances from the original. All distances are reduced by 1 hex in Arctic regions (to 6-4-3).
A unit may instead trace the overland or road portions of its supply route to a friendly Truck unit using the same lengths as above. To be used in a supply chain, a friendly Truck must be within 4 hexes in Clear or Frost, 3 hexes in Snow, and 2 hexes in Mud weather, from the next link in the chain, which can be another friendly Truck, operating rail line or supply source. If it was the overland portion of the supply route that terminated at the Truck, that Truck may instead end its own 4-3-2 hex allotment at a road hex, and the next link may then trace up to the 7-5-4 hex distance to a rail line as the road portion. Always trace from the supplied unit back to the supply source, never in the reverse direction.
These (revised) Truck supply distances are also used for Special and Construction purposes, without needing any Truck unit. An airbase supplied by Transport air missions can be used in place of a Truck up to the air mission capacity (3 REs per T air unit), to this Special distance, for example. In addition, Resource points may be used at up to Special distance from the Resource point location e.g. to build a fort or airbase.
Trucks pay Motorized terrain costs units for movement purposes, but move only in the normal movement phase. They can use Administrative Movement as long as they stick to roads, clear terrain, and avoid EZOCs and air interdiction zones. There is no delay to their supply effect after moving.
Wooded Rough, Forest, Swamp, Mountain, and Sand hexes count as 2 hexes each against supply length limits.
Interdiction zones and supply trace
A single supply link loses 1 hex of allowed length if it enters any number of air interdiction zone hexes. So in clear weather, a unit to Truck link would need to be 3 hexes or less, and a unit or Truck to rail link would need to be 6 hexes or less. Multiple links can be affected by a single air interdiction zone (covering 7 hexes) in this manner, but each link will remain intact if it has a single hex of “slack”, even under a continuous blanket of air interdiction zones. Also, a single hex of the full supply trace can only count the air interdiction zone in that hex against one link along that trace. Count out the trace hexes from the unit to the supply source for this purpose.
Changes to rule 7 A 3 – Rail conversion
Railway engineers can refit a railroad (aka convert the gauge, though it wasn’t always this in reality) of a rail hex as soon as they enter it paying the normal 1 MP per hex. Thus a 0-6 rail engineer unit can re-gauge 6 hexes per turn. They may not re-fit a RR hex while using administrative movement or strategic rail movement, but can combine it with operational rail movement over already refitted railway. Multiple sections of the same track-link may be refit in the same game turn by different engineer units if desired, but must connect with each other in a single refit network (or gauge) by the end of one movement phase.
Changes to rule 14 A – Construction
Some of these rules are clarifications, others are simplifications to replace MP expenditure with turns of construction, or to accommodate the new 10 day turns. The original rules were a bit ambiguous about faster construction by spending movement points, given the base rule that construction must always be initiated in an Initial Phase and the earlier statements that construction in clear terrain and weather takes one turn. Here are the revisions or clarifications.
Construction of forts or airfields may only be initiated in a player’s Initial Phase. Temporary airfields are ready immediately, that turn, but the engineer providing the temporary airfield may not move that entire player turn, even if motorized. Tap the engineer unit to indicate this. All other forts or airfields are Under Construction at least until the same player’s following Initial Phase.
Temporary airfields can operate only a single air unit, while permanent airfields raise the base capacity of any hex they are built in by 2 air units. This means 2 air unit capacity if built in a hex without other city or permanent fortification, naturally.
Up to 2 engineers in an airfield or port hex may remove 1 point of damage each in every friendly initial phase. Simply tap the engineers and reduce or remove the damage marker. The improved facility is available immediately, including in the same initial phase for port or airfield supply purposes. The engineers may not move or attack for the entire player turn.
To reflect the shorter turns (3 per month), permanent construction of a fort or permanent airfield in Clear terrain can be done by a single engineer in clear terrain and clear weather in 2 game turns. Accelerated construction by 2 engineer units or 1 engineer with Soviet worker help can be completed in 1 game turn in clear terrain and weather. A single engineer needs 3 turns instead in unclear terrain or poor weather, or 4 turns if both apply. Use the worst weather state experienced across the build period if more than one applies. A second engineer units reduces these times by 1 game turn in all cases. All permanent construction requires 1 Resource Point to be spent when the construction is started. This is lost if the hex becomes enemy controlled or the engineer(s) is destroyed or moves off before completion.
In all cases, if the construction is interrupted by enemy occupation of the build hex, elimination of engineers, forcing their retreat from the build hex etc, the construction is aborted unfinished. Any resource point paid for unfinished construction is lost. Leaving the build hex only allows completion in the case of 2 engineers in one moves off and the other remains. The 1 turn reduction in the build period is lost in this case.
Play note – the Germans will find they need to manage their engineers carefully to extend their air cover into the Soviet Union at the speed of their early advances. Some airfields will be captured with cities, but these will not be enough nor situated close enough to the front line in enough areas to ensure especially good fighter coverage, as all single seat fighters have quite limited range. Each panzer group has a single motorized combat engineer, and these are the most capable of keeping up with c/m advances because they can move in the Exploitation phase, though only when not building.
The Soviets, meanwhile, will generally be focused on building Forts rather than Airfields early on. Soviet engineers move fastest by operational rail movement in the Soviet interior. The Soviets will generally have far more engineer capacity that they have resource points to spend, and must choose the sites of fortified lines carefully. Spare engineer capacity may be tasked to airfield (or port) repairs, depending on German air targeting decisions.
Revisions to rule 20 E – Air transport supply and mission timing
Supply is checked in the Initial phase but most air missions are flown in the Air phase. Air transport missions for supply only therefore form an exception to normal air mission timing. In the Initial phase, a player may assign T type aircraft only to fly supply missions to any friendly airbase in range, provided the originating airbase is in trace supply. Each such mission can supply 4 REs from the destination airbase to units tracing to it as a supply source, using only the overland and special portions of a normal supply chain. In Mud or Snow weather the supplies provided are reduced to 3 REs per Transport group. These amounts are halved (FRU) if air dropping supplies without a friendly airfield at the destination. The supplies arrive immediately in the Initial phase. U-2 and Isolated units with air supply take on U-1 supply status and effects for all purposes. Units cannot be restored to full attack supply by air supply alone. The Transport groups are left at their destination airfield (or supplied hex for airdrops) and may be intercepted there during the later Air phase. Escorts may also be assigned to them during that phase before enemy interception attempts.
Play note – the way to stop air delivery of supplies is to intercept and destroy the transports after their first delivery round, preventing further missions on subsequent turns. Also note that you cannot keep full C/M corps in attack supply over weeks with just an air lifeline; the tonnages involved were not remotely sufficient for that purpose.
Designer’s Note on trace and rail revisions
Historically, the Germans were able to refit the track from Brest to Minsk by 5 July, and to extend changed and working track to Smolensk by mid August despite a major fight to clear the pocket formed around that city. These are distances of 16 and 28 hexes respectively after 3-5 turns. Brest won’t always fall on the surprise combat turn, so it is possible for the first turn with the line fully clear to be the July I turn. This might put the Germans slightly behind schedule, but there is no way to reach the historical gauge changeover pace at 2-3 hexes per turn, which is what a cost of 2 or 1 MP per hex in addition to moving into it yields. Notice the historical rate is possible if Brest falls in the surprise turn, and even a turn later the Germans can extend with a single extra Truck unit to about the historical logistic “leash” length. Hence the rule revision to just needing to pass through the rail hex at the standard MP cost, without additional MPs spent to change gauge.
Treating Frost weather as equivalent to Clear for supply purposes simplifies logistic planning considerably, and fits the experience of most winters and both sides. It is true the first winter was unusually harsh and the Germans rather unprepared for it, but winterization and Snow condition rules should suffice to show both. Mud is the worst weather for logistics purposes, cutting links to road and rail link portions to 4 hexes and Truck units to 2 hex extensions. Air interdiction does affect supply link distances, but links constructed with 1 hex of slack in each link cannot be cut by air action alone. Faster Trucks with longer range are meant to simplify German logistic planning, while still representing a realistic constraint on distant operations or advances at the rate of c/m spearheads. Note that the ability to “exhaust” Truck units for temporary full supply has been deliberately removed in return for these changes.
Lastly, the Special range for use of Resource Point rule is meant to simplify engineering while still presenting the same real constraints. I dislike the fiddle of combat units transporting Resources to the point of their use, and don’t think it reflected any real WW2 practice. Instead, rail the Resource Point to near its intended point of use, position your engineer, and spend the Resource to start any airfield or fort.
Rule 12 Changes – Supply
Supply is checked only in each player’s initial phase, for their own units. If a unit is in supply when checked then, it remains in supply throughout the rest of that player’s turn and the enemy’s next player turn. If it is out of supply when checked then, it remains out of supply throughout the rest of that player’s turn and the enemy’s next player turn. If when supply is checked, the unit is both out of supply and Isolated – unable to trace a supply line of any length to a friendly supply source – and was out of supply already (regardless of whether it was Isolated already), then flip its supply status to 2nd turn (red) out of supply status.
Out of supply units in either 1st turn or 2nd turn out of supply status that are Isolated when eliminated do not contribute to Special Replacements. 2nd turn out of supply status Isolated units are subject to Isolation Attrition in the first initial phase in which they reach that status (see Breakout and revised Isolation Attrition rules below). Losses incurred during a combat that restores a supply line are deemed to have occurred before that supply line was restored.
To be completely clear about the distinction, Isolation status may be checked when a unit is eliminated for purposes of determining whether its lost SP contribute to Special Replacement loss totals, at any time. However, unless the unit is marked at least 1st turn out of supply, its losses DO contribute to Special Replacements.
First turn out of supply units suffer 1/2 attack factor, 1/2 movement if C/M only, no Exploitation movement (obviously only applicable if C/M), and no artillery bombardment allowed. Despite the term, units may remain in this out of supply state indefinitely provided they can trace a supply line of any length to a friendly supply source, and are therefore not Isolated.
Second turn and later out of supply units suffer 1/2 attack factor, defense factor, movement regardless of type, and to flak rating. They still have no Exploitation movement and no artillery bombardment allowed. They are also subject to Isolation Attrition (see next section). Even if a supply path to these units is restored, they continue to suffer these effects until their next friendly Initial Phase when supply is checked again.
Isolation Attrition –
Each hex subject to Isolation Attrition may first decide to Break Out. This will automatically eliminate all units in that stack, including cadres, but will provide some replacements to the owning player in return. The election is hex by hex and must be declared before the Isolation Attrition roll is made. Break Out is always voluntary.
After declaring any Break Outs, move to resolving actual Isolation Attrition on remaining Isolated units. To do so, roll 2D6 for each Isolated hex. On a 6 or less, the stack must fulfill a 50% loss result normally. There are DRMs that can affect this roll, listed below. If the hex did declare Breakout, all units are removed but the excess of the losses thereby taken over any required loss from the attrition roll, minus 1, is the number of infantry RFs added to that nation’s replacement pool. Note that even armor units generate infantry replacements in this case; their equipment is considered lost. However, armor and artillery removed by Break Out use their Defense strength for RF generation purposes. Determine the unfulfilled losses as in ordinary combat loss allocation, described above.
If the modified Isolation Attrition roll is 7 or higher, there are no attrition losses to that hex to this game turn. If the hex declared Break Out, the units are still removed, with the full amount removed generating infantry replacements as above. Meaning in that case, total strength minus 1 is the number of friendly infantry replacement steps earned by that Break Out.
Attrition DRMs, all are cumulative –
adjacent to any enemy combat units, -1
any hex in Eastern Europe, Russia, Scandinavia, or North Africa, -1
winter season except in North Africa, -1
within the unit’s home country, +1
can trace a path to a friendly major city hex, +1
The replacement phase occurs in the Initial Phase along with new reinforcement arrivals. A unit may be in ZOC when taking replacements (this is a change). It must be in supply to take replacements. It may move and fight normally on the turn it takes replacements. All supply costs are measured at the new, larger size if a cadre was restored to full strength.
Cadres may be brought onto the map for 1 RE or cadre combat strength of the appropriate type from the destroyed units pile, placed at this time as you would reinforcements. Single step units may also be brought in at this time in the same manner. Cadres already on the map can be rebuilt to full strength unless subject to the Fragile Divisions rule (for starting Soviet forces and 6-6 Finnish infantry divisions). You can bring out a dead cadre and rebuild it to full using replacements in the same turn if you have the RFs available.
Air phase
The phasing player may attempt to recover all Inoperable groups to Operating status. Use the Air Unit Repair Table as is including all listed DRMs. The phasing player may move Inoperable groups to the off map Available box, and within his Group Allowance (GA) may move Operable groups from his Available box to in-supply friendly airbases on the map. All moves to or from the map and Available box are one time per game turn, only – a unit may not enter and leave the box in the same phase.
Next the phasing player moves any of his air units to mission hexes. On map ready groups may re-base before their mission range, but use the airfield capacity of the airfield they stage to if they do so. He may perform fighter sweep operations against enemy patrol fighters and against ready fighters at enemy airfields, and resolves any such sweep missions first. Fighter patrol range is a maximum of 1/2 the listed range of the unit (round up), enabling intercepts within another 1/2 range. Fighters may Escort (only) to 2x their printed range at -2 to A and D air ratings.
The maximum size of any single mission is 4 groups, and no more than 3 groups may conduct any kind of strike or interdiction. (If there is a 4th group, at least 1 must be escorting fighters in other words). Similarly, no more than 4 fighter groups may intercept a given mission.
Almost all air units are considered “double size” and use 2x the rated bombardment ratings printed on the counters. Exceptions are (1) step air units listed as such on the OOB, which use the printed bombardment rating. In air to air combat, all shots by full strength air units at (1) step air units get -1 DRM, while all shots by (1) strength air units at full strength ones suffer +1 DRM. There are no other differences between (1) and full strength air units. (1) strength air units count as full units for activation, strike size limits, AA effects, and air base capacities.
In air to air combat, whenever groups double up against an enemy, use the highest rating of the double force then give -1 DRM for the additional firing group. No more than 2 groups may fire on a single enemy in an air to air combat step. Return fire selects a single target and fires normally. Bear in mind that the German and Finnish pilot quality -1 DRM is used only for their own shots, and does not effect shots taken at them. They also do not earn it vs Soviet Guards air units.
Fighter sweep is resolved as one round of air to air combat between the sweeping fighters and their chosen targets. Each sweeping fighter picks one enemy fighter to engage; if they outnumber the defending fighters they may double up, but must be spread as evenly as possible. In each fight, both sides fire, and the defending fighter remains unless an R, A, or X result is obtained against it. It may fire at a single fighter that engaged it; each sweeping fighter also fires just once and returns to base.
After all fighter sweeps are resolved, the non-phasing player may intercept any phasing player air missions with his patrol fighters and ready fighters from his airfields, including those that survived sweeps. Both base and patrol fighters may intercept within 1/2 their fighter’s listed range from its patrol hex or its ready airbase. Interception is always voluntary and automatic, and up to 4 groups may be sent after any enemy mission.
Intercepting fighters must first fight any escorting fighter groups with the intercepted mission. Intercepting fighters now have one attack each and none may pick other targets while any escorting fighters remain. If there are no remaining escorts, each remaining intercepting fighter may pick any one bomber to attack and conduct one round vs those. If an intercepting fighter gets an R result or better vs its chosen escort and is untouched itself, it may continue by selecting 1 enemy strike group for 1 round of simultaneous fire. On any other result of its fight with an escort group (e.g. both miss), the intercepting fighter is done and must return to base.
Note that fighters on escort missions do not contribute strike value, while fighters on a strike missions rather than escorting may be targeted or ignored at the interceptor’s option, like any other bombing group.
Interdiction missions use the tactical strike rating as the chance on D6 to place an interdiction zone, each hex of which costs +2 MP to leave for enemy C/M units and +1 MP for non C/M units to leave any hex in a 1 hex radius around the center of the air interdiction zone. Note this means any group with a 6 tactical strike rating automatically places an interdiction zone. Normal, two step units use twice their native rating, so one 2 step Me-110C, Do-17, IL-2 etc (3-x rating) air unit automatically places an interdiction zone if it survives interception and flak.
Supply movement path costs are also increased by air interdiction, with any supply link that passes through at least 1 air interdiction zone reduced by 1 hex. If an interdiction zone (center hex) is placed on a rail line, it creates a rail break in that hex. Rail breaks cost units using rail movement +2 MP from the base movement allowance before rail multiple. E.g. a unit with 6 MPs, thus an 8x rail multiple, pays 1 MP to entrain, moves 8 hexes by rail for 1 MP more, with the last hitting a rail break hex. Crossing the rail break costs +2 MP, then continues beyond by rail. It has spent 8 + 8 + 16 = 32 hexes of its rail movement allowance, leaving 16 hexes remaining. It could move 6-8 hexes further by rail then 1 hex off-rail with its final MP.
Flak fires at strike and interdiction missions before the mission itself is resolved, but only fires once against the entire strike, not at every participating attacking air unit. However, there is a -1 DRM for 2 strike groups and -2 DRM for 3 strike groups. Daylight facilities strike at airfields and ships face full flak both heavy and light, while other daylight facilities strike (ports, factories, rail, supply, resource) suffers only heavy flak fire, with a +1 DRM for night if conducted as night attacks. Bomber (B or NB) units also benefit from +1 flak DRM. Night bombing missions face only NF type interception, but suffer 1 column left on the bombardment table unless all participating bombers are NB type, and may only target facilities. Front line unit strikes face heavy and light flak stacked in the target hex only. Interdiction missions face light and heavy flak from all AA in the interdiction zone (target hex and all adjacent), summed into a single shot. Flak table results are chosen at random from among the strike groups involved in that strike (roll 1-3, 4-6, or 1-2, 3-4, 5-6 for 2 or 3 group strikes). Escorting fighters are never affected by Flak.
Air to air table and Flak table results always hit a single group. An R result sends the target group back to its air based in Operating status; An A result sends the target group back to its airbase in Inoperable status. An X result sends the target group to either the EFT or EET box depending on where the combat occurred. Within 2 hexes of the nearest friendly controlled hex means EFT; 3 or more hexes from the nearest friendly hex means EET. Bombing hits scored on airbases knock 1 group per hit into Inoperable status. If all groups at an airbase are already Inoperable, each hit instead moves 1 group to the Remnants box.
The air capacity of major city hexes is 3 air groups, of dot and reference cities is 1 air group. A built airbase raises hex air capacity by 2 air groups, from a base of 0 if there is no city present. No more than one air base may be built in any hex. Temporary airfields are only possible in hexes without any inherent air capacity and can operate only 1 air group.
Facility attacks on airbases always target the base itself for points of damage. However, each hit on the airbase also moves 1 active air unit there to unready status, as well as reducing the base’s operating capacity by 1 per hit. The owning player may choose the air unit rendered inactive. If all groups present at the base are already in inactive status, one such group chosen at random is moved to the Remnants box instead. Airbase hits can be repaired in the player’s Initial Phase by Engineer capable units, 1 hit per Engineer per turn with a maximum of 2 Engineers working in a single hex. Inactive air groups must however ready normally. Hits reduce the number of air units that may be flown from that airbase and the number that may attempt to ready there in a given game turn. There is no limit on the number of inactive, not-ready air units at an airbase.
Besides the listed strategic bombing missions of port, rail capacity, factories and Russian replacements, all “rail marshaling yard” attacks (which still reduce enemy rail capacity by 2 per hit scored for the next turn, only) also reduce enemy supply points on their supply track by 1 per hit, subject to the same limits on effective hits per target as the rail mission. In addition, hits on factories and Soviet supply cities reduce Russian replacements by 1 for each hit recorded against them, not 1 per 3 hits as in the original rules. In games with explicit supply units (e.g. Western Desert), only results with 2 hit results reduce supply by 1 step, while “1” hit results have no effect. In Fire in the East / Scorched Earth, Resource points may be targeted for bombing as well, with 1 being destroyed on a bombardment table “2” result, while “1” results have no effect.
Adjustments to air strength
Revised Europa uses double strength air units to reduce the number of units players must manage while preserving their capabilities. Use the following adjustments to starting air strength for the Barbarossa start to reflect this. Also, for simplification purposes, school units are not used, having instead been added directly to the OOB.
Germans – 8 Me109F, 6 Me109E, 3 Me110C, 8 He111, 1 He111 NB, 9 Ju88A, 2 Do17, 4 Ju87B, 5 Ju52
GA 46
Finns – 1 F2A, 1 Blen (1), GA 2, if north used add 1 G50Bis north of A weather line, +1 GA
Hungarians – 1 CR42, 1 Ca135, GA 2
Romanians – 1 PZL24, 1 SM79, 1 He111 (1), 1 Ju87 (1), GA 4
Russians – 4 I15Bis, 4 I15, 12 I16, 6 MiG3, 2 LaGG3, 2 Yak1, 3 R10, 2 Su2, 2 IL2, 3 DB3, 4 SB2, 2 Pe2, 4 IL4, 1 TB3, 1 Yer2 (1), 1 G2, 2 Li2
GA 45
If north used add 1 I16, 1 SB2 in Arkhangel MD, +1 GA
Groups listed as (1) are half strength aka 1 step units, use undoubled bombardment ratings, and suffer -1 DRM on air to air shots against them and +1 DRM on their own air to air shots. Flak shots against them are unaffected.
Adjustments to air reinforcement schedule
Axis
July I – 1 Me109F, 1 He111, Italian 1 MC 200, German +1 GA, Italian +1 GA
Sept I – 2 Me110E, 1 Ju88, 1 Ju52, Finnish 1 Hawk75, German +2 GA
Nov I – 1 Me109F, 1 He111, Romanian 1 IAR80, German -4 GA (transfers)
Jan I 42 – 1 Me110E, 1 Ju88, 1 Ju87D, German +7 GA (transfers)
Mar I 42 – 1 Me109F, 1 Me109G, 1 He111, German +2 GA (transfers)
Soviet
July I – 2 MiG3, 1 Lagg3, 1 Yak1, 1 IL2, 1 Pe2, 1 IL4, +4 GA
Sept I – 1 MiG3, 2 Lagg3, 1 Yak1, 1 I16, 1 Su2, 1 Pe2, 1 IL4, (1) Yer2, (1) Pe8, +3 GA
Nov I – 1 MiG3, 2 Lagg3, 1 I15Bis, 1 I153, 3 I16, 1 IL2, 1 IL4, 2 SB2, 1 DB3, +12 GA (transfers)
Jan I 42 – 1 Yak7B, 2 Lagg3, 1 Yak1, 1 P400, 1 Su2, 1 Pe2, +4 GA
Mar 42 – 1 Yak7B, 1 MiG3, 2 Lagg3, 1 P40E, 1 IL2, 1 IL4, +4 GA
Changes to Replacement procedures
Units may be rebuilt from Cadre to full strength in a player’s initial phase if within Special supply distance of any city (including reference and dot cities) – 4 hexes in clear or frost, 3 hexes in snow, 2 hexes in mud. This replaces the original rule that cadres could only be rebuilt in a city hex itself.
Designer note – Europa turns even with these revisions are quite long, 10 days. Forcing a unit to leave the front to move to a city to rebuild is too much time off, too often. Complete rebuilds can be created at reinforcement locations and moved immediately; it should not be a “downgrade” to replacement speed to have a cadre to build from.
Changes to Soviet reinforcement arrivals
All other forces listed as arriving in the I or II turn of a given month do so as scheduled, but Soviet reinforcements from Eastern MD in the II turn of any given month are an exception. These now all arrive in the III turn of that month instead. The Soviets get extra 30 rail capacity in any game turn they receive Eastern MD reinforcements, which will now be only I and III turns of any given month (and sometimes neither, if there are no Eastern MD reinforcements scheduled).
Changes to rule 29 – Weather
There is a new procedure for weather each fall or spring season, as well as revised tables for zones B C and D in the fall with all “N” values removed. Weather is also automatically Clear C for zones B, C, D, and G in September I, II, and III turns.
First the procedural change, which significant. It the Oct I turn of a given year, a single roll is made for the entire fall season. Normally this column will be used not just for all zones, but also for all turns through the December III turn of that year. Next, in the weather phase of the Nov I and Dec I turns, a single die is rolled, with the column being used for the whole fall season shifted by -1 on a roll of “1” and by plus 1 on a roll of “6”, while remaining unchanged on rolls of 2-5. Any shift below 1 or about 6 just “pegs” at those values. See designers note below for an explanation for the motives behind this revised weather procedure. Note that Sept I, II and III weather is always Clear in zone B, C, D and G.
Zone B
Oct I – C C C C C M
Oct II – C C M M M M
Oct III – M M M M M M
Nov I – M M M M F F
Nov II – M F F F F F
Nov III – F F F F F F
Dec I – F F F S S S
Dec II – F S S S S S
Dec III – S S S S S S
Zone C
Oct I – C C C C C M
Oct II – C C C C M M
Oct III – C C M M M M
Nov I – M M M M F F
Nov II – M M M F F F
Nov III – M F F F F F
Dec I – F F F F S S
Dec II – F F S S S S
Dec III – F S S S S S
Zone D
Oct I – C C C C C C
Oct II – C C C C M M
Oct III – C C C M M M
Nov I – C C M M M M
Nov II – M M M M F F
Nov III – M M M F F F
Dec I – M M F F F S
Dec II – M F F F S S
Dec III – M F F S S S
If playing with northern Finland, the Sept I turn is always C and Sept II and III turns are always M. Thereafter, use the roll for the whole season in all the other zones as described above, but with “N” results on the existing A zone of the weather table replaced by M in Nov I, by S in Apr II, and by M in Jun I turns.
Designers note – the original weather table made the length of the mud season far too variable as a well as too long. Historically in Zone B, the critical approach to Moscow, there was full mud only for the period from Oct 10 to Oct 25, then intermittent frost and thaw that slowed reaching full Frost conditions until about mid November. From mid November there was Frost. The maximum length of the mud season was thus at most 5 weeks, and the harshest portion of the mud was only 2 weeks long. In the original, there is a fully 1/9 chance that the zone B mud season lasts a full 8 weeks, and a further 1/3 chance that it lasts 6 weeks. The expectation (weighted average) for the length of the mud is 3.38 turns or 6.8 weeks.
With the revision, instead every column has a 2 turn long mud period, and this period will only shift to 1 or 3 turns if starting on a “5” then shifting to a “4” (long mud) or starting on a “4” then shifting to a “5” (short mud). An historical length of mud is therefore expected, and there won’t be wild swings in the sequencing, as can be produced by too many rolls across too many turns, uncorrelated to each other. The original tried to impose some correlation with its “N” mechanic, but fails to do so in a realistic manner, as it is only the most extreme events that are made more extreme by that mechanic (e.g. early mud certain to be followed up by unusually long mud).
There is still enough variety across the season rolls, zones, and possible shifts that you don’t know the full weather “schedule” at the beginning of October, but you will have an idea. Early mud will be followed up by early frost, late mud by a compressed frost season about half the time. Zone C will go through a similar warmer or colder fall but delayed a bit from zone B, and so on. The revision is much less likely to swing the outcome of the whole game on a single weird weather roll, as could easily happen with a Sept II “6” in the original (locking-in not only early mud in zone B, but a 6-8 week mud season there).
Changes to rule 32 – Axis Allies
The rule restricting Finnish units from operating south of the Svir river is removed and replaced by the following. Finnish units may operate anywhere within Finland, in the arctic / Weather zone A, and also anywhere within the Leningrad and Arkhangel military districts of the Soviet Union. If Leningrad is Axis controlled, they may also operate anywhere in the Baltic, Moskva, and Ural military districts. If Leningrad and Moscow are both Axis controlled, they may also operate anywhere in Weather zone B.
The rule restricting Romanian air units operating outside of Romania is removed. Reserve status rules are unchanged for Romanian ground units. In addition, Romanian ground units and air basing inside the Soviet Union is restricted to weather zones C, D, and G – the same as the Italians. As a clarification, all Hungarian units not in Reserve may operate anywhere in the map outside of the arctic / weather zone A.
Also as a clarification, German and Romanian forces in Romania may not participate in the special surprise combat turn, but are fully active for the normal June III 1941 turn. Hungary and Finland join the war on the German side at the start of the July I 1941 turn, and are neutral on the June III 1941 turn.
Air surprise rules
The air surprise procedure is substantially changed from the original or Scorched Earth version, to reflect more accurately the portion of Soviet aviation actually destroyed in the opening air strikes. While quite effective at suppressing the ability of the Soviet VVS to operate early in the campaign, these strikes only eliminated about 1/6 of the prewar Soviet air force, not the 50% or more depicted in the original surprise rules. The following procedure is conducted only once during the German special surprise combat before the first full turn.
First, set aside the following Soviet strategic aviation groups as out of range of the German attack – 1 TB3, 1 Yer2(1), 1 G2, 2 Li2.
Next, for each German fighter group, selected one random Soviet fighter group only. Pick 3 to be targeted by Me110 groups, and 14 afterward to be targeted by Me109 groups. Roll 1D6 for each. For Me110 targets, 1-2 R (unready), 3-6 place in EFT box. For Me109 targets, 1 no effect, 2-3 R, 4-6 place in EFT box. Next combine remaining untargeted Soviet fighter groups with their bomber groups, and randomly select targets for 2 Do17, 9 He111, and 9 Ju88 groups. For Do17 targets, 1 no effect, 2-3 R, 4-6 place in EET box. For He111 and Ju88 targets, 1-2 R, 3-6 place in EET box.
Note that German Ju87 groups are not assigned in this process, but are available instead for ground support attacks during the German surprise combat turn.
Only Soviet fighter groups left Ready by this process are On Alert for the German first turn after their surprise combat turn. They can intercept within 1/2 range of their airbases, only. In the Soviet June III turn they may try to Ready their unready aircraft normally. In the Soviet July I turn, they go through the usual air recovery procedure.
To clarify the procedure and timing here, any Soviet fighter groups (only) left in Ready, Operable status after the German surprise resolution may be placed by the Soviet player at airbases within range of the Soviet-Greater Germany border. They are On Alert there for the German June III game turn and may therefore Intercept within 1/2 printed range (if not first swept by German fighter operations) during that turn. There is no air opposition during the German special surprise combat turn.
At the start of the Soviet June III turn, any Inoperable groups in the off map Available box may attempt to Ready, and if successful may be placed on the map (within GA limits). Ready Soviet bomber groups may also be placed on the map in this Initial Phase and may conduct missions in the Soviet June III turn.
Next, in the Initial Phase of the Soviet July I turn, triage all groups in the EFT and EET boxes, roll for any additional Ready groups, receive scheduled Reinforcements, then within GA limits place any Operable, Ready groups on the map as desired. Inoperable groups may also be removed to the off map Ready box in this Initial Phase if desired.
Play note – the Soviet fighter arm will not be fully recovered from the initial surprise attack until after the July I triage procedure, and the first time groups recovered to Operable by that procedure will be able to operate in on the Soviet July I turn. As defensive interceptors on Patrol or Alert, this in turn means the first turn the Germans will encounter something like full Soviet fighter opposition is their own July II turn. This is all deliberately timed and “as designed”. There will be limited fighter opposition only during the June III and July I German turns.
Later Air reinforcements after Mar 42 – These adjustments are needed to the reinforcement stream since air units now represent twice as many planes as in the original. When single groups are received later, the receiving player has options for single groups on the air reinforcement schedule. For each type, he may “spend” a new group arrival to move 1 group of the same type from the Remnants box to the EFT box, or to move 1 group of the same type from either the EET or EFT box to the Ready box. If he prefers, he can instead wait until a second group of the same type is received and then take a new full group in the Ready box. 1/2 of new GA is received in any case.
Designers note on revised air surprise procedure – Bergstrom’s four volume series on the air war on the eastern front, using primary sources from both sides, has substantially updated and revised our understanding of the immediate effects of the initial German surprise attack on the Soviet air force. Detailed Soviet side accounting makes clear this attack only eliminated about 1/6 of the Soviet front line air force, and some air opposition was up and fighting from the very start of the campaign. In the original rules, 80-90% of the Soviet air force could be destroyed by the initial strike, and the slow ready rate on what was left granted the Germans essential air supremacy from the start of the campaign. Bergstrom has made it clear this picture is false. The Germans had air superiority certainly, but they achieved it by a superior fighter arm, continuing attacks on Soviet airfields, overrunning their bases, and the technical superiority of their modern types against the initially mixed obsolete and modern Soviet force mix. The revision is meant to present a more realistic version of the air war in the first year.
Fire in the East logistics adjustments
The following adjustments to FITE logistics are recommended for realism. RR engineers can refit a railroad aka “convert a rail gauge” just for paying the full cost of moving into it using regular movement. (Not rail movement or administrative movement). Increase the supply distances in hexes for truck units by 1 hex in all weather conditions, thus 4 in clear, 3 in snow, and 2 in mud. However, the ability to “deplete” a truck to trace to it is removed completely – they only act as extenders. Without trucks, the supply lengths are now 7, 5 and 4 in clear/frost, snow, and mud weather respectively, but can be reduced a further 1 hex per link if any part of the path is in an air interdiction zone.
Being out of supply without being isolated has limited effects in the system. Attack factors are halved, C/M movement allowances are halved while non-CM movement is unaffected. C/M units may not move in their exploitation phase, and out of supply artillery cannot conduct bombardments. Defensive strength is not affected, so a wing placed out of supply by changing weather should at most be forced to go over to the defensive.
Logistics and attack supply
Europa is a relatively simple game system that uses only trace supply, but as a result it can allow too high an operating tempo for realism, particularly in the larger games. Without spoiling that simplicity with full OCS style supply movement modeling, the following rules put some overall limitations on operating tempo.
Each side has a global pool of supply points (SP), and receives new SP in their Initial Phase. The maximum stockpile for either side is 3x their current SP income, and any excess beyond this level is lost at the end of the friendly Supply Phase. (Play note – players are encouraged to spend any such excess on Resource Point conversions to stay within the stockpile limit).
Supplying 3 fighters units or 2 other combat air units to fly combat missions costs 1 SP, and enables them to perform any operations in the current player turn. Transports may operate for free in supply terms. Being Readied from Inoperable status never costs SP, and no SP are spent on air units not on the map and operating that turn.
Moving, overrunning in the normal movement phase, and fighting in the combat phase for any German panzer or Russian tank or mechanized division (or later corps) costs 1 SP (all actions funded for that unit for these phases). Doing the same with 2 Motorized (and nation) or German panzer grenadier divisions also costs 1 SP. To move and overrun in the Exploitation phase with any of these types costs the same amount (additional if they paid for the other activities in their normal movement and combat phase).
Fighting with 2 infantry, rifle, or cavalry divisions in the combat phase costs 1 SP. Firing any amount of artillery in support of a single combat, both support and bombardment table attack, costs 1 SP. Defensive use of artillery never costs SP.
OOS units never spend supply to perform any actions, including attacks at 1/2 combat factors, but in supply units may not attack as OOS. No other actions costs any supply, including moving all non-mechanized units, defending in any number of combats, and all actions by cadres and units below division size, other than artillery support. Less than division sized C/M units may also move and overrun in exploitation phases without any SP cost. Keep in mind that C/M capability is restricted to the 8 types listed on the Unit Identification Chart, including the two-wheel Motorized symbol, but does not extend to other types with 8-10 movement allowance like artillery, rockets, antiaircraft, antitank, and cavalry unit types unless they have the Motorized symbol.
Resource points may be purchased for 3 SP and may be traded in for 2 SP instead. The Germans start with 36 or 40 Resource Points (up to 10 in the arctic and up to 5 in Finland) and the Russians with 25 Resource Points. (40 points with full Finland front in the game, 36 when the Finnish front is truncated to the area on maps 1B and 2A). In the game played without northern Finland, instead give the Germans 32 resource points in Poland and 4 resource points in Romania.
The Germans start with a stockpile of 140 SP (revised for 3 turns per month) in addition to their 36 (or 40) Resource points, while the Russians start with a stockpile of 100 SP (also revised for 3 turns per month), in addition to their 25 Resource Points. Resource Points are needed to construct Fort counters and Airfields on the map, costing 1 Resource Point each.
Resource Points may also be spent to increase Rail Capacity by 10 REs for 1 game turn each, with a limit of 6 Soviet, 3 German, and 1 Finnish Resource spent on rail capacity in a single game turn. Normal Soviet rail capacity is 60 REs, German is 20 REs, and Finnish is 7 REs. In addition, the Soviets receive up to 30 REs for newly arriving reinforcements and replacements entering the map from eastern MDs, but that capacity may only be used on qualifying new arrivals from those MDs. Soviet rail capacity is reduced to 30 REs in the June III 1941 turn due to strategic surprise, and they may not increase this capacity by spending Resources. These limits are all those of the original rules, given here for clarity.
Factory evacuation takes 1 turn to prepare, then 30 RE rail capacity in the turn the factory is removed. The Soviets also pay 15 REs of rail capacity in the following game turn. Factory moves now take 9 turns (still 3 months, now at 3 turns per month).
Play note about Soviet rail capacity
In about the first 2-3 turns, Soviet rail capacity should suffice to gather and reposition units starting on the map in the interior districts or part of Stavka reserve formations. From July II onward, however, their capacity will be strained by the increased demand from the mass mobilization wave of reinforcements received that turn and from rail demand to relocate threatened factories. The Soviets can easily end up spending 15-20 resource points on extra rail capacity through the end of September 1941, even before accounting for demand for operational rail movement of units already near the front lines. They get some “slack” after that, but also on occasion exceed their 30 REs of rail cap for eastern MD arrivals, and will dip in to the general cap to cover those occasions. New formations received as replacements can sometimes be taken closer to the front, but others will create additional rail demand throughout the first year of the war, in particular. The Soviet player can economize on rail capacity by leaving some reserves as garrisons of interior cities, and my using Administrative Movement rather than rail for some of his cavalry, in particular, from the Northern Caucasus MD in particular. Since cavalry costs double infantry rail costs, moving just 5 3-8 CDs costs 30 rail lift, which can translate into another 3 forts (by saving resources spend on extra rail cap) if a couple turns of administrative movement at 16 hexes a turn will suffice instead. The Soviets can also save some capacity and potentially also get higher factory RPs in 1941 if e.g. they risk not evacuating the Moscow factory.
Fire in the East Supply rates
For Fire in the East Barbarossa, German supplies vary by how far into Russia their foremost units are. These effects are linked to the siege or control of Russian Replacement Cities. By siege of a city, we mean having any combat units within 2 hexes of any hex of that city, measured in any Initial Phase. In addition, if a city is cut off from the rest of the Soviet Union (same determination as being eligible to form part of a 3 city supply source network), then it is considered under siege in this sense.
At the start of the game, the German supply rate is 100 SP per game turn, while the Russian supply rate is 60 SP per game turn. The German supply rate falls whenever they reach Soviet Replacement cities, by control or siege in the above sense. Soviet supply rate increases for Germans reaching their cities in the Border Military Districts – Baltic, Western, Kiev, and Odessa – then falls for every city reached in all other (Interior) Military Districts.
The specific SP effect values for each Replacement City is the number give on the original Soviet Replacements Chart plus 2, given in SP per turn. To be explicit about it, for the border districts –
Riga 3, Minsk 4, Kiev 5, Odessa 4, Dnepropetrovsk 4 – total of -20 SP per turn for Germans, +20 SP per turn for Soviets. Play note – if all these cities are in German hands or under siege, both the German and Soviet supply rate will be 80 SP per turn and (prior to Soviet Lend Lease, below) will be equal to each other, with both rates falling if additional Soviet cities are reached.
Leningrad 5, Moskva 7, Gorkiy 4, Voronezh 3, Kharkov 4, Stalino 3, Rostov 4, Stalingrad 3, Kazan 3
Starting May I 1942, the Soviets get +5 SP per turn for Northern Lend Lease if they can trace a rail line off map to Arkhangel. They also receive +10 SP per turn for Eastern Lend Lease from the eastern map edge. Starting in May I 1943, the Eastern Lend Lease rises to +15 SP, and a new Southern Lend Lease of +10 SP per turn becomes available provided the Soviets can trace a rail line to Astrakhan.
Design note – These supply effects mostly reflect distances over which logistic support must be sent to the armies, along with Soviet mobilization and for deeper penetrations of the country, loss of economic resources generating military supply. At Stalingrad, both sides are more strained logistically, the Germans by distance and the Soviets by lost economic base. At the Polish border, the Germans have the shortest distance to throw their supply, while the Soviets must send theirs further. The Lend Lease benefits to the later war Soviets reflects both direct supply aid, relieving bottlenecks within the Soviet economy, and better assets to move the supplies that exist, both by rail and by truck.
In addition to SP income, the Germans receive 1 Resource Point in each month’s 1 and II turns at Polesti as long as they control it. The Soviets receive 2 Resource Points per I turn and 1 RP per II and III turn turn at Baku as long as they have line of supply to the southeast edge of the map (or to Baku when the Transcaucasus map is used). Both sides also receive Resource Points by the reinforcement schedule, usually in the 1st turn of every month.
The Germans also get a special 80 supply point allocation for their first “surprise” turn, for air, artillery, and attacks by units of AG North, Center, and South only (no overruns and no exploitation phase). These cannot be saved nor spent on Resource Points, however – use them for the surprise combat phase or lose them. They then receive their normal turn 1 supply of 100 for their regular June III turn.
Weather and supply rates
Both sides reduce their received supply by 25% during Mud or Snow turns, round fractions up. Use the weather prevailing in Zone B and C if the same. If only one of those 2 zones has bad supply weather, reduce received supply by 15% instead, fractions round up. Frost does not affect supplies received, nor does the weather prevailing in the A, D, or G zones. Stockpiled supplies are not affected by changing rates or weather changes, but the limit of 2x current supply rate stockpiled does apply at the end of the initial phase in which the weather changes.
Play note – at the German 1941 high water mark with many Soviet cities in the 2nd tier captured or besieged, and with the 25% reduction for Snow or Mud weather, German supply received could fall as low as 40 SP per turn at the end of 1941.
Adjustments to Russian replacement rate
The Russian replacements rate is somewhat too low to yield an historical trajectory for the Russian fielded force total, given the damage the Germans can be expected to inflict from their own force level, and the above logistic limits. To account for this, the ratio used for Special Replacements (percentage of lost forces returned) is 1/4 for all forces in the game, instead of 1/4 only for Germans and Finns and 1/5 for all other forces. For both players, Special Replacements start with the July I turn, using all accumulated losses to date.
Soviet infantry replacements are received every game turn (now 3 times per month) at the original chart rates. Each operating factory produces 2 armor RFs per month in the I turn of the month, plus 1 artillery RF also in the I turn of the month. Improved factories increase these to 4 armor and 2 artillery RFs per month.
Russian regular replacement RFs still do not start until the August I turn, though Special Replacements from unit losses can be received from July I. If the northern Finnish front is not being used, Arkhangelsk RFs are not received, but all RFs from the Transcaucasus MD are received into the full country pool.
Factory based RFs begin with the August I turn. Relocation of factories to the Ural is unchanged from the original rules, with each relocated factory “out of action” for 3 months.
Revision to 34 F 1 – Disbanding units
In the April III 1942 turn, the Soviets must disband any remaining pre-war tank divisions and mechanized divisions, gaining armor RFs equal to their attack strengths for each unit disbanded. As these are fragile divisions, until the end of the game Soviet armor RFs can only be used on armor brigades, tank corps, and mechanized corps, including the new 6-4-8 tank corps arriving as reinforcements (to rebuild them when destroyed or cadre’d, etc).
Fire in the East historical set up and surprise turn
Russian forces in each military district listed under any “Army” must set up either directly on the border or 1 hex behind it, and every hex along the border must be covered by a zone of control. Russian forces listed under any of the “Mechanized Corps” must set up 3-5 hexes from the border. Non-divisional artillery units with 6 MA other than siege artillery must set up stacked with the Army units on the border or 1 hex behind it. All other non-divisional units may set up in any hex containing other units from the Army, Mechanized Corps, or Reserves listings in the same military district.
German units may set up along or behind the border. No overruns are allowed in the surprise turn, and the only allowed ground unit movement is 1 hex moves to contact with Soviet units across the border in Soviet territory, where Russian positions and ZOCs allow (this will always require stopping on the first hex, since the Russians must set up with ZOCs all along the border). German units may also not move ZOC to ZOC; they must stop on the first ZOC encountered. In addition, these 1 hex moves must preserve existing stacks – no shuffling of units between hexes is permitted. There is also no exploitation phase in the surprise turn, only advance after combat into hexes taken, where applicable. The intention is only to move to contact on the border anywhere the Russians start back a hex, then a combat phase.
Rivers dividing starting Russian territory from German set up territory are ignored for movement and combat purposes in the special surprise combat phase, only. Full movement, overruns, ZOC infiltrations all start on the full June III German turn. Rivers have full effect on that turn and onward. Russian units all have Limited ZOCs (1 MP cost to leave) in the full June III turn only, regardless of set up location. Russian rail capacity is also only 30 REs on the June III 1941 turn, and may not be increased by spending resource points. Starting in the July I turn, Russians have full normal ZOCs and full rail capacity, and all surprise rules are over. Russian also receive Special Replacements (only) in the July I turn, but no regular or factory replacements until the August I turn.
The Axis receives 80 special supply points (SP) for the surprise attack turn which must be used that turn or are lost. They cannot be spent one Resource Points; any unused portion is simply dropped.
The air surprise procedure of the originally rules is completely replaced by the air surprise procedure presented above in the air war sections.
After the Axis surprise turn’s combat phase, play proceeds to the start of the normal Axis June III game turn.
Comments and especially playtest reports welcome.
