
Motivation and the system idea
Napoleonic Battles system is a new way of playing simpler and older Napoleonic wargames like SPI’s Napoleon’s Last Battles, Napoleon At Leipzig, GDW’s Eylau and La Bataille de la Moscowa by Frank Chadwick, and similar games.
The originals being revised here depict a wide variety of classic Napoleonic grand tactical fights at different scales, but usually regiment and brigade units. They had simple combat strength and movement allowance ratings of the pieces, minimal differentiation of unit types, “push” combat result tables on which the normal result was just a defender retreat of a single hex, and some very basic command rules.
Others “modded” some of these into “Last Battles of Napoleon” with the right core idea, to shift to a more attritionist combat system and sharper differentiation of unit types, but in my opinion went overboard on command and control systems, making the games a bit too complex. The realism of the combat still left a lot to be desired, as well, since attackers were heavily favored just by ganging up in bigger stacks than the defenders.
The idea of my revised system is to create one way of playing all these games using the original components with a new combat system, one heavily informed by detailed wargames at the battalion level like Wellington’s Victory, but all kept playable and simple, with an alternating formation activation system that puts player decisions in charge of the action, not random chit pulls or elaborate “orders” mechanics.
There are a few scale specific differences needed for the more detailed regiment titles (GDW Eylau for example) and the larger brigade NLB games, but these are kept as limited as possible to share the basic design. Note that a previous version of these rules that also allowed “unit activations” has been simplified to only Commanders and Officers activating formations, while failed activations now allow both Rally by the attempting formation and one additional activation attempt.
Sequence of Play
Initiative phase – determine the first acting player by highest 2D6 die roll, with bonus for overall commander’s command rating. Last turn’s initiative player wins ties.
Reinforcements phase – Initiative player first, place new reinforcements arriving this turn on their eligible entry hexes, available for activation during the action phase.
Action phase – Initiative player first, each player conducts their chosen activations, alternating sides, until both sides pass in succession. Activations using a Command Point are automatic; activations using Initiative require a die roll and turn into a Pass if the Initiative roll fails.
Impulse 1 (initiative player)
Impulse 2 (non-initiative player)
…
Victory phase – check formation demoralization levels, check for victory, then refresh all units and start a new game turn.
Action phase – activations
The core of the game is the action phase. At any given time, one player has the chance to act and becomes the active player if he chooses to activate any of his formations or units. If he declines to act when it is his turn to do so, then he has passed. The other player may then perform an action instead, after which the first may decide to act. The period of time in which one activation is occurring and running through its action sequence is called one impulse. Eventually both players will run out of units to activate or choose not to activate any, and both sides will therefore pass. When that happens the action phase is over, and units will refresh for the following game turn and thus become eligible to act again. Each formation or unit can act only once in the full game turn, but acting is always voluntary.
Activation attempts by Officers (using their Initiative rating) are not automatic and may fail (1D6 higher than the Officer’s Initiative rating). If a formation or unit attempts Initiative activation and fails, it is marked as Spent, will not act that turn except to Rally, and may not try again until the following game turn. An officer that fails his Activation roll may write out an Order for his formation recording his intended move. If the following turn the player is willing to comply with his previously written order, he gets a -2 DRM on his Activation attempt. A player may elect instead to act in a new manner using his officer’s raw Initiative rating. A formation that fails its Activation may roll for Rally for each of its units but performs no other actions.
When a player fails an Activation roll for an Officer, after writing out any order for the following turn and conducting any Rally attempts with that formation, that player may select another formation to attempt to activate, in that same impulse. A player may never attempt activation by more than 2 formations in a single Impulse. The second action could be used to activate with a Commander instead of an officer, but only for a new formation as the previous formation is already marked as Spent by this point. The second activation attempt is resolved just like the first. If it also fails, play passes back to the opponent. This second attempt is only available if a first activation attempt failed. Any successful activation will be the last for that player’s impulse.
Commanders each provide Command Points which may be used throughout a player’s turn to Activate Officer formations within the command range of the Commander, which is normally 4 hexes. An Officer activated by a Command Point automatically acts. A Commander may use some or all of his Command Points on a single Activation to activate more than one Officer Formation together, or may use them one at a time to Activate single Officers on different Activations throughout the turn. The only restrictions are that the Commander may not exceed his Command rating in activation points use, may only use those points on Officers within his command range, and may only move (himself) once in the game turn, during any single Activation. He may move before spending his Command Points and may then accompany any one activated unit during that unit’s own move. In some games, Command Points are also used to bring formations out of Reserve status (an action called Commitment of that Reserve).
March orders – A Commander may use any of his command points on a given turn to send activation March orders to subordinate Officers outside of his command range (4 hexes) by writing out an order for a specific Officer, one per command point spent. March orders increase the command distance to 10 cavalry MPs at the cost of 1 turn’s delay, or up to 20 cavalry MPs at the cost of 2 turn’s delay. (They may not be sent further). On the turn of arrival of a March order, that Officer may activate automatically without requiring an Initiative roll, but only to execute the written order received, and only as a single Officer activation with his Formation. The Officer may instead set aside a received March order, but if he does so he may only activate on his own raw Initiative rating (with no bonuses for previous failed attempts).
Officers may attempt to Activate their Formation without a Commander by rolling against their Initiative rating. If they roll less than or equal to their Initiative, their Formation activates normally. If they fail the roll, they may elect to write out an order they wish to execute the following turn, and they receive -2 DRM to their roll next turn if again attempting an Initiative activation. An Officer who fails his -2 Initiative attempt is marked with its Auto side, and automatically passes his Initiative check on his following attempt. An Officer with a written order may elect to set it aside and start over. If he uses either the -2 or Auto bonuses, he must execute his previously planned order as written. Regardless of written orders, if a formation fails its activation roll it may not attempt to activate again that turn – the commander is marked as spent. Units of a formation that fails activation may attempt to rally from disorder, but perform no other actions.
Officers have a command radius of 3 hexes, and units of their command that activate while within that radius are In Command. In Command units may perform any action. Other units of a formation that activates still do activate, but are Out of Command. Units that are Out of Command may not fire in the artillery phase and may not move adjacent to enemy units in the movement phase. If already adjacent to enemy units they may stay, but may not move to a new hex that is still adjacent to any enemy unit. Subject to these restrictions Out of Command units may move normally when activated. They may not conduct Melee Assaults in that phase either. They may Rally from Disorder normally.
Otherwise all activations are the same and run through the same action sequence until all of its phases are completed. Play then passes to the opponent to activate any of his unspent commanders or officers.
Whenever a player Passes without activating any leaders or officers on his turn, including making no initiative attempts, he rolls to see if the Action Sequence as a whole ends. It does so on a roll of “6” on 1 die. Otherwise, play passes to the opponent. If both players pass in succession then no roll is needed – the Action Sequence automatically ends. (Play note – this rule encourages players to act early with their most important Commanders. If a player delays acting his opponent may manage to end the turn before he gets to act).
Impulse Action sequence
Each impulse runs through the following steps in order –
Choose action type and roll for activation – Choose commander or officer activation, and designated which officers are included in the action if command points are being used. Commander activations are automatic. Officer activations roll against the officer’s initiative rating. If the activation fails, any designated units may still attempt to rally from disorder but cannot perform any other actions. If the activation succeeds, mark any disordered activated units as not disordered this impulse (by flipping the disorder marker) to show they are eligible for rally at the end of the present activation unless disordered again during this impulse.
Artillery bombardment phase – activated artillery may fire at enemies in range and line of sight. Foot artillery that fires in this phase will not move; it is one or the other. Exception – horse artillery may move 1/2 their movement allowance after firing in the artillery bombardment phase.
Movement phase – all activated units may move their full movement allowance conforming to all the rules of movement.
Defensive Artillery phase – inactive artillery with active enemy units adjacent (only) may fire at those active units. All artillery firing at the same target must be combined into a single shot.
Melee phase – any active units adjacent to and facing enemy units may attempt to take their hexes in melee combat. Melee is always 1 hex trying to take 1 enemy held hex and is always voluntary. The active player resolves these in any order he desires, applying the results of each before moving on to the next. Odds are calculated as attacker divided by defender strength as a percentage, rounding in favor of the defender. Any applicable shifts are applied and the dice rolls to determine the melee combat result, and its results are applied immediately before proceeding to the next melee.
Rally phase – When all desired melee attempts have been completed, each activated disordered unit from a previous impulse may check morale and recovers to good order if it passes its morale check. Officers stacked with a unit provide a -1 DRM to each rally roll in their hex, while commanders provide a DRM equal to their command rating (e.g. -3 for Napoleon). After all rally attempts, flip the disordered counter on any remaining disordered activated units to their “not this impulse side”. On an unsuccessful activation, perform only this phase instead of the full sequence above. Then the impulse ends and play passes to the opponent.
Steps and step losses
When a unit suffers a step loss, flip it to its reverse side. If there is a nationality flag on the back side it was a single step unit and is eliminated. Otherwise it uses its reverse side SP strength for all purposes. If the back side of a unit gives a strength of 4 or higher, the unit has 3 steps, and if it suffers a second step loss you need to use a step-reduced marker under the unit counter (OCS, GBoH, TSS or Wellington’s Victory markers work for this). On their last step, 3 step units use half their reverse side strength rounding fractions up. On a third step loss, any unit is eliminated. Units with strength 3 or less on their reverse side are 2 step units, and are eliminated if they suffer a second step loss.
Some games do not have back side strengths because they expected player to use single SP loss systems (e.g. the Jena! division level system). For these, all units with strength under 6 halve their strength, round up, for a single step loss and are 2 step units. All units strength 6 or higher are 3 step units which lose 1/3 of their strength, round up, for the first step loss, and fall to 1/3 of their initial strength, round up, after 2 step losses.
Recovery
In the last night turn of each night, eliminated units or 3 step units on their last step may attempt Recovery. Exception – Vedettes/Jagers and all single step units cannot attempt Recovery. Roll once for each unit against the unit’s Initiative rating, with -1 to that rating if the formation is Demoralized. If the roll is less than the units modified Initiative, it recovers 1 step. Place it within 2 hexes of its Officer if this brings it out of the Recovery box. If the roll for an eliminated unit fails, move that unit to permanently eliminated status. A non-eliminated 3 step unit that fails to recover a step suffers no additional effects, and can attempt again the following night. Recovering units can never return to full strength, only to their reduced side (without a step loss marker, at best, for 3 step units).
Vedettes& Jagers
Vedettes are small cavalry units normally used for reconnaissance and screening. For melee each counts as 1 SP in strength in open ground, while having no melee strength in covered terrain. No more than 2 Vedettes may stack in a given hex, whether alone or with other cavalry or horse artillery units. Vedettes can retreat before melee vs any unit with less than 7 movement allowance.
Jagers are 1 SP infantry units that are intended to be used much like Vedettes, while preferring covered terrain instead of open terrain. They have 1 melee strength in any terrain and do benefit from covered terrain. They can only attack other Jagers or Vedettes. Cavalry Vedettes may choose to retreat before combat if attacked by Jagers. Lastly, Jagers may choose to retreat before combat if attacked by non-Jager infantry, but not when attacked by other Jagers or any form of cavalry.
Repulse
Any activated non-Vedette/Jager unit or stack may attempt Repulse against Vedettes/Jagers, which is conducted as a melee attack during movement for no additional movement cost. The Vedette/Jager may retreat before melee if eligible, or elect to stand if the terrain is open ground (only) and an attacking or Repulsing unit or stack has 4 SPs or less. If it stands, resolve the the repulse attempt as a normal melee using the Vedette/Jager’s melee strength of 1 during the movement phase. The repulsing unit or stack may continue moving if it succeeds in taking the Vedette/Jager’s hex. Otherwise it must halt and its movement is over. A Vedette/Jager may retreat before melee multiple times in the same enemy movement phase, and a moving unit may also Repulse it multiple times. As with other retreats before melee, the retreating Vedette/Jager must check morale and disorders if it fails.
Deploying and recovering Vedettes
A full strength speed 7 cavalry unit may spawn 2 Vedettes at the start of its movement phase by taking 1 step loss, and may reuse destroyed Vedettes from the same formation for this purpose. Reduced speed 7 cavalry units may also gain a step at the completion of their movement phase by absorbing 2 Vedettes of the same formation. Vedettes have ZOCs only vs enemy Vedettes, and only enemy Vedettes and non combat units (e.g. leaders, supply or baggage) can’t Repulse them. They may however risk themselves trying to slow or halt enemy units if those enemies are weak enough. For victory and formation loss limit purposes, treat Vedettes as 1/2 SP units.
Stacking and SP limits
Stacking is limited by unit types and number of SPs that may be present in one hex, and there are also limitations of the number of SPs that are fully effective in various roles. Most of these systems are shared but a few differ in detail between the regiment scale 150 yard hex games like GDW Eylau and the brigade scale 480 meter hex games like Napoleon’s Last Battles.
In regiment scale games, no stacking of different unit types is allowed. Every hex may only contain one unit type.
In brigade scale games, infantry may stack with foot or horse artillery, and cavalry may stack with horse artillery. All other forms of mixed stack are prohibited.
The stacking limit for cavalry in 6 SP regardless of scale. Horse artillery SP count as 1/2 each against this limit, round up, in the brigade scale games that allow them to stack with cavalry. Individual cavalry units of 7+ SP are allowed, but no other units stacked with them contribute any strength.
The stacking limit for artillery is 12 SP regardless of scale. In the brigade scale games, this limit is shared with infantry and the 12 limit applies to the total of both combined.
The stacking limit for infantry is 12 SP in the brigade games, and 18 SP in the regiment games.
All these stacking limits are reduced to 1/2 those clear terrain levels in obstructed terrain, which includes village, woods, and orchard terrain. Amounts in excess of these lower limits are ignored for all fire and melee combat purposes; they may be present but they don’t help with any form of combat.
Stacks may always be examined at any time by either player, and the order of stacking never has any effects on game play. If active units are found in violation of stacking rules the active player may correct the violation during movement. Violations found at other times must be corrected immediately by eliminating units at the owner’s discretion until there is no longer a violation.
Exception – the lower stacking limits in obstructed terrain may be violated while staying within the stacking rules for open terrain, including rules restricting which types may stack together, without penalty. However, SP in excess of the lower obstructed terrain limit do not contribute to the combat capabilities of the hex in any way, while they suffer any combat results normally.
SP limits for various purposes
The maximum number of artillery SPs that may fire out of one hexside is 6 SPs. Artillery may fire out of 2 hexsides from the same hex in the same fire phase, but never more than 2. If it divides its fire in this manner, the fire through each hexside is 50% of the full artillery SP in the hex, round fractions down. Targets must be at least 60 degrees apart. If firing at long range (3 hexes in brigade scale games including Library of Napoleonic Battles), shift 1 left on the artillery fire CRT.
The first 6 SP of Artillery are worth 1 combat value each for melee defense. Any artillery beyond 6 do not contribute to melee defense. Artillery never participates in melee attacks.
The first 6 SP of infantry in a hex contribute 1 each to melee strength on attack or defense. If artillery are stacked with infantry the artillery SP count against this first 6 SP limit. All additional infantry SPs up to the hex stacking limit contribute 1/2 each to melee value. Note this means additional SP will only contribute to melee strength in open ground, as the stacking limit becomes 6 SP in obstructed terrain. The maximum melee strength of an infantry hex in brigade level games is therefore 9, requiring 12 SP.
Each SP of cavalry in a hex contribute 2 each to melee strength on all attacks, or on defense vs cavalry in open terrain, and 1 each when defending against infantry or when fighting from or into obstructed terrain. The maximum melee strength of a cavalry hex is therefore 12, requiring 6 SP and open terrain, and either attacking, or defending vs cavalry. When defending vs infantry or in any role in covered terrain, cavalry maxes out at 6 melee strength from 6 or more SP.
Heavy cavalry and Old Guard infantry – In Library of Napoleonic Battles games, one shift right on the melee table is available for uniform heavy cavalry charging light cavalry, infantry, and artillery in open ground. It is also available for attacking French Old Guard infantry units. Old Guard infantry defenders also cancel any attacking heavy cavalry shift. In Chadwick regimental level games, this shift is available for “black dot” units instead. This shift is never earned on defense. In Library of Napoleonic Battles games, all cavalry with 6 MPs are considered Heavy Cavalry while all cavalry with 7 MPs are considered Light Cavalry.
Quality shifts in melee – attackers use the lowest morale rating of attacking units while defenders use their highest. If either side has a morale rating 2+ higher than the enemy rating, that side earns 1 column shift in their favor.
Movement procedures, facing and zones of control
Activated units may move individually or in stacks as the active player desires, in any order. Foot artillery units that fired in the artillery bombardment phase may not move, and horse artillery units that fired in the bombardment phase get only 1/2 their movement allowance. Units may leave enemy front hexes, with infantry and artillery paying +1 MP to do so; cavalry pays nothing extra to leave an enemy front hex. Units may not move directly from one enemy front hex to another (“ZOC to ZOC”). A moving unit must have a facing and may only move into one of its 3 front hexes. Turns are free, but upon entering any enemy front hex (ZOC), a moving unit must halt for this impulse, and may only change its facing by 1 additional hexspine after entering enemy ZOC.
A unit faces a hexside – not a vertex – and always has 3 front hexes, 2 flank hexes, and 1 rear hex. It exerts a ZOC limiting enemy movement only into its 3 front hexes. Exception 1 – cavalry Vedettes only exert ZOCs vs enemy Vedettes. Exception 2 – units in Chateaux terrain have all around front facing. Artillery may also only fire through its 3 front hexsides, describing a 120 degree arc. Similarly, when it conducts a melee attack, it must do so through one of its 3 front hexsides. After any advance after melee, a unit may turn 1 hexspine to adjust its facing.
All units in the same hex always share the same facing. If new units just entered the hex, they adopt the facing of the units already there, which may in turn only change their facing as part of their own movement when they are activated, or by allowed reaction changes of facing as outlined below.
Units may conduct a reaction face change of 1 hexside during an enemy impulse to present a front hex to an enemy unit that moves adjacent, provided that doing so does not turn a flank or rear hex to an existing adjacent enemy unit. Units are limited to 1 reaction change of facing per enemy impulse. If after a reaction change of facing the moving unit is in an enemy unit’s front hex, it will be forced to halt for entering ZOC. Note that such a turn to face a moving unit stops the moving unit but doesn’t count as ZOC to ZOC movement if the hex entered was not in an enemy front facing before it changed its facing.
Units may not retreat due to a lost melee through an enemy front ZOC hex unless that hex already contains a friendly unit. If they have no valid retreat path in this sense when forced to retreat, if in good order they lose 1 (additional) step and are disordered, then remain in place. If already disordered, they are eliminated instead. Voluntary retreat before melee by cavalry have the same limitations, but if they have no allowed route they simply cannot perform that action.
Strategic movement
If all units moving in a given activation stay at least 4 hexes away from any enemy units, they may use “strategic movement” to increase their movement allowance. MA 3-4 units increase to 6 MPs and MA 6-7 units increase to 10 MPs. Leaders still get 10 MPs. Stacking limits for units using strategic movement or using road or trail movement rates are reduced by 1/2 e.g. 6 infantry SPs in a brigade level game. Single units over these reduced stacking limits are OK but they may not stack with other combat units.
Tactical movement
In any movement phase in which a unit starts, moves or end adjacent to any enemy unit, it pays a minimum of 1 MP per hex, regardless of road movement rates. To benefit from 1/2 per hex movement rates along roads, a unit must not move adjacent to enemy units on that activation. Roads can still be used to negate other terrain costs in such cases. Any units benefiting from the 1/2 per hex road movement rate have the same 1/2 stacking limit as units using Strategic Movement. Using the road movement rate is always voluntary.
Fire phase procedures
Artillery may fire out to 3 hexes in its own bombardment phase but suffers 1 left shift at range 3. In regimental scale games this hex range is doubled to 6 hexes and the left shift only occurs at range 5 or more. Defensive artillery fire is only allowed against adjacent active enemy units, but may occur any number of times in a game turn if those conditions are met.
Artillery may never fire over friendly or enemy units, regardless of position or elevation. It need not fire at the closest enemy units overall, but for any given line it fires along, it must fire at the first enemy unit intercepted by that line, not one “deeper” into the enemy formation. If an artillery unit’s line of fire lies along a hexspine and one of the two adjacent hexes is blocked, the fire is blocked. All artillery strength firing at the same target hex in the same bombardment phase must be combined into a single attack.
Artillery fire resolution must be done from one end of the line of eligible firing units to the other.
Artillery may fire with up to 6 SP out of up to 2 front hexsides in a given fire phase.
A given hex may not be targeted multiple times in a single fire phase.
Melee phase procedures
Activated good order units only may but need not melee attack adjacent enemy units. Melee is always from one hex vs one hex, only, never “convergent” melee and only one hex may attack a given enemy held hex per melee phase. Disordered units and artillery may not perform melee attacks, but units stacked with either may melee out of hexes containing such units. Melees may be conducted in any order the active player desires, with the results of earlier melees fully applied before resolving the next. The stacking limit of the hex being attacked applies to the attacker as well as the defender for melee purposes, so e.g. melee into an obstructed terrain hex may only use as many SP as could contribute to melee strength in obstructed terrain.
Infantry may melee cavalry but the cavalry may retreat before melee at the defending cavalry’s option. It is automatic, just retreat 2 hexes and the attacking infantry takes the hex. Cavalry that retreats before melee must check morale and becomes disrupted if it fails its morale check. If cavalry stands, the cavalry uses its 1xSP melee strength in any terrain when defending against infantry.
Artillery never melee attacks nor contributes to melee attacks when stacked with infantry; it can only defend. Artillery cannot retreat before melee, including horse artillery. In addition, any retreat result vs cavalry attackers destroys the defending artillery unit completely. Artillery of either type forced to retreat by an infantry melee check morale, and retreat with a step loss if they pass, being eliminated completely if they fail. Horse artillery gets -1 to this morale check roll.
If all defending units clear the attacked hex by retreat or elimination, then the melee attackers must advance into the attacked hex. If the attack came from stacked units, at least one must enter the won hex. After entering the won hex, they may change facing by 1 hexside, starting from facing the direction they just entered from (not their previous facing but the direction that carries them into the won hex).
Give 1 column right shift for a melee attack delivered through the target’s flank or rear hexsides. There is also a 1 column right shift for disordered defenders. (Note that disordered units may not conduct melee attacks; they must rally first). In addition, if either side in the fight have morale 2+ higher than the enemy, shift the melee column one in favor in the higher morale side. When units have mixed morale, attackers must use their lowest morale rating while defenders may use their highest morale rating.
Combat results tables

The fire table columns are for total SP of artillery firing at the target hex in the same phase. Foot artillery has a maximum range of 3 hexes but suffers a 1L column shift if any of the firing units are 3 hexes from their target. The fire column is also shifted 1L if the defender has village or chateaux terrain (woods have no effect). Shift 1R in favor of the firing artillery if the fire arrives through a flank hexside (not front or rear) of the target unit. Also shift 1R if there are 7 or more SP in the defending hex and they are in clear terrain, and shift 1L if there are 2 SP or fewer in the target hex (including Vedettes/Jagers). These shifts are cumulative. Any fire shifted past the right hand column uses the right hand column. Any fire shifted past the left hand column automatically has no effect.
Fire results include mandatory step losses, retreats (always 1 hex for fire results), automatic disorder, and both automatic and morale checks for Defender Option results. Fire step losses are chosen by the firing player. Morale checks can be made by any lead unit in the hex, target player’s option, and if passed there is no further effect to any units in the hex. When a Defender Option result occurs, the targeted player may choose to Disrupt all units in the target hex or retreat them all one hex.
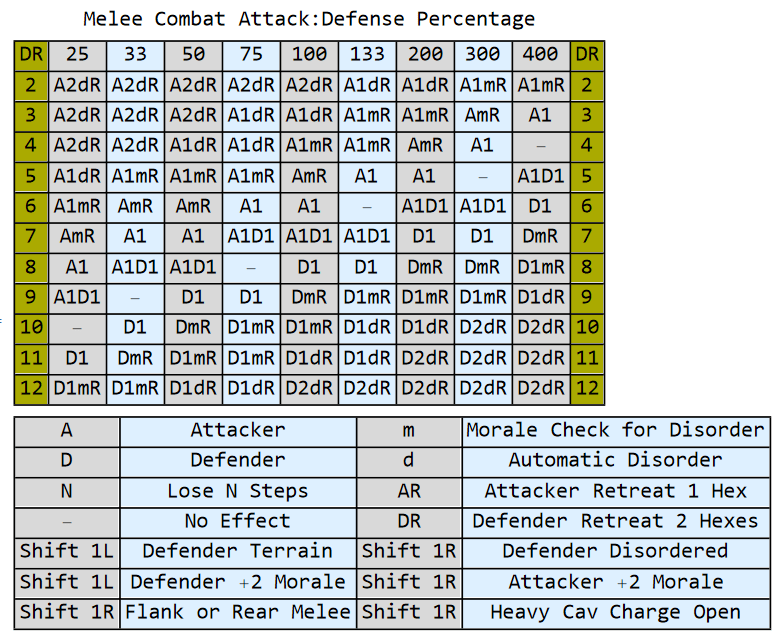
Melee table columns are for percentages of defender strength. The highest percentage column reached is used, rounding in favor of the defender e.g. 5 to 3 is 167% which rounds to 150%. Defenders may receive defense factor bonuses for terrain; these are always applied after all SP calculations and rounding. “Dot” units – heavy cavalry and some guards infantry – receive a 1 column right shift on their melee attacks if the defender is not also a “dot” unit. If both sides are “dot” units or the “dot” unit is defending against a non-“dot” attacker, there is effect on the melee column. For cavalry, the Heavy Cav Charge shift is only available if the attacker is at least 50% heavy cavalry SP and the defender has no heavy cavalry or Guard infantry SP. Cavalry units with 6 MP movement allowance are considered Heavy Cavalry in Library of Napoleonic Battles and similar system games.
Steps and losses
Combat results are expressed in step losses. One flip of a unit or removal of a reduced unit is required to satisfy each step loss. Exception – if a reduced unit has 4 SP or more, it can take a second step loss by putting a step loss marker under the counter. This reduces the unit to 1/2 its printed rear side strength, fractions round up. If the rear side of a unit is 3 SP or less, it is eliminated if its suffers its second step loss.(Slower advanced game) – track single SP losses instead, one for each combat result on fire or melee tables. Use flips to record larger losses and strength markers below counters to record smaller SP losses. Terrible Swift Sword, Great Battles of History etc can provide such markers.
In fire combat, the shooting player may choose how to assign the step losses he gets if there are more than 1 unit in the target hex. In melee combat, the player losing the steps may choose how to allocate his losses.
Artillery and melee losses
Any artillery unit forced to retreat as a result of a lost melee combat against cavalry is eliminated. Artillery units of either type forced to retreat by an infantry attack must check morale. If they pass they lose 1 step from all artillery present and retreat; if they fail they are eliminated. Horse artillery get -1 DRM on this retreat morale check.
Cover vs fire
terrain that gives 1 column left on all fire include –
across adjacent double slope hexside
across single slope hexside for hilltop only
in improved position, fleches, redoubt, or other field fortification
sunken road, or similar
infantry or artillery (not cavalry) in a village or fort hex
infantry (only) in a chateaux hex is invulnerable to artillery fire, as is any target across a double slope at range greater than 1 hex (“reverse slope”; actually considered LOS blocked).
Terrain effects on melee
The following give a defensive melee bonus of 1 left shift –
defending single crest from hilltop
defending inside field fortification
infantry or artillery (not cavalry) defending inside a fort or village hex
defending across a river bridge or ford
infantry (only) in a chateaux hex gets 1 left shift and may also ignore R results unless it is Disordered (whether from the current combat or previously).
Note that woods have no effect on melee other than via lower stacking and cavalry SP not being doubled. Minor streams and fords have no effect on fire or melee, while melee across rivers is only allowed at a bridge or ford and suffers 1 shift left.
Also notice if defenders in obstructed terrain max out the hex stacking limit and also benefit from defender shifts, attackers will not be able to reach the 100% column against them unless they are flanked or disordered.
Morale and disorder rules
In games that do not have explicit morale ratings for each unit (e.g. Chadwick regimental games or older games in the NLB system), veteran units have a base initiative / morale of 3. Guards dot units (both infantry and cavalry, but not all heavy cavalry) have 4 morale, and minor allies, militia, landwehr, inexperience armies, Russian cossacks have 2 morale. If a formation or army is demoralized (see next section), all its units suffer an additional -1 to their morale. Mixed stack hexes normally use the lowest morale in the hex, except melee defenders may use the highest.
In New England Simulations games that use a full 6 point morale scale, subtract 1 from the unit melee ratings for all purposes. So Old Guard infantry in the Battle of Dresden 1813 game, for example, are considered 5 morale, while the Young Guard units are 4s.
In the division level game Jena!, subtract 1 from all Prussia unit morale values but use French morale values unchanged.
In all combats, roll an third colored die (green or blue) along with the regular “to hit” dice. Use this die result for any morale checks caused by the combat to either side.
At the end of each activation, any activated disordered unit rolls 1D6 to rally from disorder, provided it was not disordered during the present activation. Any roll equal to or less than its present morale succeeds and the disorder is removed. If the roll is higher than the units present morale they remain disordered; there is no further effect. Commanders provide a negative DRM on these rally checks of -2 for command ratings 2 or higher ,-1 for command rating 1, while Officers provide -1 DRM. Rally from disorder is the only action allowed on a failed activation.
Formation demoralization
Each corps level formation has an SP loss limit before it loses effectiveness for excessive losses. In addition, players normally earn victory points for formations driven past their loss limits. A formation is demoralized if it has lost total SPs greater than or equal to its demoralization loss limit, counting all fully eliminated units and all step losses of units still in play. This is only checked in the Victory Phase at the end of the full game turn and does not take effect (other than victory determination) until the following turn.
Units in a demoralized formation suffer -1 to their morale for all purposes. Once a formation is demoralized there is no way for it to recover from that state.
Game and scenario specific rules
Napoleon’s Last Battles
Commanders
Only corps commanders are used – this means many of the Anglo Allied division commanders are not part of the game. Divisions are normally activated either with their corps.
All allied corps commanders have a command rating equal to the leader rating on their counter. All Prussian corps commanders have a command rating of 1. All French infantry corps commanders have a command rating of 2 and all French cavalry corps commanders have a command rating of 1.
Wing and army commanders may lend their full command rating to 1 corps leader per game turn as an addition to that corps commander’s rating. Only one higher commander may give command points to the same subordinate (e.g. Ney or Napoleon at Waterloo, but not both to the same corps on the same turn).
Hanoverians and King’s German Legion units are considered part of the British army for all activation purposes. The Dutch and Nassauers are similarly part of the same army. All others have the usual cross nationality restrictions on unit activations, but may be activated together by their corps leaders normally.
Terrain effects
The road movement rate of 1/2 MP per hex cannot be used in any impulse in which the unit moving enters or leaves an enemy ZOC. Infantry and cavalry units may not stack on road hexes in any turn in which any the involved units use the road or trail movement rates. 1 artillery unit (either kind) may stack in the same hex with infantry, and 1 horse artillery may stack in the same hex with cavalry while using road or trail movement.
Quatre Bras
Gemincourt (1711) is not village terrain, it is fort terrain, meaning +1 defense factor but not an obstructed hex. It does not block LOS for artillery fire.
Kellerman may command any cavalry units on the French side in this fight, including Pire. Pire can also be commanded by Reille as part of his corps. He may only be activated once per turn however.
Historical option – there is some dispute over how much of Kellerman’s force was actually present for this battle, but it appears to be overwhelmingly likely he did not have his full force. Neither the Carabinier half of Hurbal’s division nor the Dragoon half of Hertier’s division seem to have been present. As such, I recommend removing one of the two starting heavy cavalry units of Kellerman’s force, leaving him just 1 such unit and his horse artillery. The proper historical strength is probably to keep the 4-6 and remove the 5-6 heavy cavalry unit.
In addition, the Guards light cavalry while present was not meant to be used. It may not move adjacent to an Allied unit on its own activation until the 6 PM turn.
The Allies have only 1 corps present but he is assisted by Wellington.
The French will normally give Ney’s command point to Reille, while Kellerman will normally have to roll for Initiative activation (perhaps assisted by a written order for the following turn).
Additional force activations including all arriving Allied reinforcements will need to be activated by a unit move. The Allied turn 1 reinforcements must be entered as 2 unit activations, Picton’s division first and the Brunswick contingent second.
The Allies have +3 on all initiative rolls starting with the first turn due to Wellington’s command rating advantage over Ney (4 vs 1). Note that Merlen is out of command distance from Orange and will have to be activated by a unit activation, normally later in the turn. The Dutch Belgians are quite vulnerable in their starting positions, so if the Allies win initiative they will usually use it to pull them back somewhat.
Demoralization levels are 25 from the start for both sides and these are for the whole army on each side. Demoralizing the enemy army is worth 10 extra victory points, and pushing the enemy army to disintegration is automatic victory for the side that does so, defeat for the first side that hits its disintegration level.
Napoleon At Leipzig (older OSG rather than LNB versions)
French Old Guard and Guards Cavalry units are morale 4. All other French and Polish units are morale 3. Italians and German allies are morale 2. Russians and the 3 units of the Prussian Guards are morale 3. All other Prussians, all Austrians and all Swedes are morale 2. All speed 6 cavalry in all armies are considered Heavy Cavalry and get 1 column shift in melee combat against Light Cavalry (speed 7), only. French Old Guard infantry (only) are considered “dot” units earning 1 column shift right on their melee attacks. Cavalry units with initial strength above 6 (e.g. one French Guard heavy cavalry division) may use their full strength for melee but may not stack with any other unit.
Various Prussian units from II Corps begin attached to other formations in Barclay de Tolley’s force southeast of the city. These may be activated by the Russian and Austrian corps leaders they start with. A unit activation may activate units from different corps only if they begin stacked together. The Prussian Guard units are considered part of the Guard and Reserve Corps (mostly Russian). All French minors may be activated along with French units of their corps even in unit activations.
On the night turns, units may not move adjacent to any enemy unit and no combat of any kind is allowed.
Allies automatically have the initiative on turn 1 in all scenarios.
Leipzig Terrain Effects
Melee attacks across major river bridges use obstructed terrain stacking limits for the attackers but not for the defenders. Attackers also suffer 1 shift left on the melee table trying to cross a bridge.
Village and town terrain is obstructed terrain with a 1 column shift for artillery fire combat (only) against those hexes. They also give 1 column left against cavalry melee, but no melee effect vs infantry melee.
Chateau / fortified terrain is obstructed terrain with 1 column shift for both fire and melee against them; this can be cumulative with bridges.
Swamp terrain is (1) obstructed, (2) impassible to artillery and cavalry except along a road or trail, and (3) artillery fire into it suffers 1 column left.
Forests are just obstructed terrain.
Melee across a stream suffers 1 column left but is not obstructed terrain, with or without a bridge.
Melee and fire attacks up slope suffer 1 column left; down slope is not affected.
Turn End
Use the rule that any Pass ends the Action Sequence on a roll of 6, and use all morale and disorder optional rules. Various restrictions are in effect on French forces on the 14th, and no combat is possible at night or all day on the 15th. See this BGG thread for 14th scenario start details –
For the main 16th start scenario, make the following leader adjustments –
Schwarzenberg starts in hex 2513 (head of his column but with combat units, instead of ahead of it all alone). Napoleon is not on the map, but instead appears at the start of turn 2 stacked with Murat wherever Murat is then (he didn’t arrive on the field until 9 AM).
Leipzig formation demoralization levels
Use the following demoralization levels for formations in the 16 start main scenario.
Army of Bohemia – 110 total
Klenau 12, Wittgenstein 16, Kleist 12, Meervelt 6, Homberg 15, Konstantine 35, Liechtenstein 6, Gyulai 8.
Army of Silesia – 55 total
Yorck 18, Langeron 17, Sacken 10, Priest 10
Grand Army – 220 total
II Victor 19, III Souham 22, IV Bertran 10, V Lauriston 16, VI Marmont 23, VIII Poniatowski 14, IX Augerau 11, XI MacDonald 18, Line of Operations 7
Old Guard 19, Guard Cavalry 11, 1st Young Guard 13, 2nd Young Guard 12
1st Cavalry Corps 10, 2nd Cavalry Corps 6, 4th Cavalry Corps 4, 5th Cavalry Corps 5
Napoleon’s Art of War variant
These games don’t have leaders but can be played using the system with minimal changes as explained below, or leaders can be created for them using blank counters.
For Eylau, the French get Soult as a “1” leader commanding Lev and Leg divisions, Augereau as a special “0” leader commanding Des and Hev divisions, Murat as a “1” leader for the Cav reserve, Davout arriving B4 as a “2” leader commanding Mor, Fri, and Gud divisions, and Ney arriving A9 as a “1” leader commanding Mar and Gar divisions. They also get Napoleon as a “2 (2)” leader who can either lend 2 command points to any leader under him or act as the direct corps leader for the Grd and Sth divisions. Augereau only has command points if Napoleon lends him some (he was so sick he could barely ride on the day of the battle).
The Russians get 4 corps commanders each rated “1” – Tut, Sac, Ost and Doc, the first 3 commanding their right, center, and left pairs of division with Doc commanding the reserve in second line, plus Bennigsen as a “(1)” leader with a single command point to lend to any of the others. When the Prussians arrive they come with Lestoc as a “1” corps leader who can command the Prussians only.
If you want the “no leaders” variant, it is just that all units sharing the same name label are from the same formation, and can activate together as long as each unit is within 2 hexes of another sharing that name. At Eylau for example the 5 French cavalry units labeled “Mur” are Murat’s reserve cavalry and can activate as one group. The 2 infantry, 1 artillery, and 2 cavalry Russian units labled “Ost” are Osterman-Tolstoi’s division and can likewise activate as one group.
All other rules of the system are unchanged.
30 Years War Quad variant
This system can also be extended to cover the older military system of the 30 years war, as covered in the old SPI 30 Years War Quad game and its later Decision Games reprints. The following changes are needed to do this.
The artillery units are single counters without SP tracking. They get 3 firepower at range 1-3, 2 firepower at range 4-6. Increase the melee rating of a hex containing an artillery counter by 1 if melee’d from the front, only. Instead of making them completely immobile, allow them to be moved 1 hex and refaced if they are activated and don’t fire.
For melee purposes, all infantry are worth 1 per SP up to strength 6, 1/2 thereafter, to the stacking maximum of 18 SPs (would give 12 melee strength). Cavalry are worth 2 per SP up to the stacking maximum of 6 SP or the full strength of cavalry units with larger starting strength (8 occurs in some battles). Cavalry can decline melee if attacked by infantry, retreating 2 hexes and ceding the hex. If it stands, its strength is calculated as above. Ignore game specific rules about auto disorder of cavalry after charge (not appropriate on this time scale).
The normal cavalry stacking limit is 6 but cavalry units with 7 or 8 initial strength can still use all of it. Infantry stacking limit is 18.
Use the “morale system” variant above, meaning roll 2D6 for artillery fire attacks with disorder on 4-6 on the red morale die, 3-6 if reduced to 1/2 SP or less. Some scenarios might deserve other morale ratings e.g. Protestants might realistically be “3” morale at White Mountain, Spanish infantry might realistically be “4” morale in some fights. Any unit forced to retreat in melee is also automatically disordered. Disordered units suffer 1 column shift against them in melee.
Leaders can rally disordered units they are stacked with, needing 1-4 for a 1 rated leader, with -1DRM for each rating beyond 1 for higher rated leaders.
Because they have few leaders, the 30 Years War quad games require the possibility of “unit activations” using the morale rating of a “lead unit” in place of an officer. Unit activations can activate up to 4 units sharing the same name designation provided all are within 2 hexes of the lead unit and each is adjacent to at least one other unit being activated. If they don’t all share a name designation, 3 units within 2 hexes of the lead unit is the maximum unit activation. Note this slight modification allows infantry “tericos” to activate together; these are frequently 4 infantry units fighting in 2 ranks in these games.
Leader units also act as activation officers, with initiative rating equal to 2x their printed command rating. That is, a 1-8 leader acts as a “2” officer, a 2-8 leader acts as a “4” officer, and a 3-8 leader acts like a Commander with 1 formation auto-activated. Leaders also provide a -1 DRM on morale checks for disorder recovery in the hex where they are stacked.
For leader loss, whenever an artillery fire combat attack rolls 12 (6-6 aka both dice 6), the highest ranking leader in the target hex is a casualty. In melee combat, red 6 causes defender leader loss if the defenders have to retreat and red 1 causes attacker leader loss if the attackers are forced to retreat.
30 Years War Quad terrain effects
All the movement effects of the original games can be used, except prohibited terrain for cavalry. No terrain is prohibited to them, they just have the lower effective stacking of “obstructed terrain” described in the system above for things like woods or towns. For entrenchments, allow them to enter and fight in them normally but with defender benefits as described below.
Fire combat through a slope hexside from a slope hex gives the side on the hill 1 shift left on all shots against them. Fire downward is unaffected. Fire combat into any entrenchment or fortification hex or across a fort hexside similarly gives 1 shift left, and this may be cumulative with the previous.
Melee combat upslope, into an entrenchment or fort, or across a fort hexside gives 1 shift left on the melee table. Slope and either entrenchment or fort combine for 2 shifts.
Star palace in the White Mountain scenario is a fort hex that is also considered obstructed terrain for stacking and melee purposes, meaning its stacking limit becomes 9 SP, and likewise only that number can attack it in melee. Infantry SP beyond that are ignored.
