
Basic design
Rampant Battles of History is a redesign of the Great Battles of History and Simple Great Battles of History series of games from GMT to fix all their issues with activation system confusion and cleanness of the design, along with a significantly revamped combat system inspired by the Lion Rampant miniatures combat rules. The way combat works in practice in Lion Rampant has been translated into a D10 combat results table system and integrated into the Great Battles series. The mix provides what I think is a much more playable and believable game.
Copies of any of the Great Battles of History games are needed to play the system; Lion Rampant rules are not needed or used, nor is any familiarity with that system required to play.
Die rolls
All die rolls use D10 with the “0” face counting as “10” not 0. Normally 2D10 will be rolled simultaneously, with 1 determining combat results and the other any resulting morale check (MC). The rules assume use of a white die for “to hit” results and red for MCs.
Rampant Battles sequence of play
The game is played in turns, which give each force present a chance to activate, which are divided into activation impulses which normally alternate between the two players. There are a few beginning and ending phases in each turn around its core, the Action Sequence, in which players will alternate activation of leaders and formations to move and fight.
Ready Phase – All units on both sides refresh and become able to act again
Initiative Phase – Roll 2D10 with one color assigned to each player, and add the Initiative Rating of the present Overall Commander on each side. The higher total has the Initiative for this game turn. Ties leave Initiative with the side who had it last turn.
Reinforcement Phase – Initiative player first, each player brings any newly arriving forces onto the map in their entry areas, ready to act.
Action Sequence
Activation Impulses – The Initiative player declares his first Activation for the turn. Players then normally alternate activations unless the currently acting player Trumps to perform 2 activations in a row (never more than two in a row). After the first Activation, either player may Pass without performing any activation. When both players pass in succession, the Action Sequence ends.
Army Demoralization and Regroup Phase – Both sides check whether they have reached army demoralization limits. Units routed this turn are moved to their Regroup box, making them eligible for possible Regroup Actions on the following game turn.
Victory Check Phase – Check for fulfillment of scenario victory conditions, and if not met by either side, proceed to the next game turn.
Early turn end
As a recommended but optional rule, when one player passes they roll 1D10 to see if the turn ends early. In smaller battles, the turn ends on a roll of 8-10, in medium battles 9-10, and in large battles only on a 10. A small battle is one with less than 3 legions on a side or 40 units or less per side. A large battle is any with more than 100 units per side.
Leaders and Leader Ratings
Rampant Battles uses 4 ratings for each leader – their rank, shown on the counters as the number of stars, their command range, the first number on the lower left, their initiative rating, the number to the right of that, and their charisma, the last number on the right for some leaders only. The Line Command rating is not used. Leaders may also have restrictions on units they may activate – only their own nation, only cavalry or infantry for example.
The initial Overall Commander for a battle is given in the scenario rules. If that leader is ever lost, that side picks a new Overall Commander from among his remaining leaders with the highest rank (number of stars). He may not pick a lower ranked commander, but may choose as he likes among those tied in number of stars. A leader with no stars is the lowest rank. The Initiative Rating of the Overall Commander is used to influence side Initiative each game turn.
The initial overall commander may have a number of “Trumps” provided by the scenario (use Simple Great Battles of History amounts for this), which can be used to perform “second activations” instead of turning over the next impulse to the opponent. This is a per scenario limit, and if the overall commander is eliminated, any unused Trumps left at that point are lost. See the activation rules below for when and how Trumps can be used.
A leader’s command range is the distance in hexes to which he can activate combat units. These ranges are determined just as in GBoH – count from leader to unit, cannot pass through enemy units or unoccupied front hexes of enemy units. In unit activations, all activated units must be within 2 hexes of the lead unit, traced the same way.
The number of hexes a leader can activate is his initiative rating plus 1/2 the highest current quality level of a unit he activates, round fractions upward. For instance, a commander with a 3 initiative activating QL 6 units could activate 6 hexes of units (3+6/2). Units activating without a leader (a unit activation, see below) may activate the lead unit’s QL/2 hexes of units together, rounding up, the same as a 0 initiative leader would activate.
A leader’s charisma rating is the distance in hexes to which he can provide a -1 DRM on Rally morale checks, traced the same way as command range. In addition, leaders with a charisma of 3 or higher provide a -2 DRM for Rally morale checks in their own and adjacent (range 1) hexes, instead. A leader may provide his charisma bonus to any number of units in range in the same impulse, but they must be units that he could activate or command (e.g. if a national or cavalry only leader, units of his nation or cavalry units only).
Activation types
When a player declares an activation, he either names an activating leader or that this will be a unit activation, in which case be designates a lead unit. Leaders can declare three types of activations – Attack, March, and Regroup. Unit activations are limited to Attack and March. You may think of Unit activations as using a command range 2, initiative 0 “intrinsic” leader who cannot perform Rally or Regroup, if it helps to remember the Unit activation rules. Each activation type has its own restrictions on what activated units can do in this impulse.
Who activates – In a leader activation, the number of hexes that may activate is the leader’s initiative rating plus 1/2 the highest QL level of any of the units activating, round up. Without a leader, unit activations are limited to 1/2 the highest QL level of the activating units, round up. Note that it is hexes that activate, so if 2 Roman Cohorts are stacked together, activating that hex only counts as 1 against these activation limits. These are maximums; a player may always choose to activate fewer hexes of units. In a leader activation, each of the hexes activated must be within the command radius of the active leader. In a unit activation, all the activated units must be within 2 hexes of the lead unit’s hex. In a normal activation, none of the units activated may be “spent” aka have already acted this turn. This means normally each unit will have one and only one chance to activate each full game turn. Trump activations are the only exception to this – see below.
Attack activation – In an attack activation, as many of the activated units as can do so must move adjacent to enemy units to engage them in melee. (Exception – missile units may instead fire and refrain from melee). At least one of the activated units must do this, or an attack activation may not be declared. Units may move their full movement allowance, and missile equipped units may fire missiles for 1/2 their MA at any point in their move. No activated unit may recover from disorder or disengage if already adjacent to any enemy units. The activating leader must end his move with one of the units he activated this impulse. After all activated units have moved, resolve melee combat in any order the active player desires between each of his activated units with enemy units in their front hexes.
March activation – In a march activation, none of the activated units may move adjacent to any enemy units, but any units already adjacent to enemy units may remain adjacent. All units may move their full MA, and missile equipped units may fire at any point in their move for 1/2 of their MA. Units capable of evasion may attempt to leave enemy front hexes during their movement phase, checking for such evasion normally; they are not required to attempt this. If this was a leader activation, the active leader (only) may attempt one Rally from Disorder for any unit he is stacked with, at any point in his movement, for 1/2 of his MA, and with the benefits of the active leader’s charisma rating. This attempt does not cost the combat unit any of its MA, and may be conducted adjacent to the enemy. No other Rally attempts may be made in a march activation. After all units have moved, any activated units with enemy units in their front hexes melee those enemy units.
Regroup activation – In a regroup activation, none of the activated units may move adjacent to any enemy units. Any units already adjacent to enemy units and capable of evasion must attempt to evade out of contact in their movement phase. After all units have moved, every activated unit not currently adjacent to any enemy units may attempt to Rally from Disorder. They may receive benefits from the charisma rating of the active leader if they are close enough to him. Activated units that are still adjacent to enemies at this point (because they failed evasion or were not eligible to evade) do not get to attempt Rally and must melee those enemies instead. If any enemies survive adjacent to them, they must retreat 2 hexes after those melees to break contact. Those unable to retreat are eliminated. Note that this should leave all living activated units out of contact with the enemy.
Last, after all melee resolution and retreats, the activated leader may attempt to Regroup up to his initiative rating’s worth of units from formations he can command currently in the Regroup box (meaning Routed on a previous turn). Each such attempt is a normal morale check against that unit’s present QL without leader modifiers; if the unit passes, place it with or adjacent to the active leader in a Disordered state, but not adjacent to any enemy units, and complying with all stacking rules. If the unit fails, move it to the permanently eliminated box; it cannot attempt to Regroup again.
Order of events in an activation – each unit activated in the same activation moves one stack at a time (normally only Roman Cohorts stack), resolving missile fire as they move if they pay the MA cost to do so, until all have completed their movement. After all activated units have moved, melee will be resolved between any of those active units with enemy units in their front hexes, with each side rolling for its hits and morale effect on the opponent.
The active player determines the order of these melee fights, and each active unit fights only once, and only if it still has an enemy in front of it. Non-phasing units may fight back against every active unit that attacks them, as many times as they are attacked. After each fight, one side or the other may be forced to retreat, and if so that will be implemented before the next melee fight, even against the same target unit.
Trump activations
Normally, immediately after finishing one of his activations, the active player must turn over activity to his opponent, who will choose his own leader or unit to lead his own next activation. However, a limited number of times in each scenario, a player may declare a Trump Activation to perform two activations in a row. He doesn’t turn over activity to his opponent and tries to act again instead. This requires a die roll less than or equal to the Initiative rating of an activating leader. Trump attempts can only be made by leaders, never as unit activations. If the attempt fails, no Trump is expended but the opponent has the next activation. If it succeeds, the attempting leader must lead the formation activated for the Trump continuation.
A Trump activation is just like any other, but with the following special restrictions and effects. First, no leader or unit that just acted in the immediately previous activation may activate again. But otherwise, even units already marked as having acted this turn may act during a Trump activation. This is the only way that a unit or leader can ever activate twice in the same game turn. Any unit or leader that activates in a Trump activation, even if it hasn’t acted before, is marked as Second Activation and may not act again during this game turn, even in another Trump activation.
Trump activations must be Leader activations; they may not be used to perform Unit activations. If there isn’t an eligible leader, a Trump activation may not be declared. In all other respects, a Trump activation is exactly the same as any other – number of units activated, types of activations, etc.
A Trump activation may never be followed by another Trump activation. The active player must instead hand control over to his opponent to choose his own next activation. You may perform a Trump activation after not performing a normal activation when you had control, if e.g. your units have already acted this turn but you have a Trump remaining. But if so, you must immediately return control to your opponent after your Trump activation.
If control has been passed to you and you do not wish to perform any activation at that time, or you cannot do so, you can pass to your opponent who may then choose his own next activation normally. Regardless of how many times you may have previously passed, you can always act again when it is your turn in the alternating action sequence. If both players pass to each other in succession without acting, however, then the whole Action Sequence ends, and after the end of turn administrative phases, a new turn will begin.
Rampant battles movement basics
Units normally move by paying 1 MP to enter any of their front hexes, and 1 MP to change their facing by 1 hex spine. All infantry units can instead “about face” for 1 MP to completely reverse their facing; 2/3rd face change would still cost them 2 MPs. Cavalry units always pay 1 MP per hex spine turned. Two hex infantry units may about face, but otherwise change facing only by “wheeling”, meaning one of their two hexes remains where it is and the other moves into their center front hex (only). Wheeling costs 2 MPs for the two hex infantry units that can perform it.
Units may move in other directions without change of facing as a “flank march”, but only once in a given activation regardless of movement allowance, and at a cost of +1 MP for the hex moved. Units may not wheel or flank march into any front hex of a new enemy unit, and may not move out of an enemy front hex without first conducting “withdrawal” (see below for withdraw eligibility and procedure). (Note this actually represents various evolutions by rank within the formation, hence the higher movement cost and the restriction).
Types of terrain other than clear often cost most or all unit types more than 1 MP, with 2 MPs the most frequent other cost. Ignore TEC references to cohesion hits for moving, required or optional; these are never used in Rampant Battles. Two hex units pay the higher cost of the two hexes they enter if those costs are different from each other. Hexside costs may be additional and work the same way with two hex units – pay the higher cost. Otherwise legal moves can always be made for a single hex in the entire activation even if the full MP cost could not be paid, but this never allows illegal moves, moves out of enemy front hexes without withdrawal, wheeling or flank march into contact, etc.
Crossing some obstacles requires a morale check with disorder for failure in addition to the movement point cost, and these checks have modifiers of +2 if into an enemy front hex, -2 if not within missile range of any missile capable enemies. Disordered units do not check, there is never any further consequence for crossing such barriers beyond disorder. See module special rules for Alesia “Gardens of Death”, however – those can cause 1 permanent SP loss on their own failed task checks.
Missile combat
Missile combat is a one sided form of combat conducted during movement by the active player’s missile eligible units. It costs 1/2 of a unit’s MA to conduct missile fire, and this may be done at any point in the unit’s move, but only once per activation impulse. The firing unit must be in range with an unobstructed line of sight to the target unit at the moment in fires. The shot is a normal attack without reply, even if the target is a missile capable unit. The Combat Effectiveness Value (CEV) of missile attacks is given below and depends only on the type of firing missile unit, target unit type, and applicable modifiers. It does not depend on the range, though of course the target must be within the missile unit’s maximum range. If the firing unit is also Disordered, they suffer an additional -1 CEV. Terrain may also reduce missile fire effectiveness.
Missile units may suffer “missile low” results when they conduct a missile attack. All bow type units become “missile low” if their white “to hit” die on their attack is a 9-10, slings on a 10. Most javelin type units – light infantry, peltasts, javelin armed cavalry – become “missile low” if their white “to hit” die on their attack is 6-10. Javelin armed Cohort infantry are an exception – they immediately become “missile out” on the same roll of 6-10. (Historically they had only 1 heavy pilum per man, vs multiple lighter javelins for the dedicated javelin missile unit types). Engine type missile units never suffer “missile low” results. A missile unit may still fire once “missile low”. If it suffers such a result again it becomes “missile out” and may no longer conduct missile attacks. In addition, javelin equipped units automatically become “missile out” after their first melee combat.
Missile combat is normally only allowed at range 2 or greater. Combat at range 1 is melee and the target can fight back. If you want a missile equipped unit to fire without melee dangers and reply, you first need to successfully disengage from the enemy if you are in his front hexes, and must move off to range 2 or greater in any case.
Exception – units inside fortifications or on ramparts adjacent to enemy units outside those fortifications are not “locked in melee” with them and may conduct missile fire against them at range 1. This is not symmetric – the units in the fortifications do not need to melee front adjacent enemies, may move off without the withdrawal procedure, etc, while units outside must melee front adjacent units inside a fortification, fight them only with melee not missiles (from range 1 that is), must withdrawal to move off, etc.
Missile CEVs
Engines (E) – range 6, no missile low results
4 CEV vs RC, LN, BC, GC, LC, BI, MI, LP, LI, SK
3 CEV vs EL, CH, HC, PH, HI, LG, CO
Archer (A, B) – range 4 (5 for C composite bows), missile low on white die 9-10
4 CEV vs LC, LP, LI, SK
3 CEV vs RC, LN, GC, BC, BI, MI
2 CEV vs EL, CH, HC, PH, HI, LG, CO
Javelin (J) – range 2, missile low on white die 6-10, missile out on melee
4 CEV vs LC, LI, LP, SK
3 CEV vs RC, LN, GC, BC, BI, MI
2 CEV vs EL, CH, HC, PH, HI, LG, CO
Slinger (S) – range 3, missile low on white die 10
3 CEV vs LC, LP, LI, SK
2 CEV vs EL, CH, HC, PH, HI, LG, CO, RC, LN, GC, BC, BI, MI
Missile modifiers of terrain and status –
-1 CEV if the firing missile unit is Disordered
-1 CEV for target in soft cover or up steep slope
-2 CEV for target behind wall or fortification
Reaction change of facing
An inactive one hex unit or stack that does not presently have any enemy units in any of its front hexes may rotate one hex spine when an active enemy unit moves adjacent to it. This is normally done to present front facing to a new opponent. Note that two hex units may not “wheel” to do so, nor may units that already have “fixing” enemies in front of them – including any that may have moved adjacent earlier in this impulse – do so. This option only exists for the smaller formations and when the first enemy unit moves adjacent.
Evasion
Evasion is the attempt to get away from enemy units trying to engage you in melee. Evasion comes to two varieties depending on when it is attempted, which share many mechanics but differ in some of their details as to who is eligible, timing, and the like.
Evasion by an inactive unit during an enemy activation is “retreat before melee”. Evasion by an activated unit that is already in the front hex of an enemy unit is “withdrawal”.
Retreat before melee occurs after all active units have completed their movement for this activation, during the melee implementation portion of that activation. As each melee is declared, the inactive player may attempt to evade with eligible units. Successful evasion will prevent execution of that melee and allow the active attacker to advance into the evading unit’s former hex in some cases. This is completed before moving on to the next declared melee, which may in turn trigger another evasion attempt.
Withdrawal occurs during the active player’s movement phase, as he moves his activated units one by one. A unit must be among those named for activation in order to attempt withdrawal, and withdrawal may not be attempted during an Attack activation. The unit must begin its move with the withdrawal attempt, and if that attempt fails the unit will not be able to move on this activation. Units that fail to withdraw, as activated and being in an enemy unit’s front hex, will trigger melee in the melee execution portion of that activation, after all other activated units have finished their movement.
Who may Retreat before melee
For an inactive unit to attempt evasion various requirements must be met. The evading unit may not already be in melee at the start of that enemy activation – only “new melees” can be evaded. Elephants and siege engines can never evade. Chariots and cavalry may always attempt to evade infantry melee as long as their MA is at least as high as the unit they are evading. Bow armed cavalry (not chariots) may attempt to evade other cavalry as long as their MA is at least as high as the unit they are evading. Bow and sling armed infantry, and javelin armed infantry that is not “missile out”, may attempt to evade enemy infantry melee as long as their MA is at least as high as the unit they are evading. Other units cannot attempt to evade melee – meaning, “melee cavalry” (including Javelin armed) does not evade other melee cavalry, and “melee infantry” doesn’t evade other melee infantry. Roman Cohort infantry (CO and LG types) never evades melee even if still equipped with javelins.
Who may withdraw
For an active unit to attempt withdrawal similar requirements must be met. The unit must be activated in a March or Regroup activation. To withdraw, the evading unit must have a strictly higher MA than that of the highest MA of any unit it is in a front hex of – note that this is a stricter requirement that Retreat before melee (for which units started separated). Elephants and siege engines can never evade. Melee cavalry (including Chariots and Javelin equipped cavalry) can withdraw from other cavalry only in a Regroup activation. Melee infantry (including Missile Out javelin equipped infantry and Roman Cohort infantry) can withdraw only in a Regroup activation.
Evasion mechanics and execution
The evading unit conducts a normal morale check, with a DRM equal to the highest enemy unit’s MA minus its own MA. So an MA 8 light cavalry unit would earn a -2 DRM evading an enemy light infantry unit with an MA of 6, for example. If the adjusted roll passes, then the evasion is successful. If it fails, the evasion attempt is unsuccessful. If the adjusted roll fails by 4 or more, then the attempting unit is Disordered and fails. If it was already Disordered, it Routs instead and is removed from the map to the Routed units box.
Successful evasion by an active unit in the movement phase simply allows the evading unit to leave the enemy unit’s front hex and to move normally, subject to the restrictions of its activation type. Successful evasion by an inactive unit before melee means the non-active unit immediately retreats 2 hexes maintaining facing, and the active unit must advance into its former hex if possible (it could be impossible for a two hex unit).
Unsuccessful evasion by an active unit simple means it doesn’t get to move, and will have fight its opponent in the melee portion of this activation. Similarly, unsuccessful evasion by an inactive unit just means it fights normally in the melee portion of its opponent’s activation (perhaps Disordered, if it failed by a lot).
Melee combat
Melee occurs whenever an activated unit has enemy units in its front hexes after moving. Melee is never triggered at any other time, and only activation of one of the fighting sides can cause another round of it to occur. All units get to fight back whenever attacked in melee, even if attacked from the sides or rear and even if attacked multiple times in the same impulse. Every melee fight is always between two units; multiple units fight the same enemy as fights in succession, not as one combined fight.
The clash of swords matrix gives combat effectiveness values (CEVs) for each unit type attacking each other unit type. These list two values, a higher left hand value for full effectiveness situations and a lower, right hand value for less effective situations. The full effectiveness value is used only for frontal melee by a good order attacking unit of at least 4 Strength Points (SPs) attacking into and out of clear terrain. Any unit with 3 SPs or less, any Disordered unit, any unit fighting back through its flank or rear, into or out of an obstructed terrain hex, or any unit using missile weapons instead of melee fights using the lower, less effective right hand value. If the unit is Disordered and at least one of those other limiting conditions applies, then the unit’s attack also suffers a further -1 DRM. The other conditions are not cumulative; only Disorder.
Note that attacks across a river, wall or fortification hexside, up a steep slope, or into or out of woods or town terrain, are not clear to clear melee and therefore use the less effective right hand CEV values. The only exception is units manning a rampart or fortification wall from inside while non-active, being attacked by active units attempting to melee into their fortification. These may fight with full melee effectiveness if otherwise qualifed by SP strength, good order, etc. A unit trying to melee out of such fortifications in its own activation (to sortie, in effect) would face reduced effectiveness.
Both sides roll for their attacks on the opponent in the melee, and this is considered simultaneous between those two fighting units. Note that the term “attacks” here applies also to the non-active player’s units “fighting back”, it is not limited to the active player’s units.
The CEV gives the row of the final combat results table that unit’s attack is rolled on. Always roll 2D10, one white as the “to hit” roll on that combat table, and the other red as the “morale check” roll in case any hits are inflicted. Hits on the combat table are permanent reductions in SP strength, marked with a counter beneath the effected unit and reducing its SP strength thereafter.
CEV modifiers
There are various modifiers to the CEV off the clash of swords table, for terrain but also for flanking and cavalry charge. These are modifications to the CEV value itself, effectively shifts up or down the final combat results table.
CEVs in excess of 9 roll on the “9” row with a +DRM equal to the excess over 9 due to shifts. CEVs of 0 or less are automatic misses, the dice do not need to be rolled.
Note that the cavalry charge modifier is earned only by an active unit advancing into contact for the first time, and may not be earned in any attack on any good order PH or HI equipped unit from its front hexes. Cavalry charge can be earned against those unit types if they are Disordered or the charge hits their flank or rear hexes.
Effects of hits – All hits are cumulative and when a unit has suffered hits equal to its SP strength it is eliminated. In addition, any unit reduced to 50% or less of its starting SPs remaining suffers -1 to its QL. Units with hits on them but above 50% of their printed full strength have their full printed QL.
Morale checks – Whenever a unit takes hits as a result of the combat table (missile or melee), the red die is consulted to see if they withstood the losses without Disorder or Rout. If the red die is less than or equal to their QL (after the losses), then they pass and are unaffected. If the red die is 1-3 points higher than their QL, they fail and are Disordered. If they red die is 4 or more points higher than their QL, they are Routed and removed from the map, and placed in the Routed box for their side, retaining their losses counter. In addition, if a unit is already Disordered when it checks morale due to combat losses, then failing by even 1 results in Rout.
Leader loss – Last, if there are any leaders stacked with the target unit and the red die is a “10”, then the highest ranked leader there is a casualty and is removed. If two leaders of the same rank are present, then the player inflicting the loss may choose which to remove.
After both sides have applied the results of their morale checks, if the active player’s unit is Disordered, it must retreat one hex. If the active player’s unit is in good order and the non-active player’s unit is Disordered, the non-active player’s unit must retreat 2 hexes, and then active player’s unit must advance into the hex melee’d if possible. (It might not be if there are two hex units involved). The active player unit must also advance if the defenders routed away or were eliminated by loss of all of their SPs. If both player’s units are in good order, then neither retreats and they remain in contact.
Proceed to the next melee to resolve for units activated this impulse, in any order the active player chooses. Once all are done, move on to the next activation.
Note that the resolution of missile combat is done in exactly the same way with exactly the same effects of the red die for morale checks and leader loss, but units suffering missile fire are never forced to retreat by it and the firing units never advance. Missile fire is also one sided, only the target suffers the attack. The only effect it may have on the firing unit is a “missile low” result.
New Clash of Swords and Spears Matrix
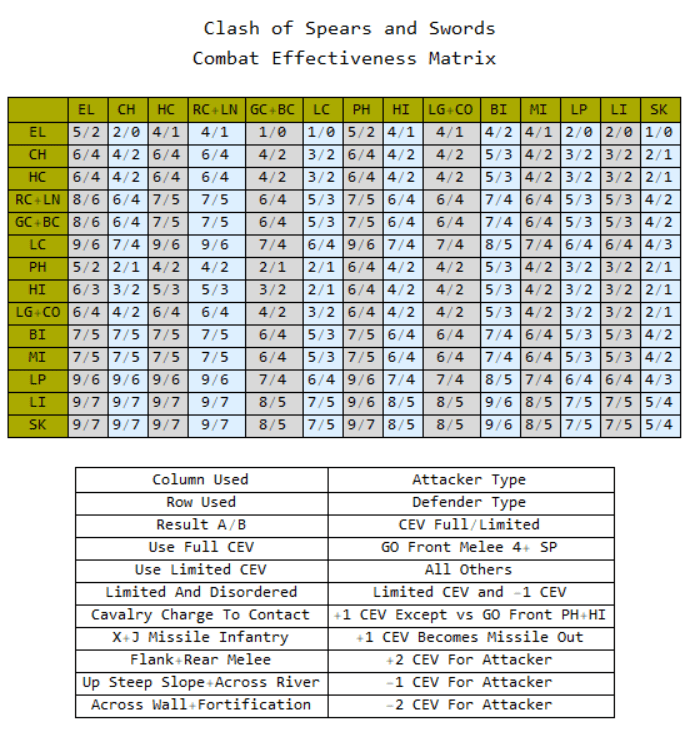
Example 1 – a 4 SP, QL 7 Macedonian HC unit charges an originally 8 SP, 6 QL Greek HI unit from the front. The Greek HI has already taken 2 hits and is Disordered, while the HC is fresh. The Clash matrix gives 5/3 for the HC attack, and since they are good order and have 4+ SPs, they can use the higher 5 value. They also earn +1 for Charge, which the HI cannot negate because they are Disordered. The Macedonian final CEV is 6. The Greek HI Clash matrix gives 4/2. Since the HI are Disordered they must use the Limited CEV value, 2. Since they have no other conditions (3 or fewer SPs, flanked e.g.) that is their final CEV. If the HI were not Disordered, they would be able to use their full 4 CEV and the HC would not earn Charge, so their final CEV would be 5.
Example 2 – a 5 SP, QL 6 Gaul BI unit attacks a Roman CO stack with QL 6, 6 SP from the front. The Romans still have their Javelins. Both sides can use their full CEV since it is a good order frontal melee and the both have 4+ SPs. The Clash matrix gives 5/3 for BI vs CO so the Gauls have a final CEV of 5. The Clash matrix gives 6/4 for CO vs BI and the Romans earn +1 for using up their Javelins, so their final CEV for this fight is 7.
After determining the final Combat Effectiveness Value for any melee or missile attack, resolve that attack for hits and morale check on the new final CRT, rolling 2D10. The white die determines hits, and the red die resolves the morale check that results if any hits were scored.
New final CRT

Example 1 – The Macedonian HC from the first example above rolls (5, 9) on white and red dice. This does 2 hits on the “6” CEV row, reducing the HI unit to 4 SP remaining. Since it is now 1/2 SP strength or less, its QL is reduced by 1, to 5. The MC check exceed their new lower morale by 4, so they would Rout even if they weren’t already Disordered, but since they already are, any MC failure would Rout them. The 4 SP HI unit is moved to the Routed box for possible Regroup on a later turn. The HI reply rolls (3,9). Since the “3” roll is too low to inflict any hits on the “2” CEV row, the HC are unharmed. They advance into one of the defender’s hexes and remain at full strength and in good order.
Example 2 – The Roman CO stack from the second example above rolls (7,6). White 7 on the 7 CEV row inflicts 3 hits on the Gaul BI unit, reducing them to 2 SP remaining and dropping their QL by 1 for being less than 50% of initial strength. The 6 red die is thus barely sufficient to Disorder the Gauls. The Gauls roll (4,6) for their reply. White 4 on the “5” CEV row inflicts 1 hit on the Romans, who remain at full QL. The “6” red die just passes, so their remain in good order. The Romans are marked with 1 hit and Missile Out and stand their ground. The Gaul BI is marked with 3 hits, Disordered, and must retreat 1 hex because they attacked and ended the melee Disordered. Even if they had also Disordered the Romans, they would have to retreat; only attackers who retain good order can avoid backing away from the melee.
Two hex units
Two hex units have some special aspects. Though normally activations are by hex, it still only costs a single activation hex to activate a two hex unit. They don’t advance after melee unless they can do so into two empty hexes after a defeated opponent retreats or is removed by rout or elimination, without changing their facing. Since their strength is spread into 2 hexes, they have full effectiveness only as long as they have 7+ SP total strength remaining. At 6 SP or less, they have 3 SP in each hex or less, and fight with limited effectiveness.
They fight with full effectiveness through any of their front 3 hexes, except when their opponent is another two hex unit and each only has 1 hex in the other’s front hexes (offset from each other, in other words, instead of 2 out of 3 enemy front hexes occupied). When two two-hex units from enemy forces touch with only 1 hex each, they both melee with reduced effectiveness.
Non-active two hex units can fight every one hex enemy that attacks them, even 3 such in the same impulse, at full effectiveness if 7 SPs or more and in good order. They remain 2 hex units even if reduced to 1 SP, they just fight with reduced effectiveness once below 7 SP happens. Of course they may rout before that, etc.
An activated 2 hex unit with a unit in one of its front hexes can wheel into closer contact or to hit an enemy front the flank provided they aren’t leaving any other enemy unit’s front hex. This is not evasion and doesn’t require a moral check, it only requires that the other hex of the wheeling two hex unit does not contain another enemy unit’s front. They can only wheel into closer contact in this manner in their own movement on their own activation, never as an advance after melee.
Stacked Roman Cohorts in SPQR
There is normally no stacking allowed in Rampant Battles of History, but 3 SP or less strength SPQR Roman Cohort and Legionaire units, or their equivalents in other Latins who fight in the same manner, are an exception. Those can stack 2 and only 2 such units from the same Legion in the same hex. (Note, not in Alesia – those units are already 6 SP each). Allies and Romans don’t stack together; they are considered separate Legions for this purpose. A stack of 2 such units gets special treatment as discussed below, but basically they are treated as a single unit with the SP strength of both combined until they “deploy” into separate hexes. The flexibility to deploy more widely is the primary purpose of this treatment of this specific unit type.
When stacked together, a Roman Cohort or Legionaire stack is treated as a single unit with the combined SP strength of both of its component units both for its initial strength and for its present strength, and all losses recorded on either unit are effectively combined as long as they are stacked. For example, 2 3 SP CO units that has suffered 2 combined hits fight as 4 SP, thus not reduced effectiveness for limited SPs. When they lose a 3rd SP, they will fight with reduced effectiveness and -1 QL. The stack always checks morale together as one unit and has a single state of good order or Disorder. If a Disordered unit moves into the hex of a good order one to form such a stack, the whole stack is marked as Disordered. Activations are by hex, so such stacks only count as a single hex against the activation totals in both leader and unit activations.
Whenever such a stack divides, the losses recorded on the two units must be split as evenly as possible, regardless of when they were incurred and whether the units were stacked when they took the losses. So if a 3 SP unit at full strength and one -2 SPs stack, then separate, 1 SP will “go” with each one as they separate and they will be 2 2 SP units for all purposes.
Consolidation –
2 units of the same troop type with a combined SP strength of 3 or less may end their movement in the same hex and “consolidated”, removing the lower of the 2 QL rated units and leaving the other, with the SP total of the remaining unit raised to the total SP both units had before the consolidation, but never more than 3 SP. If either of the 2 units was Disordered before the consolidation then the remaining unit is Disordered after consolidation. If one of the units was missile out and the other was not, the new unit is missile low (exception – CO/LG become missile out in this case, having only 1 step of missile depletion before reaching missile out). Average the missile depletion state rounding against the remaining unit in all other circumstances. The removed unit is permanently eliminated. This consolidation occurs after all movement but before melee or rally.
Unit strengths in modules without SPs on the counters
Some expansions e.g. Atilla list unit quality ratings, types and movement allowances, but do not list unit strengths in SPs on the counters. In all such cases, use the following default SP strengths by unit category –
Engines, Elephants, and Chariots – 1 SP
Cavalry, skirmishers, and missile infantry – 3 SPs
All other 1 hex infantry – 5 SPs
Two hex infantry units – 8 SPs
Terrain effects
The “gardens” obstacle belts in Caesar at Alesia have the following effects on units entering them. Take a normal morale check, with no effect if the check is passed, 1 permanent hit if the check is failed, and 1 permanent hit plus Disorder if the check is failed by 4 or more. This check is made with a -2 DRM if the unit moving through the Gardens hex is a Roman infantry unit (including allies), or a Gaul unit when there are no Roman units within missile range of the entered hex. If the hex is frontal hex of any Roman unit, there is a +2 DRM instead. In all other situations there is no DRM, including Gauls in Roman missile range and Roman cavalry units.
All units crossing a wall or fortification hexside spend +2 MPs and must make and ordinary morale check. If they fail they are Disordered. They receive a +2 DRM if the hex on the other side of the wall or fortification is an enemy unit’s front hex. They receive a -2 DRM if they are crossing from inside the fortification or into a hex not within range of any enemy missile unit. Units using gates do not need to pay extra MPs and do not need to roll for disorder unless the hex on the other side of the gate is in an enemy front hexside, then they must roll for disorder as above.
PH, HI, CO and LG crossing a river hexside must spend +2 MPs and also make the same check with the same consequences, with the same +2 DRM if the first hex on the far side of the river is an enemy front hex. Other infantry and cavalry just pays +2 MPs but does not need to check. All infantry climbing a steep slope hexside pay the same costs and have the same check, while cavalry is cannot cross such hexsides at all.
Minor rivers, up one level slopes, and broken or rocky hexes for all cavalry and PH, HI, CO, and LG heavy infantry cost +1 MP with no morale check required. Other infantry does not even pay the extra MP for broken or rocky. Woods cost all units 2 MPs per hex and any unit fighting into or out of woods is in obstructed terrain and therefore fights with reduced effectiveness.
Army morale and victory
Scenarios list army rout limits, which are totals in SPs that will cause army demoralization once hit. Every SP lost via step loss terms counts against these rout limits, and every unit that routs counts its full remaining SP. Exception – light infantry and skirmishers (LI, SK, LP types) count only 1/2 their SPs for these purposes, total across such units and round fractions down. Each lost leader also counts as 1 SP plus his rank (number of stars) and his charisma rating (0 if he doesn’t have one).
If an army is beyond its demoralization limit at the start of any turn’s army morale and regroup phase, then it is permanently demoralized for the rest of the game. All QL ratings in demoralized army are reduced by 1, and in addition that side may no longer perform Regroup activations.
Move all routed and regroup units to permanently eliminated, and all future routed units go immediately to permanently eliminated. Rally from Disorder is only possible one unit at a time during leader March activations once this has occurred. Many scenarios will end at this point with defeat by the demoralized army, but the battle can continue with the above effects if the scenario rules call for it or the players wish to see what would happen from that point.
Roman special rules
There are a number of special rules needed to cover various aspects of the Roman army for the modules SPQR, Caesar’s Conquest of Gaul, Siege of Alesia and similar. This section collects.
Javelin Cohorts – All Roman infantry with J symbols are javelin equipped, but this does not make Roman cohort infantry “missile infantry” for disengagement and withdrawal purposes. They may use javelins normally but they go “missile out” on their first “missile low” result (6-10 white “to hit” die), not their second. They receive a +1 CEV bonus in melee if they still have their javelins, but automatically go “missile out” as a result.
Eagles – Each Roman legion has an Eagle counter (Aquilae) which represents the legion’s standard, which must always be with one of its infantry units. The Eagle allows unit activations in which the unit to mimic leader activations when the unit stacked with the Eagle is the lead unit for that activation. This means that a Regroup activation may be performed, or 1 Rally attempt made during a March activation, which would normally require a leader. The Eagle may be moved among the units activated with its carrying unit and acts like the “leader” for that activation.
If the unit carrying the Eagle loses its last SP or routs while defending in a melee combat and the enemy unit survives that melee and advances into the destroyed Roman unit’s hex, then the Eagle is considered captured. When a legion loses its Eagle, all units of that legion suffer -1 QL for the remainder of that battle (or assault period in the case of Siege at Alesia). The Eagle is not replaced within the battle or assault period.
Cohort Stacking – stacking is normally forbidden in the Rampant Battles system, but SPQR Roman cohorts of 3 SP or less are an exception to this normal rule. A maximum of 2 such units of the same unit type from the same legion may stack together in the same hex, and are treated as 1 unit with the combined SP strength of the whole hex as long as they remain stacked together. Note that the larger 5+ SP cohorts of Caesar’s Conquest of Gaul and Alesia never stack, nor many Triari HI units stack with CO or LG units.
Stacked cohorts may separate without any extra cost in any movement phase in which the hex is activated, dividing the hex’s remaining strength as evenly as possible between the two units if they do so. If the total SP strength of the hex is ever reduced to 3 or less, then one of the stacked units is removed and the single remaining unit has the full remaining strength of the hex when this occurs. Any action that would render one of the stacked units Missile Out renders the whole stack Missile Out, and the same applies to Disorder. If the units have different morale levels, it is possible for one to Rout while the other only Disorders; this is the only way the stack may be “split up” by combat results. They still check morale with a single roll, that roll might just have different effects if the stacked cohort QL levels differ.
Alesia module special rules
Now working on all the changes needed to play the Alesia mini-monster GBOH module with this system. It does need some changes because that one changed the activation system a bunch, left out SP strengths, some unit types need to be tweaked, and the like.
First unit types. All the archer units on both sides are LI light infantry for melee and defense purposes, with normal (range 4) bows. The LI for both the Numidian auxiliaries and Gaul LI should actually be LP, light peltasts, since they are javelin missile using shield protected lights. In addition, the Numidians should have Movement Allowance 6, not the 5 printed on the counters. Both types of Roman artillery engines are just E engines with range 6 in the new missile system – ignore all the rule cases about them firing twice or their reaction fire etc. Their melee and missile defense are as MI (for their crews).
Then the biggest change is to the Gaul infantry, which as printed is uniform BI. Instead, all the BI units with QL 4 or 5 are MI, and only the QL 6-8 ones are true BI (which is strictly better that MI in the revised system). Roman CO legions are unchanged. Roman GC and LC cavalry are both considered type GC, as are all Gaul cavalry units. All cavalry on both sides – including the 6 Roman LN – are 3 SP per unit.
The Roman auxiliary cavalry with Javelins are still melee cavalry, and as such they can retreat from melee by infantry but not from melee by enemy cavalry. They do not get +1 in melee nor go Missile Out for javelin usage unlike javelin equipped infantry. They may use J missile attack with normal attack values and 6-10 for missile low, then again 6-10 for missile out after they are low.
Next to unit SP strengths and a few QL adjustments, since none are provided in this module (it treats all the units as the same size then gives lower QL levels to small units to give them “fewer hit points”).
All Roman CO units are 5 SP initial strength
All Roman LI (now LP) Numidians are 5 SP initial strength.
All Roman cavalry units are 3 SP initial strength with their printed QL.
All Roman archers are QL 5 and 3 SP strength.
All engines are 1 SP strength MI, and can be hurt by both melee and missiles.
All Gaul BI units (QL 8-6 only) are 5 SP initial strength
All Gaul MI units are QL 5 and SPs equal their printed QL level (5 or 4)
All Gaul LI (now LP) units are QL 5 and SP 4 (equals their printed QL level).
All Gaul cavalry are 3 SP strength with their printed QL and treated as type GC.
All Gaul archers are QL 5 and 3-4 SP strength, depending on the QL listed on the counter. They are LI for melee.
Notice, this means there are no units below QL 5 in the battle and no units above 5 SP. Units with lower QL ratings than that are simply smaller units with SPs below 5 (the infantry “norm”). And all cavalry units are 3 SP meaning they will always fight on the Limited effectiveness right side values on the Clash of Swords and Spears chart.
Javelin missiles – while now range 2, these cannot fire over friendly units; they require a clear line of sight to their target. If an LOS blockage including a friendly unit is on the hex spine if *does* block LOS. Bow and Engine missiles *can* fire over friendly or enemy units to the limits of their range. J missiles may fire at range 1 instead of melee-ing if either side is on a rampart fortification, which makes melee attack voluntary.
Next, Changes to the module specific activation system to accommodate Rampant Battles series rules.
Caesar – 5 trumps on 1-6, full Legion, Char +1 QL stacked and adjacent, trump activations only
Lieutenants – 1 trump each on 1-2, +5 units, 15 range
Legion Prefects – no trumps, +3 units, 8 range
Cavalry Prefects – no trumps, +2 units, 10 range
Comminus – 3 trumps 1-4, +10 units, 8 range
Vercingetorix – 3 trumps 1-5, +8 units, 8 range, Char+1 QL stacked and adjacent
Interior Repl – 2 trumps 1-3, +4 units, 5 range (only in play if Vercingetorix killed)
Exterior leaders – no trumps, +5-7 units, range 7 range
Caesar is used only for Trump activations, 5 successes allowed per assault period. He Trump activates any single Legion, all of its units including its Scorpion artillery, and regardless of range. He moves automatically to stack with any one unit from the legion he activates this way, and provides his Charisma modifier to any unit he stacks with or that is adjacent. He can rally only the unit he stacks with in a March activation, before it moves. He must move with the unit he stacks with and he remains with it until the next time he Trumps, and he is subject to leader loss normally.
Caesar *may* use a Trump activation of a legion as a Regroup activation. Whichever unit of the legion he moves to, move the legion’s Eagle to that hex. Perform the regroup action normally, with all units that are stacked with or adjacent to Caesar getting his charisma benefit on their rally attempts. After all those, Regroup eligible previously Routed cohorts from that legion, only, in the regroup box (not routed this game turn in other words), letting them attempt their regroup rolls normally.
The 2 Roman lieutenant units are ordinary leaders with 15 command radius and 5 initiative (2 higher than listed on the counters). They may command all Roman infantry units, both auxiliaries and CO legionaires, but not cavalry, as normal leader activations. Each may also perform a Trump activation once per assault period. The lieutenants *may* perform Regroup activations of both Auxiliary infantry units (Numidians and archers) and legion CO infantry, but they may not activate Roman (allied) cavalry.
The 10 Roman legion prefects are ordinary leaders with 8 command radius and 3 initiative, restricted to activating CO and Scorpion units of their designated legion. Note that this means at full strength, a prefect will ordinarily not be able to activate his entire legion in one impulse, but only 7/10 of its cohorts or 6/10 of those plus its artillery. The remainder should be able to activate in a single Unit Activation, or may be a reserve “left” for the Lieutenants etc.
Legion prefects may perform Regroup activations. Move the legion’s Eagle to the leader’s hex and perform the regroup activation as it the standard Rampant Battles rules. They can regroup previously routed cohorts just like Caesar above, they just won’t be receiving his charisma bonus on rallies. These must be normal activations – legion prefects can never perform Trump activations.
The 3 Roman cavalry leaders, one named and two unnamed, are ordinary leaders with 10 command radius and 2 initiative, restricted to activating only Roman cavalry units of any kind. Given the high QL of some of the Roman cavalry units these will normally be able to activate 6 cavalry units, vs 3-4 on a Unit activation, as well as a much wider command radius. They may perform cavalry only regroup activations in accordance with the Rampant Battles rules, with no charisma bonus and only cavalry units eligible to be activated or regrouped from previous rout.
That covers all of the Romans. The Gauls have the biggest changes because the Alesia module introduces many new activation systems just for them, in the form of leaders activating whole tribes, some of them over 20 units each, with the better leaders able to activate 3-4 tribes in one activation. That’s actually too much at once for the desired pacing of Rampant Battles, so the revision is to use something much closer to the “series rules” presented above, with less of the Alesia module specific “layer”.
The Gaul tribe markers are still used for all off map maneuvering and the command activation system by chieftain is used to bring Gaul tribes onto the map. Once on the map, they are activated by Leader or Unit activations in accordance with the normal Rampant Battles rules, with the specifics and differences below.
The system of moving tribes onto the map by tribal counters in the original game was somewhat clumsy and arbitrary. Instead of the 10 hex limit in the original rules, place the tribal marker with one turn worth of movement points of the entry map edge, but still at least 3 hexes from any rampart or camp wall hex (out of javelin range). Then immediately place 6 units of that tribe or all remaining units of that tribe if fewer than 6 are left, either in the hex so designated or any adjacent hex.
Any time Gaul units on or next to a tribal marker are activated, the Gaul player may bring in another 6 units from that tribe placed as above as the last action of that activation (effectively “replacing” those who activated and moved off, as the “next wave” from the tribe). They may not stack to do so, and may not be able to bring on all 6 if there are insufficient open hexes on or adjacent to the tribal marker. But they must “fill” all such hexes if possible up to the 6 units per activation limit.
Use the module rules for bringing on Gaul forces at any of the entry areas but with the following additions and modifications. Rolling to bring on a group is the Gaul activation. If the attempt fails they are consider to have passed, so the Romans can end the turn by passing on their following activation. The Gaul player needs to give the Roman player information about where the roll was for on a failure, but may “lie by one row” on the entry chance chart, higher or lower than the actual area they attempted entry from. Also, further attempts to enter from the same area benefit from a -1 DRM, but this can only be earned one time for each entry area; it is not cumulative in other words.
The chieftain(s) inside Alesia can only activate the blue units of the surrounded garrison, never units outside, and vice versa. (There is only one with a replacement if he is lost by leader loss). For activation purposes, these interior army leaders have an initiative that is double the rating printed on the counter, using their printed command range. This means initiative 8 for Vercingetorix and 4 for his replacement if he is lost.
These leaders also receive a budget of Trumps in each assault period, 3 for Vercingetorix falling to 2 for his replacement if he is lost. If the former has used any in the current assault period, his replacement is “charged” with them for that assault period only. Reset the Trump budget only in the next assault period. These Trumps can only be used for leader activations of the interior force.
The Gaul player may also use Unit activations within the interior force, and may treat that entire force as “one tribe” for these purposes, meaning that a Unit activation can include QL/2 round up units within 2 hexes of the lead activating unit.
The overall leader outside is Commius, and he gets an initiative rating of 10 – his printed command rating and initiative rating added together. He can command *any* units (including cavalry and lights) from the outside force in any mix on any of his leader activations, up to his initiative limits (10 plus highest QL/2) and within his command range (8 hexes). He also has a budget of 3 Trumps per assault period, which may be used by *any* exterior chieftain as long as Commius has not been lost through leader loss.
Each of the other exterior chieftains has an initiative equal to their command rating, 4 through 7 for the different leaders, with the 7 command radius printed on their counters. They may command tribal BI, MI, and archer LI units from the exterior force, only, not cavalry units or the non-tribal LP javelin infantry units. Chieftain activations may mix activated units across different tribes as long as all the activated units are within range of the acting chieftain and within his initiative plus highest QL/2 command span.
The two Gaul cavalry leaders get an initiative rating of 2 with their printed 10 hex command range. They may only command Gaul cavalry and non-tribal LP javelin infantry.
Unit activations for the Gauls are allowed, of the normal QL/2 units within 2 hexes of the lead unit, only. In addition, all units activated in a Gaul Unit Activation must be from the same tribe.
All Gaul chieftains may conduct Regroup activations using the normal series rules for those, bringing back previously routed units (not from the same turn) that pass their regroup morale check. (Outlawing those was too hard on the Gauls, who need to be able to recover from disorder etc).
Gaul tribes have individualized demoralization levels set at 5 SPs times the last number on each tribal counter. When the permanent SP losses, permanently eliminated routed units, and currently routed units from that tribe reach that level, that tribe is Demoralized. All its units suffer -1 QL for the rest of this assault period and may not perform or participate in any Regroup *or Attack* activations. They may continue to perform March activations. When the current assault period ends, all units of the exterior army in that tribe are removed from the Gaul order of battle – they’ve left the battle and gone home. Units in the besieged city force are never affected by tribal morale losses.
Roman legions can only perform regroup actions around their Eagle as described above, and the eagle must be positioned with one of its cohort units at all times and moves with that unit, until repositioned by a regroup activation. If the unit with the eagle is destroyed by the loss of its last SP or by rout, then the eagle is captured. All units of that legion suffer -1 QL for the rest of the game, then return the eagle (actually its replacement) to any other CO unit in the legion. A legion can only suffer -1 QL this way regardless of how many times it loses its eagle; the only purpose of the replacement is to center Regroup actions.
The only stacking allowed in this battle is one leader with a combat unit, one Roman engine, and a Roman eagle counter. Multiple combat units may never stack in the same hex. This is a deliberate change from the original. Rampant Battles combat is unit by unit and the emphasis is on outlasting the enemy or fighting him after he is disordered, not pushing 4 to 6 units to attack just 1.
Next on the effects of terrain and similar.
First, there are lots of fortifications in this one, and their effects of CEVs are reflected in many fights happening with -1 CEV for across wall or into a fortification, not -2 CEV. This should not be combined (this module only) with Limited effectiveness for the same terrain.
Attacking out of a gardens of death hex or uphill or both suffers an additional -1 CEV. Attacking a rampart from within a garden hex gets the full -2 CEV for melee only. From inside or the other wall types without ditch, gardens etc, use just -1 CEV for this module; it is plenty. Similarly, just -1 CEV vs missiles for all such terrain.
Example – Gaul BI with 4+ SP in good order attacks a Roman CO on a rampart. The Clash table lists 5/3, and fortification is -2 CEV. The BI hits on the “3” line, needing 6-10 to cause 1 hit. If they fell to 3 SP, they’d start at 3 CEV and fall to “1” because of the rampart, needing a 10 to cause 1 hit. If they were disordered but 4+ SP it would be the same. If both, their adjusted CEV would fall to “0” and they would be unable to harm the Romans on the rampart.
Next, the game specific terrain effect of rampart vs missiles is only -1 CEV not -2. Gaul bows are “2” vs CO, reduced to 1 if shooting at ramparts, thus needing a 10 to cause 1 hit. They will be more effective vs the less well armored Roman lights, missile troops, and cavalry, but have some (slight) chance of harming CO on the walls.
Caesar’s Gardens obstacle hexes force those entering them to roll for a possible 1 hit permanent SP loss. This is a QL task check, with -2 to the check if the hex entered is out of missile range of all enemy missile capable units (ignoring those missile out), and +2 if the hex entered is in the front hex of an enemy combat unit. There is also a -1 DRM for each Fill placed in the hex before the unit enters, including within the same movement phase. Within missile range but not in an enemy front hex is no DRM. If the unit passes there is no effect from the Gardens. If they fail by 1-3, the unit takes 1 SP hit but does not disorder. If they fail by 4+., they take 1 SP hit and are disordered. This is rolled during movement immediately on entering the hex, and need never by rolled again for that hex if the unit remains within it.
Melee attacks *into* a Gardens hex use the Limited effectiveness CEV for both attacker and defender. Melee attacks *out* of a Gardens hex just suffer -1 CEV.
Melee attacks *along* a rampart use Limited effectiveness CEV for both attacker and defenders, and no other terrain modifier.
Attacks *off* a rampart onto either side are not affected by terrain for the rampart alone. They could suffer limited effectiveness if into a gardens hex.
Front hex “ZOCs” and fortifications – a unit inside a camp, redoubt, or on a rampart facing a unit that is outside of those is not considered “held in melee” and may move away in its movement phase without conducting “withdrawal”. It also need not melee any enemy units in its front hexes. It may conduct missile fire – even at range 1 – an exception to range 1 combat “normally” being melee.
A unit on a rampart facing another unit along the same connected rampart *is* held in melee, would have to roll for withdrawal, and is required to melee its frontal enemies during its melee phase, and may not conduct missile fire against them instead.
Similarly, units inside the same camp or 2 hex redoubt are locked in melee and must attack front hex adjacent enemies. Note that units in redoubts, even 2 hex redoubts, have front hexes on all 6 directions, and units on ramparts, in camps, town hexes, or (other modules) woods have 4 front hexes (5 for 2 hex infantry) and no flank hexes; those still have rear hexes.
Note that the Garden rules above are similar to the series rule for “hazardous movements” but differs in being able to cause permanent SP loss, while crossing a river or wall can only cause disorder if the task check is failed. The DRMs for either type of move are the same, and a unit may have to perform multiple checks in succession in the same movement phase if it chains together multiple “difficult” movements.
Fill – Gaul infantry units other than archers with at least 4 SP (all BI/MI/LP, archers are not eligible) may carry 1 Fill (not 1-2) when they enter the map or leave Alesia for the first time in a given assault period. Any unit doing so suffers -1 to its MA, and loses the Fill counter immediately if it melees offensively or defensively. Fill markers can be placed in any adjacent garden hex, river, or ditch for 1 movement point during movement, and remains there permanently. Up to 4 Fill may accumulate in any one hex (use an SP marker under the fill for this, not additional fill markers). Each level of Fill in a hex provides a -1 DRM on all Gardens and hazardous movement rolls into or across that obstacle. Fill can never be picked up off the field or moved once placed. Fill has no other effects, it just serves to reduce the chances of disorder or loss while crossing obstacles.
On fortification effects, they all just confer the wall cover benefits described in the general series rules above. Their MP costs are taken off the module specific TEC.
In addition, the Roman “fort” hexes (1 or 2 hex ones) provide any unit inside with all around front facing; units within them have no flank or rear hexsides. Units on ramparts fighting against units outside of them have rear hexes as normal but 4 front hexes, with no flanks. If the other attacking unit is on a rampart itself or within the fortification, then normal facing rules apply.
The Rampant Battles clash of swords and spears matrix is used, all combat and losses effects, sequence of play, activations, trumps etc all work as in the Rampant Battles series rules above.
These are all the changes needed to play the Siege of Alesia GBOH module with the Rampant Battles system.
Designers notes and discussion –
