
The Musket & Pike system from GMT is a sort of intermediary between Great Battles of History for pre gunpowder and the Triumph and Glory system for Napoleonics. The game family’s page on Board Game Geek can be found here –
The system covers around 30 battles over the period from the start of the 30 Years War (“Saints in Armor”) through the English civil war to the Scanian War (Sweden vs Denmark-Norway etc, later 17th century). The same system could readily cover early battles in the period of the Dutch Revolt against Spain, campaigns in northern Italy, the French civil wars, Conde and Turenne, and the like.
Tactics evolved over this period, but it is delimited by the title weapons and the role they had on the battlefield in this period. We are firmly in the gunpowder era, but firearms are slow firing and clumsy enough that the melee pike is still essential especially to defense of the firearm infantry against cavalry. We are before the bayonet and the flintlock, which would allow these two infantry weapons to merge and disciplined fire to gain its clear ascendancy, as established by the times of Marlboro, Frederick the Great or the Napoleonic era.
The era saw infantry deployed in great overall depth in the Spanish “tercio” system, which mixed looser “sleeves” of musketeers around a central square of pikes in a kind of moving fort of men. This gave way by the end of the period to shallower linear formations – used by Gustavus Adolphus of Sweden in particular – which were about 6 deep, to optimize frontage over staying power and engage more of the men.
Cavalry fought against pikes by leaning more on the pistol than the sword, but as the infantry formations grew thinner and wider, operated against their flanks by charge with the saber. It was an important arm throughout, but could not easily defeat heavy infantry tactics optimized to resist cavalry. Artillery was still heavy, slow, and limited in numbers, making it an auxiliary on these battlefields, useful to disorder enemy heavy infantry formations before the main combat arms engaged, but not capable yet of the firepower effects it achieved in the Napoleonic era.
The original game system featured a heavy command and orders system that slowed play and lead to the sense that the armies are sluggishly defying actual control by the player. It also suffered from a number of the issues of its Great Battles predecessor and Bergian levels of over-engineered chrome. Despite its complexity, it also still manages to get some of the more important formation peculiarities of the period completely wrong.
For all these reasons, I see a need for a simplifying revision. I reuse many ideas here from my Rampant Battles of History revision to Great Battles of History (GBoH) (notably simplified activation and order types) and some from my Napoleonic Battles system (notably force to space limitations on melee strengths). There are new D10 fire and melee tables and especially new rules of melee strength to accurately reflect the different “force to space” issues in play in the evolving formations and tactics of the period.
Sequence of play and activations
Each turn there is an initiative player, which be given by the scenario for the first turn, otherwise roll 2D10 with a die assigned to each player; high rolls have initiative for that turn. On subsequent turns roll for it again with the previous turn’s initiative player winning ties.
Each player has a separate “draw cup” of their commanders, including their wing commanders with subordinate formations they directly activate, and another overall commander (OC) whose chit is considered “wild”- able to activate any formation under him. In some rare scenarios a side may have 2 OCs for different national armies; each then goes in the cup and is “wild” only for formations within their army. Each side also adds one additional “any unit” activation marker to their cup, which may be used for a unit activation only.
The initiative player draws first, uses his activation chit and completes all its actions. Play then passes to the opponent who does the same, continuing until all chits have been drawn. Either player may Pass instead, but his turn is then over; if both players Pass the turn ends early. Check for victory, advance the turn marker, roll initiative and put all command chits back in their draw cups for the following turn.
Activation options and procedure
When a command chit is drawn, you can use it for one order type for up to all the units under an original force commander. An OC can do the same for any of his previously unactivated commanders (only). These are both called “Leader Activations”. Alternatively, any chit can be used to perform a Unit Activation, which designates a single Lead Unit and will activate that unit and a few others, without regard to command spans. The drawn chit is still used up in this choice and is set aside.
Each activation must be for a definite Order type – charge, march (replaces Make Ready and Receive Charge), or rally. You may freely choose the order type and don’t need to roll anything to change orders, but the chosen order type will put restrictions on what activated units may do during this activation.
After designating the order and setting the commander’s order accordingly, the active player designates which specific units will activate with this order on this impulse. Activation of a unit is always voluntary and any number of eligible units may be left out (e.g. because they don’t want to take part in a charge right now). Units “left out” simply don’t activate on this activation. They may or may not have any other chance of acting this game turn.
A wing commander activation or OC designating a given wing commander can activate up to all units sharing that letter designation in the scenario. Unit activations are more limited, and depend on the lead unit chosen. One of the downsides of leader loss is that a replacement “colonel” may only perform a unit activation when that command chit is drawn. For unit activation, the chosen lead unit always activates, and its current morale rating divided by 2, round fractions up, gives the total number of *hexes* of friendly units that may activate in this unit activation. 2 hex HI units count 2 vs this total, for example. A lead infantry unit may only activate infantry and artillery, and a lead cavalry unit only cavalry and artillery, and either only from the same formation as the lead unit (by letter designation of the army’s “wing”).
Other than activating fewer units, a unit activation is resolved like a leader activation, with all 3 order types available. However, the rally benefits of a leader in March and Rally activations are not available in a unit activation – those normally get 1 free automatic recovery from disorder for a unit the active leader is stacked with, and in a unit activation there isn’t one, so this benefit is lost.
Note that the activation amounts are deliberately set higher than absolutely needed to activate all units once a turn, but marginally so. This leaves some room for “split activations” of one order type followed by a unit activation later, of the same or a different order type – but not many across the whole army for a given game turn. You can always activate the most important unit(s) on your first chit, but may have to substitute a unit activation to do so. Your overall commander might “clean up” for that later when his own chit is drawn, by selecting the formation of the chit first used – that’s a normal use of such flexibility.
There are no rolls for order changes, rolls for continuations, pre-emptions or “trumps” in this revised M&P system – just the alternating chit pulls
Order types and restrictions
On a Charge order, all the activated units that can move adjacent to enemy units must do so, except artillery units (which cannot) and light infantry units (musketeers e.g.) which may but need not. You cannot call a charge order if at least one of the activated units cannot advance into contact in this manner. Only units under Charge orders may move adjacent to new enemy units. No units that begin their activation in a front hex of any enemy unit may leave that front hex, though they may changing facing, and if a 2 hex HI units, may “wheel” to bring an additional hex of their own counter adjacent to the enemy (but never out of contact). No units rally (recover from disorder) during a Charge activation. Note that melee is still voluntary under Charge orders – the requirement is to move next to the enemy, which will generally trigger fire combat, with melee possible but not required.
On a March order, no advances into new enemy adjacent hexes may be made, but units already in such contact may stay there or withdraw as they see fit. Units that remain may conduct fire and melee combat normally. If a unit withdraws from contact it may not re-enter contact with any enemy unit in this activation. One unit may attempt to rally from disorder – if that unit is stacked with the activation leader, the recovery is automatic, otherwise it is a morale check at the end of the activation. Note however the movement through disordering terrain may prevent recovery from disorder in the same activation. If all units begin and remain at least 10 hexes from all enemy units, you may use Strategic March to increased movement allowance on a March activation only. This doubles MPs for all but artillery and raises artillery movement to 8 MPs.
On a Rally order, no advance into new enemy adjacent hexes may be made, and in addition all units already in contact with the enemy must leave that contact by the end of their movement, and therefore none will be conducting fire or melee combat. A unit that cannot withdraw from enemy front hexes (surrounded e.g.) may not take part in a Rally activation. All units may roll to recover from disorder at the end of the activation as a normal morale check; a single unit stacked with the activation leader recovers from disorder automatically without a roll. Note again that units that move through disordering terrain will not be able to recover from disorder in the same activation.
Action sequence within an activation
Within each activation, the order of events is active artillery fire, movement, defensive fire, advancing fire, melee, and rally. Only activated units conduct any of these actions except defensive fire, which is conducted only by enemy units that activated units end their movement adjacent to, in any of their Front hexes. Inactive units may also conduct a limited reaction change of facing during enemy movement, and may in some cases retreat before melee. All active units conduct each of the actions above before resolving the next phase in that sequence e.g. all move before there is any defensive fire.
Action specifics – artillery and movement phases
Artillery is always considered unlimbered and ready to fire when activated. It may rotate 1 hex spine for free before firing. If a given artillery unit fires in the artillery fire phase, however, it can’t move in the following movement phase of the same activation. Artillery never conducts advancing fire, and may not voluntarily move adjacent to an enemy unit, even into an already occupied hex. One artillery unit may stack with any one cavalry or infantry unit in the hex; no other stacking is allowed (but see consolidation below).
Units that move into terrain that has a formation hit listed on the TEC are automatically disordered on doing so. If it was already disordered there is no further penalty. A unit that disordered by movement in this manner cannot rally later in the same activation.
Open order – open order is a voluntary form of being disordered that may be adopted at the beginning of any movement phase. A unit in open order may recover to good order by passing a morale check at the end of its activation under any orders, as long as it is not in an enemy front hex and did not make any move that would have disordered it in the same activation. Open order is typically used to pass terrain obstacles. If a unit suffers any form of disorder other than that caused by movement it becomes normally disordered instead of being in open order.
Units of the same force type and nation may Consolidate during movement by ending (only) their move in the same hex. The lower morale rating of the 2 units is retained and the other unit is removed, passing its SPs to the remaining unit. Cavalry may not exceed 4 SP after consolidation in this manner, and heavy infantry may not exceed its original printed SP strength. Light infantry may not exceed 4 SP nor its original strength on consolidation. Only 2 units may consolidate in this manner in one movement phase. Disordered units may consolidate, but the remaining unit is always disordered if either of its original constituents was. It may still rally later in the activation, however, other circumstances permitting.
Other than consolidation and the one free artillery unit, units may not stack during nor at the end of movement and may not “pass through” each other. In forced melee retreats, units may be forced to “displace” to make way for a retreating friendly unit. The unit forced to do so checks moral and is disordered if it fails the check; if it was already disordered it loses 1 SP and retreats 1 additional hex after “making way”.
Action specifics – defense and advancing fire
Once all movement is completed, inactive enemy units that are adjacent (only) to any active unit and have any of those in their front hexes may fire on one chosen target each, in any order the non-phasing player desires. See the fire combat procedures below. Once all defensive fire has been conducted and all effects applied, active units with enemy units in their own front hexes may conduct advancing fire themselves, generally with a modifier for moving. Again conduct all advancing fire and apply all results. Note that no fire combat is ever simultaneous, and if a given shot destroys or forces retreat of an enemy unit, it may lose its own fire or you may lose additional shots against it. Each player always controls their own firing order in any way they see fit.
Action specifics – melee and rally
After all fire, the phasing player may conduct melee attacks as attempts to displace chosen defenders from their occupied hexes. Melee is always voluntary. A given enemy occupied unit may only be attacked once in a melee phase, and only by the forces that could take its place in its present hex(es). See below for the detailed melee procedure. Each melee is conducted in any sequence the phasing player chooses and all its effects are resolved and implemented before resolving the next. If a melee attack clears the defenders from their hex, attackers *must* advance into that hex(es). They may rotate 1 hex spine after doing so, except 2 hex HI never rotates in a won melee unless necessary to conform to the hexes occupied by a defeated 2 hex HI.
Rally occurs after all other phases of the activation, and only units that did not move through disordering terrain or suffer disorder during this activation (including by fire or melee) may rally this activation. Any unit that succeeds in its rally just removes disorder. There is no penalty for failing a rally check beyond remaining in disorder. (There is also no “extra” formation state “below” disorder, unlike the “shaken” and “broken” of original rules as written M&P).
Infantry facing and original SP strength
Light infantry has 4 front hexes and 2 rear hexes instead of the usual 2 front, 2 flank, and 2 rear. Single hex HI with at least 8 original SP may treat its 2 flank hexes as front hexes for purposes of melee defense, fire combat and forcing moving enemy units to stop, but may still only conduct melee attacks through its original 2 front hexsides. Normal 2 hex HI with 15-20 original SP strength may similarly treat its 2 flank hexes as front hexes for the same purposes. 2 hex HI with 21+ original SP have all around facing, with even their 3 “rear” hexes covered in the same way. They may still only melee attack out of their front 3 hexes. Note that it is the original full SP strength of an HI unit that determines which of these classes in falls into, since it is a matter of its formation-configuration; ongoing losses never change it. These rules replace all references to “hedgehogs” in the original rules.
HI without pikes (N unit type) appear is some games. These are treated as Other HI for all purposes including fire combat, stacking limits, and melee strength determination, but they suffer 1 column shift against them in melee combat against regular HI or cavalry. If they take part in a multi hex combat as attackers, they do suffer this shift; if they take part as defenders and the other defending hex is cavalry or regular HI (and does not withdraw before melee), the defenders don’t suffer this shift. Optional – an army with these units may elect instead to treat them as LI for all purposes at the start of the scenario. This election in one time and irrevocable.
Morale effect of losses and leaders
Any unit that has lost 20% or more of its original SP strength suffers -1 to its morale rating. When its losses reach 50% or higher, the morale loss becomes -2 instead. Consolidation may raise unit’s morale by pushing it back over one of these thresholds. Any unit stacked with a leader with a -1 or better command rating gets +1 to its morale level for melee combat purposes, and receives the full leadership rating (-1,-2, etc) as a benefit to its actual morale checks.
Replacement leader “colonels” never confer either of these benefits, and are also ineligible for the 1 unit per march or rally activation rallying from disorder without a morale check roll. An overall commander may activate a wing “through” a replacement colonel when the OC is drawn – it is the overall commander conducting the activation in this case. However, when the chit for a formation directly commanded by a replacement colonel is drawn, the owner gets only a unit activation, not a full wing activation.
Named leaders are lost in fire combat whenever the unit they are with suffers any non-0 fire result and the morale check die roll is a “10” (unmodified). Melee attackers also suffer such leader loss on any melee attack with melee resolution roll “1”, and melee defenders any with melee resolution roll “10”, assuming they have a leader present. Replacement “colonel” leaders do not need to check for leader loss.
Combat
Here are the new fire and melee combat tables. First fire –
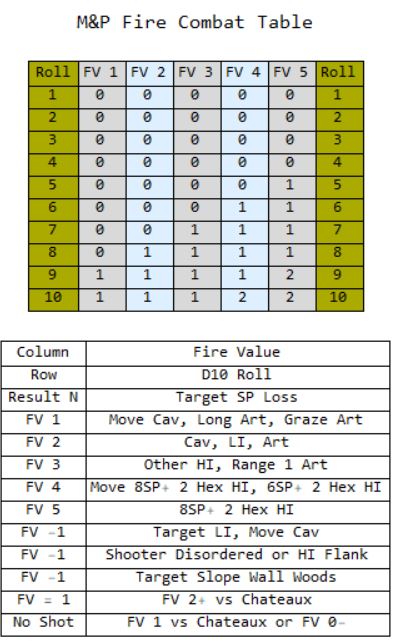
Heavy infantry, artillery, light infantry and cavalry can all fire in this era and system. Heavy infantry has the greatest fire values, with stationary 2 hex HI with at least 8 SP getting the highest fire value (FV) of 5. When the same is moving or 2 hex HI with 6-7 SP, this falls to FV 4, while 1 hex HI or anything weaker gets FV 3. That is also the FV of range 1 artillery, while normal range artillery, any light infantry (“musketeers” in the game, typically 1-2 SP per unit) and stationary cavalry get FV 2. Moving cavalry and artillery at long range get FV 1, as does “grazing fire” from artillery vs all targets after its initial target. Various conditions reduce FV one each – moving cavalry or LI targets (less firing time and lower density), disordered shooters or HI firing through a flank, or targets with cover like walls, redoubts, or up a steep slope.
In some scenarios, heavy infantry units appear with cannon icons on their unit counter, representing integral light artillery (“battalion guns”, generally 3 pdrs). These HI receive +1 DRM on their fire combat roll when conducting defensive fire into their front 3 hexes, or when conducting advancing fire into those hexes if they did not move (including wheel) in this activation. Advancing fire after movement and flank hex fire (even if they have enough SP to treat those as front hexes in other respects) do not receive this DRM.
Fire combat is conducted by designating the target and rolling 2D10 of different colors. The first or white die is the to-hit roll used on the fire table above, while the second or red die is the target’s morale check if any hit is obtained. The morale die is ignored if the fire got no hits. Hits permanently reduce the target’s SP strength, while a failed morale check causes disorder (“formation hit” in the original’s sense, but with only 1 level used). When an already disordered unit fails a fire MC, it loses 1 additional SP and must retreat 1 hex.
Only the first morale check a unit takes from fire in the same activation applies to it. You may continue to fire at a target that has already passed its MC this phase, but only further losses can be inflicted – no additional MCs, disorder, or leader loss checks.
Artillery units check morale normally (same die) on any fire loss result but are never removed by fire combat SP losses, which are suffered by any unit they are stacked with, not by the artillery unit. Disordered artillery may not fire until it rallies to good order.
Here is the new melee table –

Melee odds are given as the attacker’s percent of the defender’s melee strength, rounded in favor of the defender. However, melee strength is not simply the SP count of the units involved, but varies with the formation type and sometimes the terrain. This reflects the number of men – specifically the portion armed with pikes in the case of heavy infantry – that it actually takes to “line” the frontage to a depth actually useful in such melees, and their melee fighting power per man.
In open ground, only the first 3 SP of cavalry matter, but each counts as 2 melee strength, so the maximum melee strength of a single cavalry unit is 6. Into obstructed terrain, cavalry can still only use 3 SP and they are not doubled. Light infantry is halved (fractions round up) in open ground, while each SP counts normally in obstructed terrain. No more than 4 SP of LI count, and most LI units are just 1-2 SP.
For 1 hex HI units, the first 4 SP count 1 each, and the next 4 SP count 0.5 each (fractions round up), thus reaching a maximum of 6 melee strength for 8+ SP of HI in a single hex. These limits are doubled for 2 hex HI units, so up to 16 SP may matter for melee with a maximum melee strength of 12.
The only multi-hex melees that are allowed are 2 adjacent hexes of units attacking a 2 hex HI defender, or a 2 hex HI attacking 2 adjacent hexes of defenders. Otherwise just pick your best attacker – you can’t fit more men into the hex than the defenders can.
Various conditions modify the melee odds as column shifts to the right or left. A disordered target, adjusted morale 2 higher than the defender, being on the defender’s flank or rear are each worth 1 column right. A disordered attacker, defender with morale 2 higher than the attacker, or the defender in cover (behind a wall, up a steep slope, etc) are each worth a column left. In addition, obstructed terrain will usually disorder the attacker before the melee, whenever the move would do so, except that downslope melee attacks only suffer after the combat if they actually make the move. Advance after melee is required if the defenders are cleared from the hex(es) by retreat or elimination.
Roll 2D10 for melee combats as for fire combat. The second morale check die roll applies to the side that lost the combat, and to both sides if the melee table result is A1-D1. Any good order unit that fails this melee result MC is disordered. If a previously disordered unit fails its melee MC, it loses additional SPs equal to the amount of the MC failure.
All units that are forced to retreat by a melee result are disordered, and if already disordered they lose 2 SP additional losses as rout losses, in addition to any MC failure excess losses above.
Example – a 2 hex Imperial HI in good order with 16 SPs and QL7 attacks a 2 hex Saxon HI that is already disordered, which has 19 SPs (1 hit so far) and QL 5. Both sides have 12 melee strength (maximum for 2 hex HI) so the initial odds column is 100%. The Imperials have 2 higher morale and the defenders are disordered, so there are 2 column shifts right to the 150% column. The melee combat rolls are 7,8 on white and red dice respectively, the latter being the melee MC. The table result is D1R, so the Saxons retreat 2 hexes and the Imperials advance into its previous positions. The Saxons failed their MC by 3, so they lose a total of 6 SP (1 table, +2 forced retreat while disordered, +3 MC failure by 3 while disordered). The Saxons now have 13 SP remaining and their morale is now 4 (-1 for 20% losses; they will hit -2 after 3 more SP lost).
If a unit is forced to retreat past enemy front hexes, it may do so, but it suffers -1SP additional for its entire retreat in doing so. It may displace friendly units to make way for its retreat, and those displaced units check morale. They disorder if they fail that check, and if already disordered lose 1 SP and retreat an additional hex. This may cause a chain reaction if forces are packed too closely together.
If a unit is forced to retreat but cannot do so, even displacing friendly units or passing through enemy front hexes, it surrenders and is eliminated.
Artillery units never take part in melee attacks, and when defending if their hex is lost in melee by a retreat result or loss of the last SP stacked with them, they artillery is captured. They never fire again, but control of their hex may matter for victory purposes. Artillery is not displaced by the retreat of other friendly units.
Game specific additional rules
Heavy infantry with a Cannon icon (e.g. Swedes at Breitenfeld) get +1 DRM on their defensive and stationary fire combat from their 3 front hexes only.
Musket LI cannot stack with cavalry and units set up that way should be placed 1 hex behind them. They follow the normal revised system rules for LI; use them interleaved not stacked.
In the Breitenfeld scenario, Gustav Adolf is the OC of the Swedish army only, while the Saxons are a separate army. The Saxons may therefore only activate when their own commander’s marker (Johann Georg) comes out of the cup. If Georg becomes a leader casualty, the Saxons will only get a Unit Activation by his replacement colonel.
In the White Mountain scenario, divide between historical with Transylvannians not participating and existing victory conditions, or they enter from the Protestant board edge and VCs are changed – see next section.
(1) 20 VPs for 1 point of Imperial light infantry musketeers running around anywhere inside the gardens of the “star” fortress – just no. It makes a snipe hunt side show on this flank and affords it importance far out of proportion to any actual military effect of a few men being inside a garden wall after 2 hours of fighting.
Instead, if the Imperials can actually capture the thing (because the Protestants abandon it for example) then fine, they can get 20 VPs for it. But they have to control the chateau for all 20 VPs, and get 10 VPs only for having more infantry SPs alive within the walls at the end of turn 7 than the Protestants have. The Protestants get no VPs for holding the star fort – it is presumed they will.
(2) conflating 2 different scenarios, one historical and one a fanciful might have been designed to completely turn the numerical tables, as one scenario decided by a D10 roll for whether the Transylvanians stick around and fight. Just no. “Flip a coin to see who wins” is the worst game design ever.
The Transylvanians didn’t fight, so they aren’t in the historical scenario at all. There is no reason whatever to treat a fight where they did as the same scenario, with the same 7 turn limit and the same territorial victory conditions etc. Let alone awarding the Imperials 10 VPs for *winning a die roll* that makes their job *easier*.
If you want to play instead a *separate scenario* in which the Protestants are supported by Transylvanian cavalry, they arrive as follows.
At the end of each game turn including the first, roll D10 each for the eastern group (7 units and leader Kornis) and the western (4 QL 5 units). Each arrives on a roll of 7-10 and does not appear (yet) on 1-6. The eastern group sets up within 2 hexes of 3525 and within 1 hex of the board edge when it arrives. The western group sets up within 1 hex of 3510 and within 1 hex of the board edge when it arrives. An AM for Kornis goes into the cup for the following turn once the eastern group arrives, and he commands both forces; only unit activations may be used for the western force if Kornis hasn’t arrived yet.
In this scenario, the 2 flank redoubts 2506 and 2320 are each worth 10 VP to their possessor at the end of turn 7, and in addition the Imperials receive +20 VPs in return for the engagement of the Transylvanians. So if the Imperials control those two “outworks” at the time limit, “territorial” VPs will be equal and losses will decide the day. If they also control the central redoubt, the Imperials will be ahead 20 VPs.
Melee notes
Note that cavalry with 3 SP per hex and single hex HI with 7+ SP per hex both reach the same maximum melee value of 6 per hex. 2 hex HI also reach 12 melee value whenever they have 15+ SP, and can be melee’ed from 2 hexes, thus at 100% odds by either of those formation types. Cavalry with fewer SP per unit of melee power is more acutely affected by ongoing losses, especially from fire. It also has lower firepower per hex than any form of HI. In return it is much faster and more maneuverable on the battlefield, and with advantages of flank position, better order or higher morale can be deadly even to larger formations.
Original comments on BGG
My thoughts on my redo of the GMT Musket and Pike series, as things are now…
(1) Activation by chit pull with alternating sides, not random from the same cup.
(2) Each side gets 1 additional chit for their overall commander; this chit is “wild” meaning any formation you want. Units still only activate once per game turn however.
(3) You may return any chit drawn to choose instead a Unit Activation anywhere, unspent units only, with only a limited number of units activated (half the current morale of the lead unit worth of hexes, all within 2 hexes of the lead unit).
(4) Activations are for charge, march, or regroup, but with automatic change to those orders. Charge must move adjacent to enemies, march may stay but not start new engagements, regroup must leave existing engagements. March gets 1 rally attempt, regroup all activated may attempt to rally.
(5) Sequence within activations is artillery fire, movement, defensive fire, advancing fire, melee, rally. This replaces all “reaction” rules except single hexspine facing change for new adjacent enemies.
(6) Defensive fire is only range 1 / contact in front hexes.
(7) All fire rolls 2D10 for to hit and MC simultaneously; MC ignored unless the to-hit causes losses; fail MC means disorder; second disorder is -1 SP extra and retreat 1 hex. MC 10 with a hit causes leader loss as well.
(8) Melee is voluntary as entry attempt vs enemy hex(es); 2 hex infantry must hit 2 hexes (one might be empty) and can be hit from 2 hexes; all others single hex vs single hex.
(9) 1 hex heavy infantry (HI hereafter) with 6+ initial SPs have rear but no flank hexes for fire and melee defense purposes; still only melee attack their front.
(10) 2 hex HI with 14-20 initial SP have rear but no flank hexes like the previous.
(11) 2 hex HI with 21+ initial SP have all around facing for fire and melee defense.
(12) melee strength of cavalry is 2xSP for their first 3 SP, remainder is ignored
(13) melee strength of light infantry (LI) is 0.5xSP round up for their first 4 SP in open, 1xSP to 4 in covered terrain.
(14) melee strength of 1 hex HI is 1xSP for their first 4 SP and 0.5xSP for 5-8, ignoring anything above that.
(15) melee strength of 2 hex HI is 1xSP for their first 8 SP and 0.5xSP for 9-16, ignoring anything above that.
(16) artillery gives +1 melee strength through front hexes only.
(17) units that lose 20-49 of starting SP are -1 morale.
(18) units that lose 50%+ of SP are -2 morale.
(19) new melee table with percentage odds columns for 50, 75, 100, 125, 150, 200, 300% of defender strength. Results as SP lost to either side and required retreat R results.
(20) column shifts right for disordered and flanked defenders (each), left for disordered attackers or into cover (each). Better adjusted morale is 1 column shift only if +2 or better.
(21) melee retreats are 1 hex for attackers, 2 hexes for defenders. Attackers must advance if they clear the hex.
(22) melee retreat automatically disordered the retreating units.
(23) if already disordered, melee retreat causes -2 SP additional loss. LI vs cavalry or HI in the open also suffers this.
(24) cavalry can decline melee by infantry, retreating 2 hexes, attackers advance.
(25) light infantry can decline melee by heavy infantry in the same manner, but not by cavalry.
(26) new fire table by fire values 1-5.
(27) FV 1 for moving cavalry, long range artillery, and artillery graze after 1st target hex. Also all fire vs Chateau (and requires 2+ initial FV or no shot)
(28) FV 2 for light infantry (moving or not), stationary cavalry, normal range artillery.
(29) FV 3 for range 1 artillery, “other” HI (see below)
(30) FV 4 for moving 2 hex HI with 8+ SP, or stationary with 6+ SP
(31) FV 5 only for stationary 2 hex HI with 8+ SP.
(32) those FVs are expected hits 0.2,0.3,0.4,0.6,0.8 with “2” results only for FV4 roll 10 or FV5 rolls 9-10.
(33) some conditions each give -1 FV, including moving cavalry target (time), LI target (density), disordered or flank shooter, or into cover. If adjusted to FV 0 or below there is no shot.
(34) rally of 1 unit with a commander is automatic (remove disorder), others check morale remove disorder if they succeed and no result if they fail. Only on March (1 unit) or Rally (all activated) orders.
I think that covers the essentials of a full replacement system. Some key things to note –
Very large 2 hex infantry units acquire all around facing rather than greater melee or fire strength. They still also get staying power vs losses, but disorder to them affects more SP.
Max firepower for infantry happens as soon as a 2 hex HI unit has 8 SP – thus quite soon in SP terms, and e.g. Swedish 10 SP line HI are already at maximum firepower.
Max melee power for infantry happens at 16 SP for 2 hex infantry units and is 12 total melee strength. This is the same 6 per hex maximum achieved by 8 SP 1 hex HI or 3+ SP cavalry.
Extra depths confers staying power only; it is relatively easy to reach these maximum melee strengths. However, some of the “thinner” formations of the later eras will fall under max melee strength, while still having full firepower. They will also have more vulnerable flanks than deeper formations.
100% melee is a risky coin toss with 0.8 expected SP losses and 30% chance of forced retreat with disorder for either side. You can’t get better than that vs max stacked good order HI or cavalry.
But once you disorder an enemy unit, you can earn a column shift against them in melee even if the raw percentage is 100%, and all his retreat results also bring -2 SP extra losses. This is already enough to make such an otherwise “even” melee a 2-1 expected loss favorite for the good order side.
2 cavalry units side by side of 3+ SP each can melee like 16 HI for their first round, but they can’t take losses nearly as well. They also have much less firepower, so its a Bad Idea to trade them evenly with “unprepared” large HI.
HI can only force melee against other HI, but also has more firepower than any other troop type.
LI shoots as well moving or standing, can evade melee by HI and gets a defensive benefit for fire against them. But in the open they are extremely vulnerable to cavalry melee.
Low firepower LI, cavalry, and artillery combine only 20-30% chances of hits with similarly modest MC chances against good troops to only have a modest chance of disordering by fire on any one shot. But they try to make up for it by getting shots often.
Comments welcome. I will test the system more thoroughly before posting a finished version of it on wargamegrogs.com.
Chits and activations – each side gets 1 chit per wing by the normal rules plus an overall commander chit. The overall commander can be used to activate any wing provided its commander is still alive on the map. Leaders are marked as gone when used. If / when an OC activated wing’s own commander is drawn, he can be used for a unit activation. Similarly the OC can always be used for a unit activation. If a leader is a casualty, his wing will only activate using unit activations, but his chit remains in the cup and only gives a unit activation.
Normal wing activations (including by the OC) activate up to all units on that wing at the owner’s discretion. He may leave any units out of that activation (for later or because e.g. they don’t want to charge, say). Activation is always voluntary as to the units activated.
Overall init starts as the scenario gives it; roll for it if none is specified. On later turns, roll for init with the previous turn’s init holder winning ties.
Unit activations – select a lead unit; its current (loss adjusted) morale divided by 2 round up is the maximum number of hexes of units activated. The lead unit always activates. Others must be the same type (infantry or cavalry; light infantry may activate with either, artillery same and activates free when any unit it is stacked with activates) and from the same wing in the scenario command structure.
The only other drawback of a unit activation is that there is no single unit auto rally as there is with a commander. Rally unit activations are still possible with all units rolling, and 1 unit may roll for rally in a March unit activation.
Consolidation – cavalry may consolidate units up to 4 SP, any excess is lost. Single hex heavy infantry from the same command and nation may consolidate up to 8 SP, any excess is lost, but also not beyond their original max strength. If the units combining are of different morale ratings, the lower one is the one left on the map. Consolidation is not allowed during a Charge activation nor in a hex in contact with the enemy.
Disordered units may consolidate, and if an ordered consolidates with a disordered unit the combined unit is disordered. Consolidation happens during movement and rally later, so it is fine to e.g. consolidate 2 small disordered cavalry remnants then use your one automatic leader rally to return the combined unit to good order.
Leaders and leader loss – if fire combat causes losses and the MC die is a 10, any leader with the target unit is a casualty. In a melee attack with a leader with the attacking units, the leader is lost on a roll of “1”. In a melee defense, the leader is lost on a roll of “10”. Leaders give +1 morale for all MCs and for melee QL differential/shift purposes, but give no shift themselves directly.
A leader can rally one unit automatically (no roll) on March or Rally activations, but must stack with the unit helped to do so. OCS can move 10 MPs at the start of their activation (wing or unit) to join the force they are activating. They may still activate it if they can’t reach them, but to give their MC and auto rally benefits must be physically present with the unit helped.
Fire combat and MC limits – any number of units may fire at the same target in the same fire phase, but the target’s MC only matters the first time a hit is obtained. If the unit has already taken losses, if doesn’t check morale again in that fire phase. This includes leader loss; only the first hit’s 10 MC die can cause one.
Note that artillery fires in its own fire phase at the start of an activation, so it is never firing in the same phase as other arms for this rule.
Melee and obstructed terrain – cavalry may melee into obstructed terrain but their SP strength is not doubled if they do so. They may not melee against a chateaux hex. Light infantry in obstructed terrain is not halved in melee. Both of these include cases of crossing a hexside obstacle (e.g. wall), but not a slope. It also includes hexes containing wagons. HI uses half the normal stacking limit for its melee strength formulas inside obstructed terrain, and fires on the “Other HI” line regardless of SP strength or movement status. This includes melee-ing into obstructed terrain, by either hex of 2 hex HI.
Units melee-ing across obstacles or into terrain that would disorder them (formation hit) if they moved there are disordered before the melee occurs, with one exception. Moving downslope – including down a steep slope – never disorders the attacker before melee. If the attacker wins a down steep slope melee they must advance and will be disordered by the move, but it only happens if they win the hex and make the move. This asymmetry is the “high ground advantage” in such melee situations, along with downslope not being worth a “cover” column shift while up a steep slope is.
Multi hex melee and 2 hex HI – Melee attacks can only bring the units that occupy the defender’s terrain, so normally there are no joint or concentric melees. A given defender may only be melee’d once in a given melee phase. There are some exceptions to one hex melee‘ing into one hex for 2 hex HI units as attackers or defenders, however.
As an attacker, 2 hex HI may attack any pair of hexes it could enter as a front move. If one of them is occupied and the other is empty, it may melee a single defending hex this way; it must advance into the 2 it attacked if the hex is vacated. If both hexes are occupied, it fights one joint melee against the combined melee strength of both hexes, using the highest defending QL rating. The defenders split their table loss result as evenly as possible with owner deciding on odd losses; however, the -2 SP for disordered before a forced melee retreat must be lost by each unit to which is applies.
If a 2 hex HI announces a melee and one of the targets retreats before melee and the other does not or cannot, it fights the one that “stands” solo.
As a defender, 2 single hex HI or cavalry may attack the same 2 hex HI unit only if the two attackers are adjacent to each other. If they are adjacent to the two hexes of the defending HI they advance that way if they win. If they are both adjacent to the same flank hex of the 2 hex HI, they may still combined provided they are adjacent, and if they win one of them advances 2 hexes (ignoring other enemy units) to occupy the second, more distant hex of the displaced defending 2 hex HI.
When 2 2 hex HI are both only adjacent by a single hex to each other, they may fire but not melee. If a 2 hex HI is facing only one (flank, generally) hex of an enemy HI, it may melee attack, and if they win may advance 1 hex maintaining facing if the way is clear, or wheel into the defender’s vacated positions if the previous is not possible. This is the only occasion when a 2 hex HI can change facing as a result of melee.
Single hex melee winners must advance into the vacated enemy hex (either of them if they defeat a 2 hex HI, but occupying both if 2 attacked together), and may change their facing 1 hex spine after entry.
Withdrawal – on a Rally or March activation, units in contact may leave enemy front hexes freely and do not take any fire doing so. Any unit may about-face in place for 1 MP. In a March activation you can stay instead; rally activations all must withdraw and charge activations none may withdraw.
Stacking and consolidation – One artillery unit may stack with any unit type, and likewise 1 leader. No other stacking is allowed, but 1 hex units of the same type and nation may Consolidate in the same hex. Cavalry may not exceed 4 SP on consolidation, 1 hex HI may not exceed 8 SP or their original strength, and LI may not exceed 4 SP or their original strength. 2 hex HI may never consolidate.
Facing and fire – 2 hex HI uses the “other HI” fire value for shots vs all but its 3 frontal hexes. All other shooters lose 1 FV for “flank or disordered” if firing at other than their frontal hexes, but not cumulative with disorder. Artillery may only fire through front facing.
Strategic movement – in a March activation in which all units remain at least 10 hexes from the enemy, you may double their movement allowance, raise arty/wagons to 8 MPs. (This represents using all the available time to just move because out of enemy charge range).
Moving artillery – ignore the limbering and unlimbering rules; inappropriate at this time scale, fully covered by low MPs. Instead artillery has 2 MPs, but may not move in an activation in which it fires at the start of the activation. So either you fire them (and you are unlimbered), or you move them 2 MPs and then they are unlimbered after than in their new hex, able to fire in enemy activations but not in this one. See above re Strategic movement and arty.
Artillery may chance facing 1 spine for free before firing, and pays nothing for facing changes while moving. It may React to change facing by 1 spine if an enemy unit moves adjacent for the first time, provided it is not already in the front hex of any enemy unit.
Artillery may never move adjacent to an enemy unit, even if the hex is already occupied by friendly units. Artillery never has to “charge”, and may do all its usual things in any kind of order activation. It activates for free with other units in its hex, or if alone when its wing activates or as 1 hex in a unit activation, with any unit type.
Grazing fire – the fire value of artillery using grazing fire is 3 at range 1 and 2 otherwise for the first hex targeted, and FV 1 for any remaining eligible hexes behind the initial target and in line with it, to the limit of its grazing fire range.
Other ranged fire – 3 lb artillery has a 5 hex normal range, 4-8 lb has a 7 hex normal range, and 12-24 lb has a 9 hex normal range. Normal artillery has FV 3 at range 1 (exception – 3 lb only get FV 2 there) and FV 2 to its normal range, with FV 1 beyond those normal ranges to its second listed maximum range.
All other (infantry, cavalry) fire is range 1 only.
High SP HI and facing – as mentioned in the post above, large HI formations have fewer flank and rear hexes for fire and melee defense purposes. They still only melee attack to their original 2 or 3 front hexes (for 1 and 2 hex HI respectively).
Single hex HI with 6+ initial SPs have no flank hexes, only rear hexes, for these purposes. 2 hex HI with 14-20 SP are the same, and 21+ SP 2 hex HI have no rear hexes either. It is the original strength of the unit that controls this, not its present strength, so it never changes as the unit takes losses (it’s a formation/configuration).
White Mountain scenario changes
Some comments on the typical Bergisms in this White Mountain scenario and what to do about them…
(1) 20 VPs for 1 point of Imperial light infantry musketeers running around anywhere inside the gardens of the “star” fortress – just no. It makes a snipe hunt side show on this flank and affords it importance far out of proportion to any actual military effect of a few men being inside a garden wall after 2 hours of fighting.
Instead, if the Imperials can actually capture the thing (because the Protestants abandon it for example) then fine, they can get 20 VPs for it. But they have to control the chateau for all 20 VPs, and get 10 VPs only for having more infantry SPs alive within the walls at the end of turn 7 than the Protestants have. The Protestants get no VPs for holding the star fort – it is presumed they will.
(2) conflating 2 different scenarios, one historical and one a fanciful might have been designed to completely turn the numerical tables, as one scenario decided by a D10 roll for whether the Transylvanians stick around and fight. Just no. “Flip a coin to see who wins” is the worst game design ever.
The Transylvanians didn’t fight, so they aren’t in the historical scenario at all. There is no reason whatever to treat a fight where they did as the same scenario, with the same 7 turn limit and the same territorial victory conditions etc. Let alone awarding the Imperials 10 VPs for *winning a die roll* that makes their job *easier*.
If you want to play instead a *separate scenario* in which the Protestants are supported by Transylvanian cavalry, they arrive as follows.
At the end of each game turn including the first, roll D10 each for the eastern group (7 units and leader Kornis) and the western (4 QL 5 units). Each arrives on a roll of 7-10 and does not appear (yet) on 1-6. The eastern group sets up within 2 hexes of 3525 and within 1 hex of the board edge when it arrives. The western group sets up within 1 hex of 3510 and within 1 hex of the board edge when it arrives. An AM for Kornis goes into the cup for the following turn once the eastern group arrives, and he commands both forces; only unit activations may be used for the western force if Kornis hasn’t arrived yet.
In this scenario, the 2 flank redoubts 2506 and 2320 are each worth 10 VP to their possessor at the end of turn 7, and in addition the Imperials receive +20 VPs in return for the engagement of the Transylvanians. So if the Imperials control those two “outworks” at the time limit, “territorial” VPs will be equal and losses will decide the day. If they also control the central redoubt, the Imperials will be ahead 20 VPs.
Tactical examples
(White Mountain)
The Protestant redoubts with battery and 1 SP of LI musketeers defend from their front hexes with 2 melee defense, since the LI are not halved when attacked across an obstruction and the battery gives +1 from the front only. Cavalry are not doubled crossing an obstacle, so the most cavalry can get from the front is 3 melee attack strength for 150% odds. They are also auto disordered for trying to cross the obstacle and face a column shift for it as well, so this puts a 3+ SP frontal cavalry melee against the redoubts the 100% melee column. They will usually have +2 morale over the musketeers, however, so they can go in at the 125% column. If an A1R result occurs against them, however, it will cost them 3 SP since there is +2 for being forced to retreat in melee when already disordered.
In addition, in such situations the defenders can fire at the charging cavalry first, with base 3 and 2 FV for the guns at range 1 and the musketeers respectively. Those drop to 2 and 1 for a moving cavalry target if the attackers are charging to contact rather than already adjacent. That means 30% and 20% to do 1 hit. The cavalry have no reply shot, since their initial FV 2 is adjusted left for LI target, cover, and maybe their own move, so only their melee can harm the defenders. If fire drops the cavalry to 2 SP before melee, the same considerations as the previous paragraph will make the attempt go in on the 75% column, which with attacker eliminated consequences for an attacker retreat result is not a good attack.
Cavalry can improve its chances against the redoubts by hitting them from a hex the guns aren’t facing. The guns can React with a 1 spine change of face and thus cover the entire 4 hexside arc of the redoubt against the first attacking cavalry unit, but if 2 or more are sent from different angles two hexes apart, one will have a flank. The LI aren’t flanked so there is no actual shift for this, but the guns won’t contribute their +1 SP melee strength vs the flanker’s charge. Nor can they fire at that group in the defensive fire phase.
So only musketeers will have a defensive fire shot at the cavalry on the flank, with 20% to hit them if they are charging, 30% if they are standing. If they have 3 SP left after that shot, they will start from the 300% odds column, shift 2 left for disorder and cover, and then 1 right again for +2 morale over the QL 4 musketeers. That means a 200% column final melee with an excellent chance of taking the redoubt, though perhaps losing 1 more SP in the process from an A1-D1 result (which will succeed because the defenders only have 1 SP here).
If they take a redoubt, attacking cavalry will be disordered, can face the open rear against any counterstroke, and can spike the guns. They will have faced layers loss chances from gun, musket, and melee, so they may be reduced, enabling any cavalry counter stroke to have odds on them if they are by then below 3 SP. So a defender with cavalry supports behind can expect to make the intruders pay for the loss of the redoubt.
Compare a large 2 hex heavy infantry assault on such places. They could face an ordinary range artillery shot on the approach since they are only 4 MPs rather than the cavalry’s 8. They won’t get around a flank; not maneuverable enough or fast enough. They will take 40% and 30% shots from the guns and muskets in defensive fire. Their own advancing fire starts at FV 4 (moving) but is down 2 for LI target and cover to a 30% chance of destroying the defenders with their fire, before melee. They will readily have 300% odds and +2 QL for the melee phase, with columns left for disorder and cover to the same 200% column cavalry needs a flank to get. This means they almost surely carry the place at the first assault, but will end disordered and “astride” the fortification hex, unable to rally to good order again until they move off it. They likely lost 1-2 SP on the way to fire and melee results.
So a big infantry formation will roll over such lightly held small forts readily enough. It just takes a few losses and disorder and leaves that large formation vulnerable afterward, until it takes a turn of March or Rally orders to move off the obstructed terrain and rally back to good order.
What if a 1 hex HI formation is holding the redoubt instead? It can fire out with FV 3 shots, 40% to hit an enemy infantry approach and 30% to hit charging cavalry. It can defend with 5-6 melee defense and 4 hexside “front” facing if it has 6-8 SP. It may have equal QL to its attackers, and it won’t be flanked. Cavalry can only get 100% odds on them and face 2 left shifts to the worst 50% column – never gonna happen. Large 2 hex HI can get 200% shifted to the 125% column, which is 40% to force a defender retreat vs 20% for the attacker to suffer a retreat result, which would kill 2 SP extra. The attempt thus has expected losses 1.4 to the attackers and 1.2 to the defenders with a 40% of taking the place.
I hope this illustrates some of the realistic tactical relationships that the above system creates in this sort of scenario. Shades of the Russian Fleches at Borodino, by the way…
