One of the largest games of all time, SPI’s War in the Pacific first appeared in 1978 and attempts to cover the entire Pacific war with individual ship counters for everything as large as a cruiser, with destroyers in 2 ship units and merchant shipping etc handled in slightly larger abstract MS points. Aircraft are tracked in air points (AP) which each represent 10 aircraft of a given type, with every type individually rated for numerous characteristics.
Dauntingly complex, it featured many innovations in logistics, air strike, operations planning and tempo, and has attracted continued interest and several reprint attempts over the decades since its release. In physical scale the full campaign is a classic “convention game”, with 7 mapsheets each 22×34 inches covering a playing surface of 7 by 6 fleet, with plenty of additional surface space needed for all its record tracks for task forces and air groups and the like.
I played it decades ago and was able to get some distance in the one map Guadalcanal scenario, which covers 6 months in the second half of 1942 in the south pacific, easily the most balanced period of the overall war. But over the years I have found realism problems with many of the game’s systems, and research has shown me the force match up even that scenario shows is far from the historical reality, with a US logistic and air power superiority that actually only appeared in the course of 1943 effectively accelerated a year. This deprives that period of the war of much of its inherent interest as a closely balanced contest in which both sides could and did take the initiative.
This page will cover a complete overhaul of the original game system, of a scale that can be considered as creating an entirely new game. It is however meant to enable the new game to be played with the existing components of the original 1978 SPI edition, or the later Decision Games reprint with minor adaptations. Behind the project lies my conviction that the right way to treat the original is as something of a “kit game”, allowing numerous smaller scenarios to be played with updated mechanics, each meant to be far more playable and historically accurate than the sprawling original.
Condensed rules – https://wargamegrogs.com/war-in-the-pacific-revisited-condensed-rules/
Charts and tables – https://wargamegrogs.com/war-in-the-pacific-revisited-charts-and-tables/
Air unit types – https://wargamegrogs.com/war-in-the-pacific-revisited-air-type-charts/
Revised Sequence of Play

rrr
Comments about all of it can be tracked on the Board Game Geek forums about the original
https://boardgamegeek.com/boardgame/9650/war-pacific-campaign-against-imperial-japan-1941-4
And also the consimworld game forum dedicated to the same
http://talk.consimworld.com/WebX/.ee6b9ca/2902
To playtest the full system, I have first adapted the Guadalcanal scenario of the original game. Here are the revised characteristics of the new scenario
Revised Guadalcanal
US carrier task force – add BB-55 (North Carolina), 1xSF 8/2 speed 2 with 160 supply point capacity.
MS links off map – 2.5 MS chain to Noumea from east edge, 2.5 MS chain to Brisbane from east edge.
4xMS additional free use on the map, which can link to / divert from either of those off map chains.
9/42, Noumea link goes up to 3xMS chain, 1 MS additional on the map.
10/42, Brisbane link goes up to 3xMS.
11/42, 1 MS additional on the map.
US SF can resupply off map for free by spending 1 cycle off map.
Starting allied air forces adjusted to the following –
Milne Bay – 3xP40 RAAF (level 1 airbase is completed)
Port Moresby – 5xP39
Townsville – 10xP39, 2xB17, 2xB25, 2xB26, 4xA20, 1xSBD, 1xPBY
Bisbane – 2xC47, 1xHudson RAAF
Efate – 2xPBY
Espiritu Santo – 3xF4F (NCT, USMC) (level 1 airbase is completed)
Noumea – 4xP39, 2xB17, 2xB26, 1xPBY, 1xHudson RAAF
USN carriers – 10xF4F, 10XSBD, 4xTBF
3-3-2 Saratoga
4-4-1 Enterprise
3-3-1 Wasp
4-3-2 Hornet when it arrives 9/42
The Allied air reinforcement stream becomes the following –
8/42 – Special 3rd turn, USMC 2xF4F, 1xSBD to any on map airbase (flown off CVE historically)
9/42 – 5xP39, 4xP40, 1xB17, 3xB25, 1xPBY, USMC 2xF4F, 1xSBD, USN 4xF4F, 2xSBD, 1xTBF (plus Hornet arrival)
10/42 – 2xP40, 2xP39, 2xB17, 2xB25, 1xC47, 1xPBY, USMC 4xF4F, 1xSBD, USN 4xF4F, 2xSBD, 1xTBF, RAAF 4xP40, 2xA20, 2xBeaufort.
11/42 – 5xP39, 4xP40, 2xP38, 2xB17, 2xB24, 1xB25, 4xC47, 1xPBY USMC 4xF4F, 1xSDB, 1xTBF, USN 4xF4F, 2xSBD, 1xTBF
12/42 – 2xP38, 3xB17, 2xB24, 1xPBY.
The Japanese starting air force is adjusted to the following –
Rabaul – 4xZero, 3xBetty, 2xVal, 1xMavis
Lae – 2xZero
Tulagi – 1xRufe, 1xMavis
Truk – 2xMavis
Start of Japanese 8/42 turn 2, they get a special reinforcement of 3xBetty at Rabaul (transfer from Saipan).
Start of Japanese 8/42 turn 3, additional 4xZero, 4xBetty, 1xRufe, 2xPete.
9/42 – 6xZero, 4xBetty, 2xVal, 1xRufe, 2xJake, 2xPete, 1xMavis plus CT 3xZero, 1xVal, 1xKate
10/42 – 4xZero, 6xBetty plus CT 3xZero, 1xVal, 1xKate
11/42 – 5xZero, 2xVal, 1xRufe, 2xJake, 2xPete, 1xMavis plus CT 3xZero, 1xVal, 1xKate
12/42 – 3xOscar, 4xNell, plus CT 3xZero, 1xVal, 1xKate
13/42 – 3xOscar
Japanese starting CVs in Japan have 14xZero, 9xVal, 8xKate, with CV5-6 and CVL2-5.
Those are split 8-5-5 for the group CV5, CV6, CVL3 (representing Ryujo) (3-2-2, 3-3-2, 2-0-1) available immediately, and
and 6-4-3 for the remaining CVL2 (representing Zuiho), CVL4 (Hiyo), CVL5 (Junyo) (2-0-1, 2-2-1, 2-2-1) available 9/42.
Japanese MS is a 5xMS link to Truk, with 3xMS available for the rest of the map.
10/42 they receive 1 MS addition for anywhere on the map.
As in the original, they also receive 1 7-3 ground division in each cycle 9/42 through 12/42 inclusive.
Notably, these historical adjustments make the overall campaign “air odds” 4 to 3, not 2 to 1 as in the original scenario.
The scenario covers 8/42 to 13/42 cycles inclusive. The Japanese player is always the first player each game turn in my revised system, but this scenarios starts having skipped the 8/42 Interphase (incorporated into the scenario start aka special set up rules below) and the Japanese player turn of 8/42. So play begins with the Allied / US player turn for 1/8/42.
After placement of MS, both players receive 1 cycle thruput aka 100 supply points per MS link, 50 supply points for a 1/2 MS link. Japanese player first, each also designates air missions as they would for a normal interphase. Each may deploy their sub points to subrons for the 8/42 cycle and put those on patrol or stage them instead if desired.
The off map rules for Japanese naval listed as in Japan are unchanged except that 3xCVL with 5,5,3 air point capacity are not available until the start of the 9/42 cycle.
The US as mentioned above gets 1xSF, 8/2 rating and speed 2, but SFs now have a supply point capacity of 20 fuel supply points for each point of their rating, thus 160 SP capacity for a standard 8/2 SF. If placed at a port instead, it adds its “2” to the port rating instead of that sea SP capacity, for naval refueling SP only. The US SF enters on the first turn loaded with 160 SP. It can be reloaded by exiting off the eastern map edge and returning on the same turn of the following cycle, loaded again (that represents a round trip to Pearl along with refit, loading and unloading times etc).
Play continues until the end of the 13/42 cycle, meaning 24 total weekly game turns (23 for the Japanese who skip their 1/8/42 turn).
There are special reinforcements listed for the first Japanese player turn 2/8/42 and for both players on their own 3/8/42 player turn. After that, all reinforcements arrive in the cycle interphase as they normally would in the new rules.
Both sides may use Seacap in the Solomon Islands and the New Guinea area, with each side’s seacap in the two areas tracked separately. The Japanese start with 10/30 seacap in both areas, and may use either capacity in the Bismarck Islands (Rabaul, Kavieng and vicinity). The Allies start with 10/30 seacap in New Guinea (base Port Moresby), restricted to the New Guinea coastline. Allied seacap in the Solomons includes the New Hebrides but starts at 0/30 so it must be built up to be used. Eastern Australia has 30/60 rail cap for the area of play and also 15/30 sea cap.
Noteworthy logistic considerations at set up –
The Japanese base at Rabaul is entirely due to its 5xBF fully deployed there. This is sufficient to unload 500 supply points per cycle and its served by a 5xMS link off the north edge that cannot be attacked by US submarines or other forces in the course of the scenario. Japan has 3xMS starting otherwise, which would suffice e.g. to run 2xMS to Rabaul from Truk with 200 supply points per cycle to that port, which with a 4 printed port rating and +4 more from a fully deployed BF it can unload (just). 1/2 MS from Truk could also serve each of Kavieng and Lae, each 2 printed port capacity, with 50 supply points per cycle. Japanese fleet forces in Japan fuel for free.
The US base at Noumea starts with 1xBF fully deployed along with its printed 4 port capacity. This is enough to unload 200 supply points per cycle, and the US starts with a 2.5 MS supply link to it from off the eastern map edge that likewise cannot be attacked or severed in the scenario. The other 50 SP of capacity along that link can “send” to Efate or Espiritu Santo but must use on-map MS to “link” to the Noumea link in order to do so. The US also gets 2.5 MS to Brisbane, but it can only unload 125 SP per cycle at its capacity 5 port; on map MS must again be used if some of this link (3240 position e.g.) is to be used to supply other Australian ports e.g. Sydney with its effectively unlimited unloading capacity. The US starts with 4xMS on map for such purposes and supply runs farther forward, and receives more 9/42 to 11/42 as detailed in the reinforcement schedule in the first post. As covered above, the US can also get fuel from off map via its single SF unit, but it cannot exit ships to refuel them otherwise, needs to conduct repairs on map at places like Sydney with excess port capacity, etc.
Players will find that both sides are running their logistics on pretty tight leashes, and in particular cannot run their full navies at highest op tempo while also supplying their air forces, ground units, base upgrades and the like.
Revised game systems
The core timing system of the original game is kept in the sense of weekly turns within 4 week cycles, 13 to a year. The cycle start interphase handles most logistics functions, strategic and submarine warfare, reinforcement, attrition, and the like. The weekly “normal” game turns cover most of the combat action including the core air and naval activity, amphibious operations and ground combat, and there are now two of these, a Japanese player turn followed by the US (or Allied) player turn.
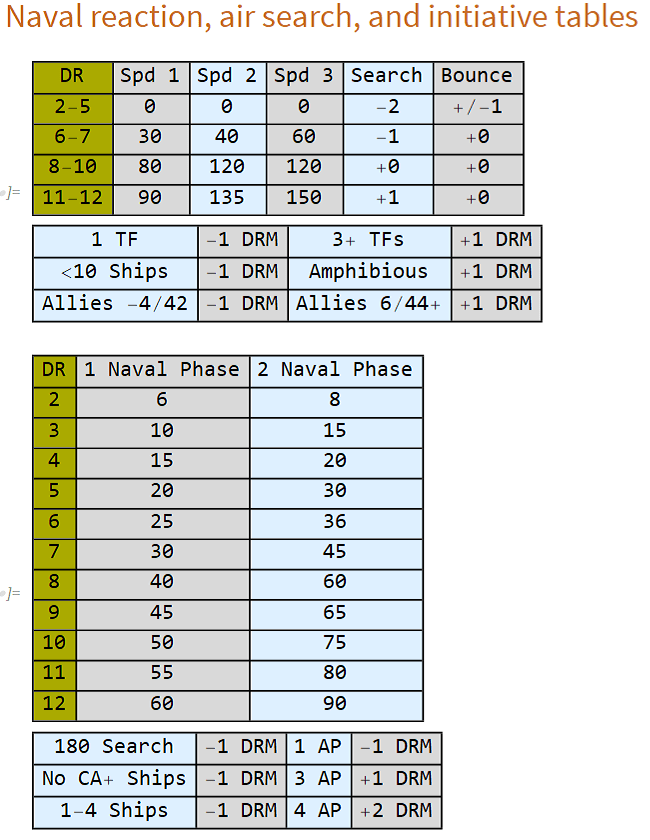
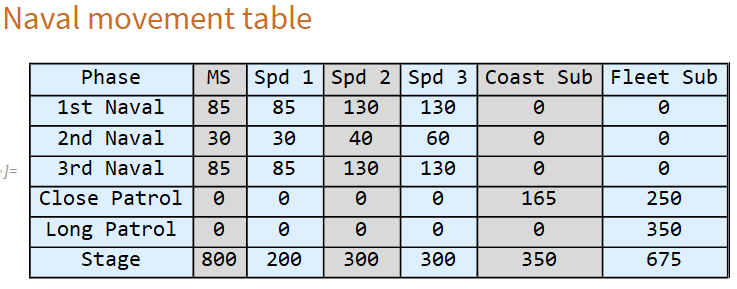
All regular game turn actions are folded into a system of 3 naval phases in each player turn, but these are not copies of each other. Instead the first naval phase originates operations, and search and air strike follow it. The second naval phase then represents a shorter period of activity with smaller naval movement allowance, a second air strike phase (without additional search), surface naval combat, and followed by amphibious operations. The third, final naval phase is normally about acting task forces returning to port and doesn’t feature any additional strike or surface action combat; it can also be used to “stage” task forces long distances if they did not act earlier in the turn sequence. All 3 of these naval phases include phases for reactions by the non-phasing player, with an Alert roll controlling how rapidly they can react to a given operation.
This results in a pulsed operating sequence in which either player is able to trigger a flurry of air and naval action on their half of the player turn. Players can choose to respond in their reaction phases when they desire combat or seek to disrupt enemy naval operations especially, or can wait for their own player turn and act then, instead. This phases system with explicit reactions replaces all plotted simultaneous movement systems of the original, and is meant to increase playability and combat dynamics.
Here is the full revised sequence of play of the new system, given first as a top level outline, then full segments, and finally at the lowest level of individual phases explaining what happens in each.
Strategic Sequence
Logistics segment
Reinforcement phase – Reinforcements, production, new supplies appear
Cargo phase – MS pipelines move cargos up to 8 transport links, ports and BFs unload cargos within capacity limits
MS relocation phase – Unused MS pipelines may relocate up to 800 mp or switch to tactical mode
Ground segment
Ground supply phase – Ground units pay supply upkeep or suffer attrition
Ground construction phase – Strategic construction, paying movement allowance and supply costs
Naval segment
Yard and Repair phase – Naval yard period assignments and long term ship repair
Attrition phase – Naval attrition, campaign game only (CGO)
Fueling phase – Strategic naval fueling
Task Force phase – Strategic ship to TF assignments
Submarine segment
Submarine attack phase – Ready Subrons may attack MS pipelines
ASW phase – ASW counterattacks any attacking Subrons
Mine attack phase – Mines attack MS pipelines
Escort phase – New escort assignments (DD,DE,CD, CV/CVL/CVE only) to MS pipelines
Submarine movement phase – Subrons move to new patrol zones, spent fleet subrons return to port
Submarine fueling phase – Subrons pay fueling costs, all coastal subrons, fleet subrons in port only
Air segment
Air attrition phase – All active groups and wings suffer 5% air attrition
Air supply phase – Air Group and Wing supply payment; unpaid HQs may not operate air points
Air missions phase – Air point mission assignments and ASW patrol zones
Strategic air strike phase – CGO, strategic strikes are resolved, including defensive CAP
Economic repair phase – CGO, Japanese resource and industry centers repair damage from previous strikes
Japanese Player Turn
Air operations segment
Missions phase – Air points (AP) are assigned to missions for the turn; no strikes are conducted; transfers occur.
Search arcs phase – Search mission AP set their patrol arcs on the map
First Naval segment
Naval refit phase – TFs pay for refit and skip their turn, ships under repair progress 1 turn toward ready
Naval fueling phase – TFs in port or with SF may fuel with available SP; also costs 30 mp
Initial embarkation phase – Transports in a friendly port may load ground units and (within port capacity) SP; costs 30 mp
First Naval movement phase – 130-130-85 mp allowance for speed 3, 2, 1 TFs, sub attacks possible
First Reaction phase – Allied player may conduct Reaction rolls, setting Reaction mp allowances; moves reacting TFs
Search phase – Both sides resolve air searches for enemy TFs, Japanese player first
First strike phase – Air strikes are conducted vs First Round Spot TFs, Japanese may strike land targets
Second Naval segment
Second Naval movement phase – 60-40-30 mp allowance for speed 3,2,1 TFs; may engage enemy TFs within 1/2 mp.
Second Reaction movement phase – 60-40-30 mp allowance for Reacting TFs; may engage, higher speed may disengage
Second strike phase – Air strikes conducted vs Second Round Spot TFs; engaged CV TFs may strike attacking TFs
Surface combat phase – engaged TFs fully resolve any surface combat; far superior forces may leave ships out of battle
Landing segment
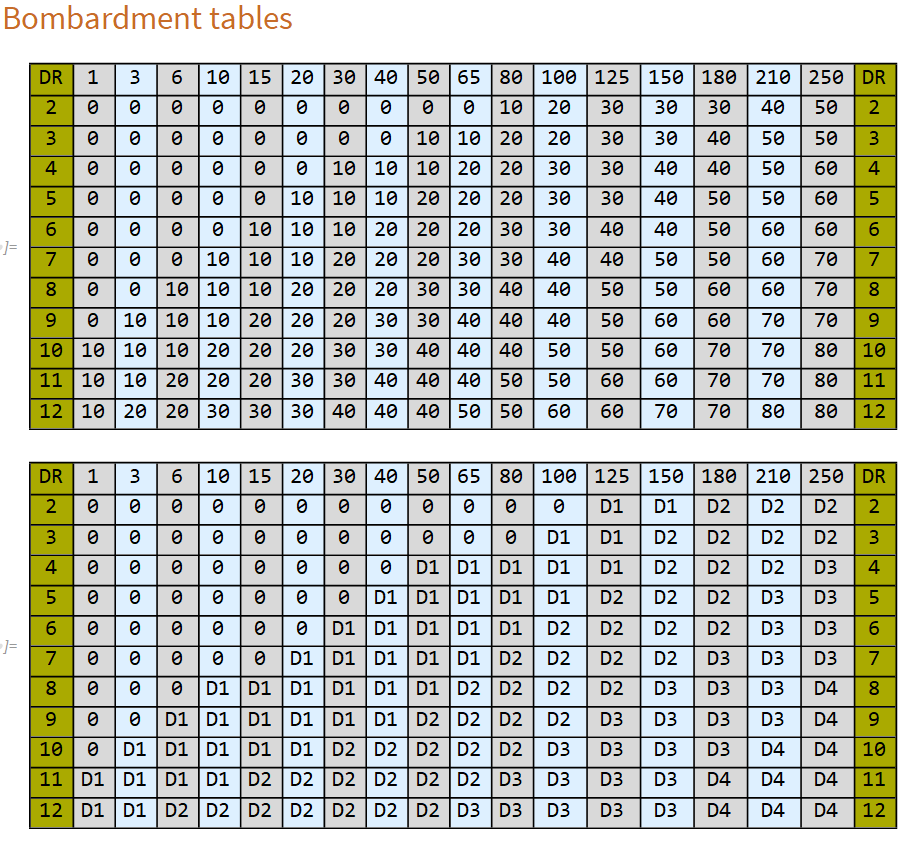
Bombardment phase – unengaged TFs may conduct bombardment attacks in their hex
Amphibious phase – transported ground units may be unloaded at destinations, and SPs within capacity
Final Naval segment
Final Embarkation phase – transports may pick up friendly land units at a cost of 30 mp
Final Naval movement phase – Active TFs 130-130-85 mp allowance, Staging TFs 300-300-200 mp, critical hits
Final Reaction movement phase – 130-130-85 reacting TFs, must return to a friendly port, critical hits
Final Disembarkation phase – transports ending in a friendly port (only) may unload SP and units within capacity.
Ground segment
Ground movement phase – ground units may expend MA on unit movement, SP movement, or construction
Ground combat phase – ground combat must be initiated in contested hexes unless fortified
Sequence of play designer notes
The non phasing player has a chance to move TFs in Reaction after seeing all phasing player first naval phase movements. However, Reaction is not automatic, reacting TFs must be within 150 mp of an acting enemy TF, and limited success rolls will restrict Reaction to shorter mp ranges. See the Reaction rules for full details. TFs that have already acted during the current game turn are also restricted to limited reactions even on the best reaction rolls.
Notice that air strikes may be conducted in the first and second naval phases after TF movement by both sides has been completed. There is only an air search phase in the first naval phase, and searches can spot enemy TFs either immediately in that phase, only in the second phase, or not at all.
Search results are given in distances, and if the enemy TF is within first round spot distance they are spotted immediately; if within longer second round spotting distance they are unspotted in the first naval phase but spotted in the second. See Search rules for full details. TFs move in the second naval phase, but this does not affect their spotted status, which is determined in the first naval phase for the entire player turn.
However, second round strike must measure its range against the updated position of an enemy TF, which may be able to move out of range entirely, especially of stationary land airbases. In such “hit and run” cases, only a first round spot will enable land based air to strike an enemy TF.
Reacting CV TFs may also have to choose between positions that allow only a second round strike and those vulnerable to surface engagement, since if you move close enough to strike an enemy TF in the first reaction phase you may also be close enough for his TF to reach you with 1/2 their full mp in the second naval phase, if your first round strike doesn’t cripple him.
TFs may only engage enemy TFs for surface combat in the second naval phase, which has smaller (1 day distance) movement allowances. Only spotted enemy TFs may be engaged (first or second round spot). To engage, the engaging TF may only expend 1/2 its normal mp allowance for that phase, reflecting the need to catch a fleeing enemy. The non-phasing player may disengage before surface combat only if their TF has strictly superior speed to an engaging enemy TF, while the phasing player may not decline surface combat at all if intercepted within 1/2 mp in the second naval reaction phase. If the phasing player wants to decline surface combat, he must instead use his second naval phase movement to stay out of range of enemy TFs.
Speed 3 TFs only have more mp in the second naval phase, 60 vs 40 mp. The primary benefit of faster TFs is the ability to catch or evade enemy TFs in that second naval phase, often used to force or decline surface combat. High speed may also be used to position a TF out of range of enemy second round strike. Speed class has a secondary use within surface combat, as it helps choose engagement range or disengage. Speed 3 TFs also get a benefit vs submarine attack.
Although it is not mentioned prominently in the sequence of play, Subrons can choose to attack moving TFs in any naval movement phase whenever enemy TFs pass within their search radius, but each Subron can only attempt one search and attack in a full cycle. Any Subron that conducts a search and attack attempt during any player turn is marked as spent, and may not attack again that cycle, including vs MS pipelines in the Strategic Sequence. See the submarine warfare rules for full details.
Second round air strikes occur before naval surface combat, and engaged CV TFs may conduct such strikes against surface TFs engaging them even if those were not previously spotted. Surface engagement of CV TFs is definitely possible in the system, but those CVs will have an opportunity to strike their surface attackers first.
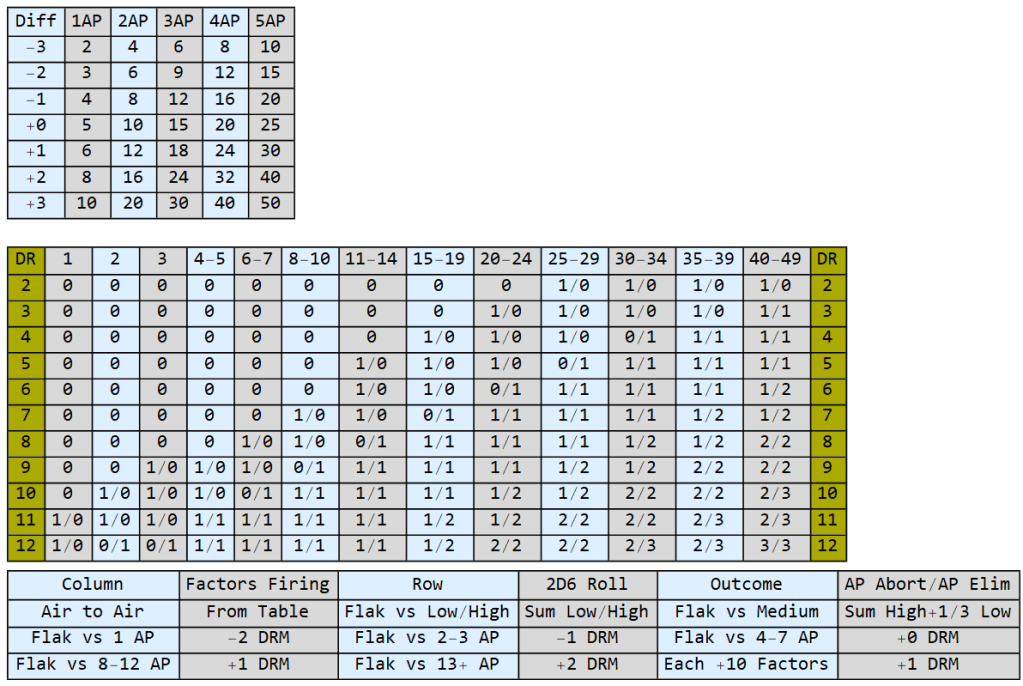
Air strikes against land targets do not require search, and may be conducted in the first or the second strike phases at the striking player’s option. Land target strikes still suffer strike attenuation, though they get a favorable DRM for it. Second round strikes also get a favorable strike attenuation DRM, though this is more than offset if the involved AP already acted this turn. Still this means if you only want to conduct a single land based air strike against a stationary land target, hitting in the second strike phase alone will give you your best chance of most AP participating.
AP may conduct strikes in successive naval phases, but all previously aborted AP are not available for the rest of the turn, and strike attenuation and CAP rolls governing AP availability suffer significant DRMs if any involved AP acted before in the same game turn. This means fewer remaining AP will conduct any later strikes, and sometimes none will, especially at long range. Bases and CVs suffering damage during the turn may also affect AP availability.
Shore bombardment operations require the TF conducting them to have not engaged in surface combat in the preceding surface combat phase. Ships can deliberately be left out of surface engagement to enable them to conduct shore bombardment later, but only the excess that outnumber enemy ships more than 2 to 1.
Land units conducting amphibious operations still get their movement allowance in the invasion hex on the invasion game turn, but cannot use it for land movement. They normally use it to unload supplies, and spend MA on that in the amphibious phase rather than the later ground movement phase. This allows amphibious shipping to choose whether to remain or leave in the third naval phase with forces and supplies already ashore. Amphibious operations cannot unload unlimited SP however; it requires MA expenditure by troops ashore or controlled port capacity at the location to unload SP.
Transports may pick up and drop off friendly land units at multiple points in the turn, but only if doing so at controlled friendly ports. Landings or pick ups in all other locations are restricted to the Landing Segment or the final embarkation phase immediately following it. Also note that SP rather than units can only be picked up in the initial embarkation phase in a friendly port within that port’s capacity, and only dropped off either during the landing segment within the MA of friendly land units in the destination hex, or at a friendly port in the final disembarkation segment, within port capacity. This means to use a port’s full unloading capacity you have to end your whole turn in that port; drop offs within the naval phases are limited to what friendly land units ashore in the drop off hex can unload with their MA.
The third naval phase will most often be used to get operating forces out of range of enemy actions on their following turn, but sometimes a force will “come to stay”, instead. The phasing player may conduct “staging” movements of 300-300-200 mp with TFs that conducted no operations earlier in the turn. Any Reacting TFs must use the third naval phase to return to a friendly port; if they exceed their normal mp allowance in doing so their required Refit period is accelerated. Both sides also roll for Critical Hits at the end of their third naval phase; this may add D1 additional damage to any ship damaged during the player turn, on a D6 roll less than or equal to their current damage level.
Ground units will frequently use their movement allowance to unload or shift supplies if not moving themselves. They also spend MA to perform construction, though construction can also be “prepaid” in the Strategic Sequence. Doing so dedicates a unit’s MA to that task for the cycle, however, so it cannot perform other MA spending actions during turns if it is performing Strategic construction. This can be marked by rotating the unit 180 degrees.
Ground combat is mandatory in contested hexes, and the phasing player suffers penalties in those combats if they cannot pay the supply cost of initiating combat. Fortified positions, however, are exempt from the requirement to attack enemy land units in their hex. Without fortification, the only way to decline combat is to use the ground movement phase to leave the contested hex voluntarily.
Both players have considerable flexibility in deciding when to act with their naval TFs especially. You can choose to React during your opponent’s turn, or wait for your own turn after your enemy has acted. (Historical examples – Midway was an Allied reaction before the Japanese could invade; Savo Island was the Japanese acting on their own turn, after the Allied invasion of Guadalcanal). The players control which naval tactics they use.
New ground combat CRT

Attackers must spend supply points equal to ground combat strength to attack. Defenders must spend supply points equal to 1/2 ground combat strength or suffer +1 DRM.
Roll 2D6 once. Add any DRM for attacker bombardment result this turn, subtract any DRM for defender bombardment result this turn. Fortified defenders are doubled.
Right hand side – use combat odds to determine result to the defender
Left hand side – use total defense strength to determine result to the attacker
Combat result outcomes
S – spend supplies equal to ground combat strength or lose 1 step
1, 2, 3, 4 – lose 1, 2, 3, 4 steps
R1 – retreat 1 hex unless entrenched or fortified
R2 – retreat 2 hexes unless fortified
Surface combat engagement and battle procedures
Engagement – spend 1/2 mps in Second Naval Phase to enter enemy TF hex.
Engaging TF goes on top of Engaged TF. May spend additional mp, getting -1 DRM to enemy
disengagement for each 5 mps spent, up to -6 DRM for 30 extra mps. Place a die with the
number of additional 5 mp increments spent on the engagement hex.
Disengagement –
Phasing player cannot disengage, has no movement phase after Reacting TF engages.
Slower TF cannot disengage. Faster TF can always disengage for 1/2 mp.
Same speed TF cannot disengage unless Engaging TF was Spotted, 1st or 2nd round Spot.
For same speed TF to disengage requires rolling 7+ on 2D6, with DRM for extra mp Engaging TF spent. The attempt is voluntary. If adjusted disengagement roll is 2 or less, Engaging TF gets +/-2 on the Bounce roll, his choice. If adjusted disengagement roll is 7 or more, Disengaging TF spends 1/2 mp and exits the hex.
Surface combat
The side that Engages is the Attacker.
Attacker can choose day or night action.
Then roll for bounce.
Day engagements with any BB/BC present start at range 3
Night engagements and day engagements without BB/BC present start at range 2
Tactical shipping – MS, APB, and SF always split into D2 portions, each counting as 1 ship.
Combat ships – all ships with surface combat strength status D2 or lower.
Superior force – If either side has more than 2x enemy combat ships, may leave excess out of battle.
Superior speed – If the slower combat ship on a side exceeds the speed of all ships on the other.
Superior numbers – 150% count of all ships D3 or lower status, combat or not, not left out of battle
Day range round 2 is always range 2, night round 2 is always range 1
Withdrawal is possible after round 2, not before
Superior speed can choose range 1 or 2 in rounds 3+.
If neither side has superior speed, each side rolls D6, +highest combat ship speed, +1 superior numbers
Winner chooses the range 1 or 2. Repeat the trial each round if neither has superior speed.
Withdrawal by single ship or by group at player’s option after round 2 and each later round.
Withdrawal requires D6 <= ship or group’s (lowest) speed, +1 2nd round, +1 DRM any group, -1 night.
Superior numbers for withdrawing side gives -1, enemy side +1 DRM.
Breakoff level – 25% of total defense factor, rounded up.
Breakoff impact – Each D1, 1. Each D2, 1/2 DF rounded up. Each D3, DF-1, min 1. D4+, DF.
If a side meets or exceeds breakoff level, all its ships must attempt withdrawal, alone or grouped.
If both sides meet or exceed breakoff level, combat ends with Attacker repulsed.
Surface screening – non combat ships <= combat ships may be surface screened.
They cannot be targeted as long as they are screened, and may attempt breakoff normally.
Adjust screening total every round as ships are damaged or sunk.
Front rank – initiative loser must put forward as many ships from his unscreened total as the initiative winner has combat ships, or all his unscreened ships if he cannot match enemy combat ship total.
Initiative targeting – the initiative player may target any of the enemy front rank ships with any of his own, in any mix he likes.
Assistance – any unmatched non-initiative combat ships may roll to fight one initiative ship unless surprised.
Roll must be <= speed class, with -2 front rank, +1 DRM at night, -1 DRM superior numbers.
They may gang up as much as they like, but all assignments must be made before assistance success rolls.
Combat pairings – after all front rank, targeting, and assistance attempts, ships fire.
Surprise – a side with surprise fires all round 1 shots without any replies.
Initiative – side with initiative fires first round 1, thereafter all fire resolution is simultaneous.
Re-pair each round after withdrawals. Initiative still confers pairing choices before assistance.
Fight is over when all remaining ships on one side are D4 or higher or both exceed breakoff level.
Note that ships still fight after one hits breakoff level, they just have to attempt withdrawal every round.
Japanese CA, CL, DD have torpedo capability at range 2 or 1. One round of fire only.
US DD and CW CL, DD have torpedo capability at range 1 only. One round of fire only.
Savo Island example
Time is 1942, Engaging side is Japanese. They choose Night action. 2-7 gives Japanese surprise and this occurs. Starting range is automatically 2 at night. Allies have 13 combat ships vs 8 and 2 additional APB D2, which they choose to screen. Allies have numerical advantage. Both sides have speed 3 ships so neither side has speed advantage.
Allies must put 8 ships in front rank, and choose 2 CW CA, 4 US CA, 2 US DD. The Japanese can choose any portion of these to target in any mix they like. All their ships can fire torpedoes, but only their CAs can fire guns (because the range is 2, and their CLs and DD all have range 1).
Round 2 the range will be 1, all Japanese ships will have torpedoes expended and only gun attacks. Fire will be simultaneous. Any Allied ships damaged D3 or worse in round 1 won’t be in the “combat ship” category for round 2, and thus won’t be in the front rank and can even be surface screened. This time, unengaged Allied combat ships will be able to roll for Assistance, but even speed 3 at night do so on 1-2 only, so roughly 1/3rds of the unengaged Allied ships will fire. Their front rank ships will be 2/3rds to engage if not targeted and automatic if targeted. The Allies have torpedoes only on their DDs and CW CL.
After round 2, either side could break off, and the Allies will certainly attempt it with their APBs. D3 damaged ships on either side will also attempt breakoff, since they can’t contribute to the battle any further. Note that the Japanese can only penetrate to the APBs if they reduce the D2 or better Allied combat ships to lower than their own numbers (D2 or better) at a given point in the battle – unlikely here.
Undamaged Japanese ships could break off 1-4 (Speed 3 at night) or 1-3 together as a body. They are strongest in their unanswered 1st round with surprise and torpedoes, and their edge declines after that, so it may be in their interest to cut the engagement short.
Revised Tables